Xml Serialization in Java using Simple – Inheritance

This is a continuation from this post: Xml Serialization in Java using Simple

Example 4 – Serializing a list of objects that inherit from Person

Lets create some objects that inherit from Person. I looked at some documentation to try to get it right the first time. And then I hoped that it would just work….

import org.simpleframework.xml.Element;
import org.simpleframework.xml.Root;

@Root
public class Person
{
	@Element(name="FirstName")
	private String _FirstName = "";

	@Element(name="LastName")
	private String _LastName = "";

	public String getFirstName()
	{
		return _FirstName;
	}

	public void setFirstName(String inFirstName)
	{
		_FirstName = inFirstName;
	}

	public String getLastName()
	{
		return _LastName;
	}

	public void setLastName(String inLastName)
	{
		_LastName = inLastName;
	}
}
import java.util.ArrayList;
import java.util.List;
import org.simpleframework.xml.ElementList;
import org.simpleframework.xml.Root;

@Root
public class People 
{
	@ElementList(inline=true)
	List<Person> List = new ArrayList<Person>();
}

I didn’t want to get too complex so I only added a single item to Patient, a list of Symptoms.

import java.util.ArrayList;
import java.util.List;
import org.simpleframework.xml.ElementList;

public class Patient extends Person
{
	@ElementList(entry = "Symptom", inline = true)
	public List<String> Symptoms = new ArrayList<String>();
}

For the Physician, again to keep it simple, I only added a list of Hospitals.

import java.util.ArrayList;
import java.util.List;
import org.simpleframework.xml.ElementList;

public class Physician extends Person
{
	@ElementList(entry = "Hospital", inline = true)
	public List<String> Hospitals = new ArrayList<String>();
}

And here is the main method where I create the instances and serialize them.

import java.io.File;
import org.simpleframework.xml.Serializer;
import org.simpleframework.xml.core.Persister;

public class Run
{
	public static void main(String[] args) throws Exception
	{
		People people = new People();
		
		Patient p1 = new Patient();
		p1.setFirstName("Jared");
		p1.setLastName("Barneck");
		p1.Symptoms.add("Runny nose");
		p1.Symptoms.add("Congestion");
		people.List.add(p1);

		Physician p2 = new Physician();
		p2.setFirstName("Mike");
		p2.setLastName("Michaels");
		p2.Hospitals.add("Intermount Health Care");
		p2.Hospitals.add("St. Marks");
		people.List.add(p2);
		
		Serializer serializer = new Persister();
		File file = new File("people.xml");

		serializer.write(people, file);
	}
}

And yeah! This worked. Here is the Xml.

<people>
   <person class="Patient">
      <FirstName>Jared</FirstName>
      <LastName>Barneck</LastName>
      <Symptom>Runny nose</Symptom>
      <Symptom>Congestion</Symptom>
   </person>
   <person class="Physician">
      <FirstName>Mike</FirstName>
      <LastName>Michaels</LastName>
      <Hospital>Intermount Health Care</Hospital>
      <Hospital>St. Marks</Hospital>
   </person>
</people>

There you go.

There are a lot more examples here:
Simple Xml Serialization Tutorial


Xml Serialization in Java using Simple

So, I have to serialize some code in Java and I have used Simple (a java Xml Serialization library) before for Xml serialization with Android in Java, so I thought I would use it again for a regular java project.

Here is what I have done. Some examples have failed, some have succeed. Here are my results.

Example 1 – Serializing a simple Person object

Attempt 1 – Failed with exception

import org.simpleframework.xml.Element;
import org.simpleframework.xml.Root;

@Root
public class Person
{
	@Element
	public String FirstName;

	@Element
	public String LastName;
}

And here is the Run.java with the main method.

import java.io.File;
import org.simpleframework.xml.Serializer;
import org.simpleframework.xml.core.Persister;

public class Run
{
	public static void main(String[] args) throws Exception
	{
		Person p = new Person();

		Serializer serializer = new Persister();
		File file = new File("person.xml");

		serializer.write(p, file);
	}
}

Result

An Exception was thrown because FirstName is null. So maybe it cannot handle null values?

Attempt 2 – Succeeded

Lets try be setting the default values to an empty string.

import org.simpleframework.xml.Element;
import org.simpleframework.xml.Root;

@Root
public class Person
{
	@Element
	public String FirstName = "";

	@Element
	public String LastName = "";
}

It worked. Here is the xml file.

<person>
   <FirstName>
   <LastName>
</person>

Attempt 3 – Succeeded

Of course if we set the values for FirstName and LastName…

    Person p = new Person();
    p.FirstName = "Jared";
    p.LastName = "Barneck";

…they show in the Xml as well.

<person>
   <FirstName>Jared</FirstName>
   <LastName>Barneck</LastName>
</person>

Example 2 – Serializing a Person object with getters and setters

Attempt 1 – Succeeded

I changed the member variables to be private and created public getters and setters.

import org.simpleframework.xml.Element;
import org.simpleframework.xml.Root;

@Root
public class Person
{
	@Element
	private String FirstName = "";

	@Element
	private String LastName = "";

	public String getFirstName()
	{
		return FirstName;
	}

	public void setFirstName(String inFirstName)
	{
		FirstName = inFirstName;
	}

	public String getLastName()
	{
		return LastName;
	}

	public void setLastName(String inLastName)
	{
		LastName = inLastName;
	}
}

I now use the setters to set the values in the main method.

import java.io.File;
import org.simpleframework.xml.Serializer;
import org.simpleframework.xml.core.Persister;

public class Run
{
	public static void main(String[] args) throws Exception
	{
		Person p = new Person();
		p.setFirstName("Jared");
		p.setLastName("Barneck");

		Serializer serializer = new Persister();
		File file = new File("person.xml");

		serializer.write(p, file);
	}

}

That worked and output the desired Xml.

<person>
   <FirstName>Jared</FirstName>
   <LastName>Barneck</LastName>
</person>

Example 3 – Using a custom name

What if the name of the member variables were _FirstName and _LastName. We wouldn’t want the underscore “_” to show up in the Xml.

So what do we do? The documentation says to use this line:

@Element(name=”FirstName”)

Attempt 1 – Success

import org.simpleframework.xml.Element;
import org.simpleframework.xml.Root;

@Root
public class Person
{
	@Element(name="FirstName")
	private String _FirstName = "";

	@Element(name="LastName")
	private String _LastName = "";

	public String getFirstName()
	{
		return _FirstName;
	}

	public void setFirstName(String inFirstName)
	{
		_FirstName = inFirstName;
	}

	public String getLastName()
	{
		return _LastName;
	}

	public void setLastName(String inLastName)
	{
		_LastName = inLastName;
	}
}

This worked, and the Xml output was unchanged.

Example 3 – Serializing a List

Ok, now we want to serialize a list of Person objects.

Attempt 1 – Failed with exception

I tried to use an ArrayList<Person> and it didn’t work. The person object is the same as in example 2, but I changed the main method as follows:

import java.io.File;
import java.util.ArrayList;
import org.simpleframework.xml.Serializer;
import org.simpleframework.xml.core.Persister;

public class Run
{
	public static void main(String[] args) throws Exception
	{
		ArrayList<Person> people = new ArrayList<Person>();

		Person p1 = new Person();
		p1.setFirstName("Jared");
		p1.setLastName("Barneck");
		people.add(p1);

		Person p2 = new Person();
		p2.setFirstName("Mike");
		p2.setLastName("Michaels");
		people.add(p2);

		Serializer serializer = new Persister();
		File file = new File("people.xml");

		serializer.write(people, file);
	}
}

So that didn’t work.

Attempt 2 – Failed, no exception, just bad Xml

I created a People class that extends ArrayList<Person>.

import java.util.ArrayList;
import org.simpleframework.xml.Root;

@Root
public class People extends ArrayList<Person>
{
}

I then used this class in the main method.

	public static void main(String[] args) throws Exception
	{
		People people = new People();

		Person p1 = new Person();
		p1.setFirstName("Jared");
		p1.setLastName("Barneck");
		people.add(p1);

		Person p2 = new Person();
		p2.setFirstName("Mike");
		p2.setLastName("Michaels");
		people.add(p2);

		Serializer serializer = new Persister();
		File file = new File("people.xml");

		serializer.write(people, file);
	}

It didn’t throw and exception but the Xml was basically empty.

<people/>

That isn’t what we want.

Attempt 3 – Succeeded but not quite right

Ok, so how about a container object instead of an extending object. The documentation has an @ElementList attribute that can be used if the class contains a list. So lets use that.

import java.util.ArrayList;
import java.util.List;
import org.simpleframework.xml.ElementList;
import org.simpleframework.xml.Root;

@Root
public class People
{
	@ElementList
	List<Person> List = new ArrayList<Person>();
}

The main method changed slightly to accommodate the People class.

	public static void main(String[] args) throws Exception
	{
		People people = new People();

		Person p1 = new Person();
		p1.setFirstName("Jared");
		p1.setLastName("Barneck");
		people.List.add(p1);

		Person p2 = new Person();
		p2.setFirstName("Mike");
		p2.setLastName("Michaels");
		people.List.add(p2);

		Serializer serializer = new Persister();
		File file = new File("people.xml");

		serializer.write(people, file);
	}

The Xml was created and looks as follows:

<people>
   <List class="java.util.ArrayList">
      <person>
         <FirstName>Jared</FirstName>
         <LastName>Barneck</LastName>
      </person>
      <person>
         <FirstName>Mike</FirstName>
         <LastName>Michaels</LastName>
      </person>
   </List>
</people>

That is almost correct. However, we don’t need to the List line between People and person.

Attempt 4 – Succeeded

Ok, so I read the documentation and it said to use this to remove the useless List Xml element.

@ElementList(inline=true)

So I tried and sure enough, it worked.

<people>
   <person>
      <FirstName>Jared</FirstName>
      <LastName>Barneck</LastName>
   </person>
   <person>
      <FirstName>Mike</FirstName>
      <LastName>Michaels</LastName>
   </person>
</people>

Ok…lets continue this a bit later in another post.

Xml Serialization in Java using Simple – Inheritance


A Log singleton in java

I needed a simple logger in java. I wrote a quick singleton. I sort of want to keep this around if I ever need to use it again, so I thought I would post it here.

Note: Feel free to complain about this singleton using my own code style and not the java code style. 🙂

package ClinicSoft.Singletons;

import java.io.File;
import java.io.FileWriter;

public class Log
{
	public static Log Instance = new Log();

	private String _FileName;
	private String _Extension = ".log";
	private int _LogId = -1;

	private Log()
	{
		SetFileName("ClinicSoft");
	}

	public String GetFileName()
	{
		if (_LogId > -1)
			return _FileName + "." + _LogId + _Extension;
		else
			return _FileName + _Extension;
	}

	// The root file name, without the extension
	public void SetFileName(String inFileName)
	{
		_FileName = inFileName;
		while (FileExists(GetFileName()))
			_LogId++;
	}

	private boolean FileExists(String inFile)
	{
		return new File(inFile).exists();
	}

	public static void WriteLine(String inLogMessage)
	{
		Log.Instance.WriteLog(inLogMessage
				+ System.getProperty("line.separator"));
	}

	public void WriteLog(String inLogMessage)
	{
		try
		{
			// Create file
			FileWriter file = new FileWriter(GetFileName(), true);
			file.write(inLogMessage);

			// Close the output stream
			file.close();
		}
		catch (Exception e)
		{
			// Catch exception if any
			System.err.println("Error: " + e.getMessage());
		}
	}
}

Building a FreeBSD kernel for debugging

You may want to actually debug the kernel or a kernel module, however, debugging is not enabled by default.

Prereqs

Before getting started it is assumed you have a FreeBSD Install and you have downloaded/installed FreeBSD Source.

The steps are identical to the steps contained in the How to build and install a custom kernel on FreeBSD? article, with the exception of the kernel configuration file.

Step 1 – Create a new kernel config

  1. Determine your architecture by running this command:
    # uname -a
    FreeBSD 9.0-RELEASE FreeBSD 9.0-RELEASE #0: Tue Jan 3 07:46:30 UTC 2012 root@farrell.cse.buffalo.edu:/usr/obj/usr/src/sys/GENERIC amd64
    
  2. Look at the last text item in the output string. I have amd64 so that is my architecture: amd64
  3. Change to the directory of the kernel configuration files for your architecture. Remember if you are on a different architecture to replace amd64 in the following command lien with your architecture.
    # cd /usr/src/sys/amd64/conf
    
  4. Copy GENERIC to a new file.
    # cp GENERIC KRNLDBG
    
  5. Edit KRNLDBG with your favorite text editor.
  6. First, change the ident value near the top from GENERIC to KRNLDBG.
    ident           KRNLDBG
    
  7. Add debugging settings to your KRNLDBG configuraiton file.
    options           KDB
    options           KDB_TRACE
    options           DDB
    options           GDB
    
  8. Save and close your new KRNLDBG configuration file.

For the remaining steps, follow the How to build and install a custom kernel on FreeBSD? article, only replace any references to KRNL1 kernel config file with the KRNLDBG config file created in the previous step.

Once you are done building and installing the kernel, you should have debugging enabled.

I happen to be working with a kernel module that is crashing and when it crashes, it automatically places me in a debugging session with the following prompt.

db>

Installing VMWare Tools on FreeBSD 9

Virtualizing a FreeBSD server is common place. Knowing how to install VMWare Tools on a FreeBSD server without X11 is going to be extremely important. This article will provide the steps.

Lets get started.

Step 1 – Install FreeBSD as VMWare Guest.

Instructions for installing FreeBSD 9 are found here: How do I install FreeBSD 9?

It shouldn’t be much of an effort to follow these steps inside a VMWare guest.

Note: You may consider taking a snapshot here to save your current state.

Step 2 – Update FreeBSD and Install ports

Instructions for updating FreeBSD and installing ports are found here:
Update FreeBSD and Install ports

Note: You may consider taking a snapshot here to save your current state.

Step 3 – Install Prerequisites

Step 3.1 – Install Perl

Installing Perl is easy. Use either of the following commands.

From ports

# cd /usr/ports/lang/perl5.12
# make install

From packages

# pgk_add -r perl

Step 3.2 – Install compat6x-amd64

The compat6x-amd64 port is also easily installed.

From ports

# cd /usr/ports/misc/compat6x/
# make install

From packages

# pkg_add -r compat6x-amd64

Step 4 – Take a VMWare Snapshot

Important! Take a snapshot here! Do not skip this step.

Step 5 – Mount the VMWare Tools ISO

I am using VMWare workstation. Some steps may be slightly different if you are using ESXi or other VMWare solution.

  1. In VMWare Workstation, choose VM | Install VMWare Tools.
  2. In FreeBSD as root, create a directory to mount the CD-Rom to.
    # mkdir /cdrom
    
  3. Mount the cd-rom.
    # mount -t cd9660 /dev/cd0 /cdrom
    

Note: You may consider taking a snapshot here to save your current state.

Step 6 – Extract the vmware-freebsd-tools.tar.gz

Now that the drive is mounted, it should be easy to get to the vwmare-tools file.

  1. Copy the vmware-freebsd-tools.tar.gz file to a local location.
    # cp /cdrom/vmware-freebsd-tools.tar.gz /root
    
  2. Extract the vmware-freebsd-tools.tar.gz file.
    # cd /root
    # tar -xzf vmware-freebsd-tools.tar.gz
    

VMWare tools should now be extracted.

Step 7 – Recompile VMWare Tools Modules

Before you install VMWare tools on FreeBSD 9, you need the modules to work with FreeBSD 9. VMWare is slow to update the vmware tools for the FreeBSD guest. So you are just going to have to update them yourself.

Note: We are now at the point where we are going to do more and install more than you want to for your nice new clean server, but that is ok, because we have a snapshot and once we get the files compiled you can revert to the clean snapshot. Alternately if you have another FreeBSD system, you can do these steps on that system.

If you install without recompiling as of May 10, 2012, you will get this result.

Starting VMware Tools services in the virtual machine:
   Switching to guest configuration:                                   done
   Guest memory manager:                                              failed
   Blocking file system:                                              failed
   Guest operating system daemon:                                      done
Unable to start services for VMware Tools

Execution aborted.

Compiling the modules first should prevent the above failures.

Step 7.1 – Get FreeBSD Source

Download the FreeBSD Source as described here.

How to download FreeBSD source using svn?

Step 7.2 – Configure the /etc/make.conf

Right now there is a move toward compiling with clang over gcc. Because of changes due to this, you need to add the following line to your /etc/make.conf to compile with gcc. I have not tried to compile with clang yet.

  1. As root open the /etc/make.conf file with you favorite editor and add the following line:
    MK_CLANG_IS_CC=no
    
  2. Save and close the /etc/make.conf file.

Your /etc/make.conf is now configured.

Note 1: You may want to compile a custom kernel while you are at this. If so, check out this article: How to build and install a custom kernel on FreeBSD? If you do this, remember that you have to copy the new kernel to your clean system too.

Step 7.3 – Compile the vmmemctl module

Recompile vmmemctl using these steps.

  1. Go to the lib/modules/source directory under where you extracted vmware-freebsd-tools.tar.gz.
    # cd /root/vmware-tools-distrib/lib/modules/source/
    
  2. Extract vmmemctl.tar
    # tar -xf vmmemctl.tar
    
  3. Change to the vmmemctl-only directory.
    # cd vmmemctl-only
    
  4. Run make.
    # make
    
  5. Run make install.
    # make install
    

You have now built and installed the vmmemctl module.

Step 7.4 – Compile the vmblock module

  1. Go to the lib/modules/source directory under where you extracted vmware-freebsd-tools.tar.gz.
    # cd /root/vmware-tools-distrib/lib/modules/source/
    
  2. Extract vmblock.tar
    # tar -xf vmblock.tar
    
  3. Change to the vmblock-only directory.
    # cd vmblock-only
    
  4. Run make.
    # make
    
  5. Run make install.
    # make install
    

You have now built and installed the vmblock module.

Step 8 – Install VMWare Tools

You are now ready to install the VMWare Tools.

Note: If you are trying to keep you server clean and pristine, then copy the /root/vmware-tools-distrib directory off the server somewhere. THen revert to the snapshot you took just before Step 4. Copy the directory back to your clean snapshot and continue.

  1. Move into the directory created by the extraction.
    # cd /root/vmware-tools-distrib/
    
  2. Run vmware-install.pl
    # ./vmware-install.pl
    
  3. Select all the defaults.

Your vmware tools installation should go smoothly.


How to build and install a custom kernel on FreeBSD?

Lets get started. The main reason I am writing this when so many articles on this already exist is because many articles do not have all the steps in one place. For example, the article in the FreeBSD Handbook doesn’t have steps for downloading the source using subversion or for making sure you have enough space on the root partition. See this article here: Building and Installing a Custom Kernell

Step 1 – Install FreeBSD as VMWare Guest.

Instructions for installing FreeBSD 9 are found here:

How do I install FreeBSD 9?

You may also want to install FreeBSD ports:

How to install FreeBSD ports

Step 2 – Download FreeBSD Source

Instructions for downloading FreeBSD Source can be found here:

How to download FreeBSD source using svn?

Step 3 – Build the GENERIC Kernel

Before you create a custom kernel it is always good to know that the default GENERIC kernel is compiling and working. Also, if you are practiced at this and are certain this will work, feel free to skip this step.

Note: I call it the GENERIC kernel because the GENERIC is the file name of the default kernel configuration.

  1. Go to the /usr/src directory:
    # cd /usr/src
    
  2. As root, run this command:
    # make buildkernel
    
  3.  Wait for the compile to complete

Step 4 – Create a new kernel config

  1. Determine your architecture by running this command:
    # uname -a
    FreeBSD 9.0-RELEASE FreeBSD 9.0-RELEASE #0: Tue Jan 3 07:46:30 UTC 2012 root@farrell.cse.buffalo.edu:/usr/obj/usr/src/sys/GENERIC amd64
    
  2. Look at the last text item in the output string. I have amd64 so that is my architecture: amd64
  3. Change to the directory of the kernel configuration files for your architecture. Remember if you are on a different architecture to replace amd64 in the following command lien with your architecture.
    # cd /usr/src/sys/amd64/conf
    
  4. Copy GENERIC to a new file.
    # cp GENERIC KRNL1
    
  5. Edit KRNL1 with your favorite text editor.
  6. First, change the ident value near the top from GENERIC to KRNL1.
    ident           KRNL1
    
  7. Make any other changes you would like to make.It is hard to know why you are building a custom kernel and hopefully you know what you need in your custom kernel. This is where you modify the kernel to provide what you need.
  8. Save and close your new KRNL1 configuration file.

Step 5 – Build the custom kernel

Now that you have a new configuration file, build a kernel using that configuration file.

  1. Compile the kernel.
    # cd /usr/src
    # make buildkernel KERNCONF=KRNL1
    
  2. Wait for you kernel to build.

Step 6 – Verify you have enough space for the new kernel

  1. Make sure you have enough free space to install your kernel.Note: Your output may be quite different than mine.
    # df -ah
    Filesystem    Size    Used   Avail Capacity  Mounted on
    /dev/da0p2     74G    4.3G     64G     6%    /
    devfs         1.0k    1.0k      0B   100%    /dev
    
  2. If your root partion, /, has a capacity greater than 55%, you probably OK. Otherwise, your backup or kernel installation may fail.

Step 7 – Install the custom kernel

  1. Install the Kernel.
    # make installkernel KERNCONF=KRNL1
    
  2. Reboot the system.
    # reboot
    

You now have a custom kernel installed.


Unit Testing with Parameter Value Coverage (PVC)

Parameter Value Coverage (PVC) is the ability to track coverage of a method based on the common possible values for the parameters accepted by the method.

Current code coverage tools fail to take into consideration the possibility that a value for a parameter is not handled resulting in a bug. However, there may not be any code addressing this value in any way, introducing the possibility of obtaining 100% code coverage or line coverage (LC) without detecting the bug.

If the common values for types, especially primitive types and known types, are documented and methods that use them are required to have a test for each possible parameter value, bugs can be avoided.

The following is a table of parameter value requirements for an int or System.Int32 and string or System.String. A unit test should exist for each of the possible values in order to have 100% PVC.

System.Int32 System.String
  1. A positive integer
  2. A negative integer
  3. Zero
  4. int.MaxValue or 2,147,483,647
  5. int.MinValue or -2,147,483,648
  1. A null string
  2. An empty string, String.Empty, or “”
  3. One or more spaces ” “
  4. One or more tabs ” “
  5. A new line or Environment.NewLine
  6. A valid string.
  7. An invalid or junk string
  8. Unicode characters such as Chinese

See Parameter Value Coverage by Type for more complete list of common Parameter Values per type.

Were code coverage tools enhanced to take into account Parameter Value Coverage (PVC), better tests would be written and more bugs would be found.

Such PVC lists should be created for each primitive type and a list of required parameter values to test against for each of primitive type should be standard for each language. You could also create a list of parameter values for you own types though you may find that your own type is actually a collection of primitive types and methods, and if they are tested with PVC, your class is automatically tested with PVC as well.

Finding bugs beyond 100% Code Coverage with PVC

100% code coverage or line coverage (LC) can fail to find many bugs. Developers often write a unit test with only the goal to get as close to 100% LC as they can. Unfortunately, they are only covering the written code, but bugs may exist due to code not written.

Here is a quick example. The method below is a very common example of a piece of code that looks so simple, most assume there is no way there is a bug, but after a brief analysis, the bug becomes obvious.

public class Adder()
{
    private int Add(int val1, int val2)
   {
        return val1 + val2;
   }
}

To get 100% LC, the following test could be used.

private void Add_Test()
{
    Adder adder = new Adder();
    var actual = adder.Add(1,2);
    var expected = 3;
    Assert.AreEqual(expected, actual)
}

You now have 100% LC, but have you found all the bugs? No you haven’t. Here are two problems:

  1. An int or System.Int32 is a 32-bit integer with a max value of 2,147,483,647. What happens if you add one or more to the max value?
  2. The minimum value is -2,147,483,648. What happens if you subtract one or more from the minimum value?

How should this problem be fixed?

  • Should you enabled “checked” to disallow overflows?
  • Should you return a long so two 32-bit integers can always be added together?
  • Or should you ignore the issue as it isn’t going to matter in your project?

Your answer may be different depending on your project. I am not going to tell you how to fix this bug in this article, that is not the point. The point is to show that 100% LC failed to find this bug, proving that some level of coverage is missing; some value is not being tracked and reported on.

What is the missing value? Parameter Value Coverage (PVC).

If PVC were taken into account, the test above only provides 20% coverage as only one of the five integer value types were tested. Reaching 80% to 100% PVC would have found this bug.

Every bug that is found internally will cost your business far less money overall than if a customer finds the bug.

Return to C# Unit Test Tutorial


Better Unit Tests in C#

When you test the right thing, you get better unit tests. Better unit tests often lead to better design, testable design, and easier maintainability of code.

Look at an example of testing a Copy() method in a Person object. You will see that as you unit test this method, you are forced to think. If you think about what you really want to test (instead of just thinking about 100% coverage), and test for that, it will lead you to changing your code for the better.

With a Copy() method, you want to make sure that every property in the Person object is copied. You want to make sure that any new Property added in the future is copied.

Lets see if we can do this. Lets start with our simple example Person object with a Copy() method and lets test the copy method.

using System;

namespace FriendDatabase
{
    public class Person
    {
        #region Properties
        public int Age { get; set; }
        public String FirstName { get; set; }
        public String LastName { get; set; }
        #endregion

        #region Methods
        public Person Copy()
        {
            Person retPerson = new Person();
            retPerson.Age = this.Age;
            retPerson.FirstName = this.FirstName;
            retPerson.LastName = this.LastName;
            return retPerson;
        }
        #endregion
    }
}

Lets list the three most obvious tests for the copy method.

  1. Age is the same value.
  2. FirstName is the same value.
  3. LastName is the same value.

If you are an expert at Unit Testing, you are probably already thinking that there are more tests to run that just these three tests.0

A simple Unit Test

A test for this that would give use 100% code coverage and covers the three most obvious tests would be as follows:

[Test]
public void Person_Copy_Test()
{
    // Step 1 - Arrange
    Person p = new Person() { FirstName = "John", LastName = "Johnson", Age = 0 };

    // Step 2 - Act
    Person copy = p.Copy();

    // Step 3 - Assert
    Assert.AreEqual(p.Age, copy.Age);
    Assert.AreEqual(p.FirstName, copy.FirstName);
    Assert.AreEqual(p.LastName, copy.LastName);
}

The code coverage is now 100%. But is this a good test? No.

What are the problems with our tests?

Problem 1 – The Unit Test does not guarantee every property is copied

In the Person.Copy() method, comment out the line that copies the Age. Run the test again.

Oops! The test still passes.

What is the problem? Well, int defaults to zero.

Change the age to a value other than zero and try again.  The test now fails.

[Test]
public void Person_Copy_Test()
{
    // Step 1 - Arrange
    Person p = new Person() { FirstName = "John", LastName = "Johnson", Age = 25 };

    // Step 2 - Act
    Person copy = p.Copy();

    // Step 3 - Assert
    Assert.AreEqual(p.Age, copy.Age);
    Assert.AreEqual(p.FirstName, copy.FirstName);
    Assert.AreEqual(p.LastName, copy.LastName);
}

This fixed this one problem.

Is the test good enough now? Of course not.

Problem 2 – The Unit Test does not guarantee every property is copied

Wait, you might be saying that my problem 2 is named the same as problem 1 and you might think this is a typo. It is not a typo.

We still have a similar problem to the first problem.

Imagine a new user developer takes over the code, and decides that a MiddleName property is needed. Go ahead and add a middle name property. Don’t modify the Copy() method yet. Now run your Unit Test again.

Our one test still passes.

Shouldn’t there be a test that fails because the copy is now failing to copy to all properties? Yes there should. We have just identified a new test that actually includes the previous three tests. The goal of our three tests were all the same overall goal. Our three tests were actually slightly wrong. Instead we really had only one test: Test that when Copy() is invoked, all properties should be copied.

Now that we have gain more insight on what we are actually testing, how do we test it? How do we test all properties. One idea might be to use reflection.

[Test]
public void Person_Copy_Test()
{
    // Step 1 - Arrange
    Person p = new Person() { FirstName = "John", LastName = "Johnson", Age = 25 };

    // Step 2 - Act
    Person copy = p.Copy();

    // Step 3 - Assert
    PropertyInfo[] propInfo = typeof(Person).GetProperties();
    foreach (var prop in propInfo)
    {
        object pObj = typeof(Person).GetProperty(prop.Name).GetValue(p, null);
        object copyObj = typeof(Person).GetProperty(prop.Name).GetValue(copy, null);
        Assert.AreEqual(pObj, copyObj);
    }
}

At first this looked like a good idea, because it will check each property for us, even properties added in the future. However, it turns out that because int and string have default values, This test didn’t exactly test what we wanted to test. This test still passes when it should fail and that is a problem.

Remember the test: to test that when Copy() is invoked, all properties should be copied.

We need guarantee that each property was called and to do this. If only we were using an interface, then we could mock the interface and assert that each public property were called…A good rule to live by when developing is if you hear yourself say or you think “if only…” you should actually try implementing the “if only…” you just thought of. So lets do that.

This is a little longer of a solution but a better design, so here are some steps to get there.

  1. Create an IPerson interface that has the properties and methods we want to guarantee exist.
    using System;
    
    namespace FriendDatabase
    {
        public interface IPerson
        {
            int Age { get; set; }
            String FirstName { get; set; }
            String MiddleName { get; set; }
            String LastName { get; set; }
    
            IPerson Copy();
            void CopyTo(IPerson inIPerson);
        }
    }
    
  2. Change the person object so that you can never get a Person object, you always get an IPerson.
  3. We also need to be able to mock the instance of IPerson that is getting created by the Copy method and our current design doesn’t allow for that. Lets change our Copy method and add a CopyTo method to make this possible.
    using System;
    
    namespace FriendDatabase
    {
        public class Person : IPerson
        {
            #region Constructor
            ///
    <summary> /// Nobody should use Person, but on GetPerson()
     /// which returns and IPerson
     /// </summary>
            protected Person()
            {
            }
            #endregion
    
            #region Properties
            public int Age { get; set; }
            public String FirstName { get; set; }
            public String MiddleName { get; set; }
            public String LastName { get; set; }
            private String NickName { get; set; }
            #endregion
    
            #region Methods
            public static IPerson GetPerson(string inFirstName, string inMiddleName, String inLastName = null, int inAge = 0)
            {
                return new Person()
                {
                    FirstName = inFirstName,
                    MiddleName = inMiddleName,
                    LastName = inLastName,
                    Age = inAge
                };
            }
    
            public IPerson Copy()
            {
                IPerson retIPerson = new Person();
                CopyTo(retIPerson);
                return retIPerson;
            }
    
            public void CopyTo(IPerson inIPerson)
            {
                inIPerson.Age = this.Age;
                inIPerson.FirstName = this.FirstName;
                inIPerson.LastName = this.LastName;
            }
            #endregion
        }
    }
    
  4. Now we need a Mocking tool. Download you favorite mocking library (RhinoMocks, NMock2, or MOQ). I am going to use NMock2 which can be downloaded here: NMock2
  5. Lets put the mocking library in a lib directory in your test project.
  6. Add a reference to the dll.
  7. Now lets change our test. Lets go ahead and use the reflection still, but this time, we want to guarantee that each property was called.
    [Test]
    public void Person_Copy_All_Properties_Copied_Test()
    {
        // Step 1 - Arrange
        Mockery mock = new Mockery();
        IPerson p = Person.GetPerson("John", "J.", "Johnson", 25);
        IPerson mockIPerson = mock.NewMock();
        PropertyInfo[] propInfo = typeof(IPerson).GetProperties();
    
        // Step 2 - Expect
        foreach (var prop in propInfo)
        {
            Expect.AtLeastOnce.On(mockIPerson).SetProperty(prop.Name);
        }
    
        // Step 3 - Act
        p.CopyTo(mockIPerson);
    
        // Step 4 - Assert
        mock.VerifyAllExpectationsHaveBeenMet();
    }
    

    Note: NMock2 requires a slight variation of the Arrange, Act, Assert (AAA) unit test model in that it is more Arrange, Expect, Act, Assert (AEAA), which is just as good and just as clean. One could argue that the expectations are part of the Arrange and I would somewhat agree with that too.

  8. Ok, now run your test again and it should fail because we are not calling MiddleName in our CopyTo() method. You have now written the correct unit test for the goal.

So by taking time to think of the correct test and Unit Testing the correct test, solving the right problem, we gained a few benefits.

  • Better future maintainability
  • Better design
  • Testable design

Now hopefully you can go and do this when you write your Unit Tests.

Return to C# Unit Test Tutorial


Mocking an internal interface with InternalsVisibleTo in C#

Previously, posted instructions for setting this up.

How to Mock an internal interface with NMock2?

Attached is a sample solution that demonstrates actually implementing this.

ExampleOfIVT.zip


How to Mock an internal interface with NMock2?

I was attempting to mock an internal interface with NMock2 and no matter what I tried I continued to get the following failure.

Test 'M:ExampleOfIVT.PersonTests.FirstTest' failed: Type is not public, so a proxy cannot be generated. Type: ExampleOfIVT.IPerson
	Castle.DynamicProxy.Generators.GeneratorException: Type is not public, so a proxy cannot be generated. Type: ExampleOfIVT.IPerson
	at Castle.DynamicProxy.DefaultProxyBuilder.AssertValidType(Type target)
	at Castle.DynamicProxy.DefaultProxyBuilder.CreateInterfaceProxyTypeWithoutTarget(Type interfaceToProxy, Type[] additionalInterfacesToProxy, ProxyGenerationOptions options)
	at NMock2.Monitoring.CastleMockObjectFactory.GetProxyType(CompositeType compositeType)
	at NMock2.Monitoring.CastleMockObjectFactory.CreateMock(Mockery mockery, CompositeType typesToMock, String name, MockStyle mockStyle, Object[] constructorArgs)
	at NMock2.Internal.MockBuilder.Create(Type primaryType, Mockery mockery, IMockObjectFactory mockObjectFactory)
	at NMock2.Mockery.NewMock[TMockedType](IMockDefinition definition)
	at NMock2.Mockery.NewMock[TMockedType](Object[] constructorArgs)
	PersonTests.cs(59,0): at ExampleOfIVT.PersonTests.FirstTest()

Obviously I have a project, ExampleOfIVT, and a test project, ExampleOfIVTTests.

All the Google searching suggested that I should be adding these lines to my AssemblyInfo.cs file in the ExampleOfIVT project but these line did NOT work.

Please not that I downloaded NMock2 from here: http://sourceforge.net/projects/nmock2/

[assembly: InternalsVisibleTo("Mocks")]
[assembly: InternalsVisibleTo("MockObjects")]

Turns out that they have changed to use Castle.DynamicProxy and so the only assembly I needed was this one.

[assembly: InternalsVisibleTo("DynamicProxyGenAssembly2")]

Return to C# Unit Test Tutorial


Beginning Unit Testing Tutorial in C# with NUnit (Part 2)

Continued from Beginning Unit Testing Tutorial in C# with NUnit (Part 1)

Step 4 – Create your first NUnit test

  1. Choose a method from the class you want to test. For example, SimpleAddSubtractTool has the Add() method.
  2. Create a corresponding test method.  Try to name your test as follows: Method_Param1_Param2_Test() and you can add any other words to help clarify the test.
  3. Place the [Test] attribute above the test function.
  4. Add code to test the Add function.
    Note: A common testing method is Arrange Act Assert (AAA). Lets write the code in our method with this in mind.

            [Test]
            public void Add_1_And_2_Test()
            {
                // Step 1 - Arrange (Basically create the objects)
                SimpleAddSubtractTool tool = new SimpleAddSubtractTool();
    
                // Step 2 - Act
                int actual = tool.Add(1, 2);
    
                // Step 3 - Assert
                int expected = 3; // This makes it clear what you expect.
                Assert.AreEqual(expected, actual);
            }
    
  5. Now Create a similar test for the Subtract method.

You are now ready to run your test.

Step 5 – Run the test

You might think you can just right-click on the project and choose Run Tests. However, by default you cannot do this. To add a plugin called TestDriven.NET that provides this right-click Run Tests functionality,  see this post.

How to run a Unit Tests in Visual Studio?

Now you should be able to run your tests.

Step 6 – Check your code coverage

Code Coverage is basically the number of lines of code tested divided by the total number of lines of code.  If you have 10 lines of code but your test only touches five lines of code, you have 50% code coverage. Obviously the goal is 100%.

Again, by default you cannot just right-click and run the Unit Tests unless you have installed TestDriven.NET.

You should now see your code coverage. The Add() method should be 100% covered.

Step 7 – Parameter Value Coverage

You may think that you are good to go. You have unit tests, and your code is 100% covered (based on line coverage). Well, there are bugs in the code above and you haven’t found them, so you are not done. In order to find these bugs you should research the possible parameter values. You will find some more tests to run. I coined the term Parameter Value Coverage (PVC). Most code coverage tools completely ignore PVC.

Both parameters are of the type int or System.Int32. So these are 32 bit integers.

How many possible values should be tested to have 100% PVC? You should have at least these five:

  1. Positive value: 1, 2, 3, …, 2147483647.
  2. Negative vlaue: -1, -2, -3, …, -2147483648.
  3. Zero
  4. int.MaxValue or 2147483647.
  5. int.MinValue or -2147483648.
So while we have 100% code coverage we only have 20% PVC.
So looking at these five possible values, the following questions come to mind.
  • What happens if you add 1 (or any number for that matter) to int.MaxValue?
  • What happens if you subtract 1 (or any number for that matter) from int.MinValue?

Well, write unit tests to answer these questions. Adding 1 to 2,147,483,647 will fail if the expected value is the positive integer 2,147,483,648. In fact, the answer is the negative integer -2,147,483,648. Figure out why this is. Determine where the bug is, then decide how to handle it.

[Test]
        public void Add_Int32MaxValue_and_1_Test()
        {
            // Step 1 - Arrange (Basically create the objects and prepare the test)
            SimpleAddSubtractTool tool = new SimpleAddSubtractTool();

            // Step 2 - Act (Bacically call the method)
            int actual = tool.Add(int.MaxValue, 1);

            // Step 3 - Assert (Make sure what you expect is true)
            int expected = 2147483648; // This won't even compile...
            Assert.AreEqual(expected, actual);
        }

It is up to you to decide how to fix this bug, as the right way to fix this bug is not part of this article.

Return to C# Unit Test Tutorial


Beginning Unit Testing Tutorial in C# with NUnit (Part 1)

So how do you get started with Unit Testing? Well, you need a Unit Testing framework and some basic know how. This article will help you with both.

NUnit is a commonly used testing framework for C#. Well, NUnit has a guide  but I found it incomplete for a newbie, though perfectly acceptable for an experienced developer.
http://nunit.org/index.php?p=quickStart&r=2.6

Lets assume that you have a project with this class:

namespace NUnitBasics
{
    public class SimpleAddSubtractTool
    {
        public int Add(int value1, int value2)
        {
            return value1 + value2;
        }

        public int Subtract(int value1, int value2)
        {
            return value1 - value2;
        }
    }
}

You need to test these methods and find bugs in them and despite how simple they appear, there are bugs in the above methods.

Step 1 – Install NUnit

  1. Go to this url and download the latest version of NUnit.
    http://nunit.org/?p=download
  2. Run the installer.

Step 2 – Create an NUnit testing project in Visual Studio

You can do this manually, as described below, or you can download my templates: NUnit Project Template for Visual Studio

Part 1 – Creating the Project

  1. In Visual Studio, open the solution that holds the project and code that needs to be tested.
  2. Right-click on the solution and choose Add | New Project.
  3. In the tree on the left, select Visual C# | Windows.
    Note: You would think you would select a Test project, but that is for the testing framework built into Visual Studio, MSTest.
  4. Click to highlight Class Library.
  5. Provide a project name.
    Important: It is usually best practice to give the test project the same name as the project it is test only with the word “test” at the end. For example, a project called MyProject would have a corresponding test project called MyProjectTests.
  6. Click Ok.

Part 2 – Configuring the project

  1. Click Reference | Add Reference.
  2. Click the first tab: .NET
  3. Find and add nunit.framework and nunit.mocks.
  4. Click Reference | Add Reference (again).
  5. Choose Projects.
  6. Select the project that is being tested.
  7. Click Ok.
  8. Delete the Class1.cs as it is not used.

Step 3 – Start your first Unit Test

You can add a class and manually change it to be an NUnit test class as described below, or you can download my template: NUnit Item Template for Visual Studio

Part 1 – Create the class file

  1. Right-click on your project and choose Add | Class.
  2. Name the class after the class you are going to test. For example, a class called SimpleAddSubtractTool would have a corresponding test class called SimpleAddSubtractToolTests.
  3. Click OK.

Part 2 – Convert to an NUnit class file

  1. Add a using reference to NUnit.Framwork.
  2. Add the [TestFixture] attribute above the class name.
  3. Add Setup and Tear down attributes and methods if needed.
using System;
using System.Collections.Generic;
using System.Linq;
using System.Text;
using NUnit.Framework;

namespace NUnitBasicsTests
{
    /// <summary>
    /// A test class for ...
    /// </summary>
    [TestFixture]
    public class SampleTest
    {
        #region Setup and Tear down
        /// <summary>
        /// This runs only once at the beginning of all tests and is used for all tests in the
        /// class.
        /// </summary>
        [TestFixtureSetUp]
        public void InitialSetup()
        {

        }

        /// <summary>
        /// This runs only once at the end of all tests and is used for all tests in the class.
        /// </summary>
        [TestFixtureTearDown]
        public void FinalTearDown()
        {

        }

        /// <summary>
        /// This setup funcitons runs before each test method
        /// </summary>
        [SetUp]
        public void SetupForEachTest()
        {
        }

        /// <summary>
        /// This setup funcitons runs after each test method
        /// </summary>
        [TearDown]
        public void TearDownForEachTest()
        {
        }
        #endregion
    }
}

You are now ready to create your first test.

Note: For this basic class you can actually delete the Setup and Tear down region as it won’t be used, however, it is good to know how to use it when you get started.

Beginning Unit Testing Tutorial in C# with NUnit (Part 2)

Return to C# Unit Test Tutorial


How to run Unit Tests in Visual Studio?

NUnit does not currently have a plugin for Visual Studio that allows you to run test right from Visual Studio. However, it can be done.

You can use a number of tools but the tool I prefer is TestDriven.NET.

Step 1 – Download and Installation

  1. Go to the TestDriven.NET web site.
  2. Click the download link.
  3. Download the appropriate version (Enterprise, Professional, or Personal).
  4. Close Visual Studio.
  5. Install TestDriven.NET.

Step 2 – Running Unit Tests

  1. Open your solution that has a test project in Visual Studio.
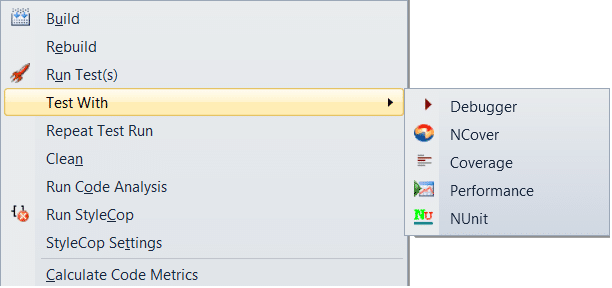
  2. Right-click on your test project and you should see a Run Test(s) and a Test With option.
  3. Select Run Test(s).
You are now running tests just by right-clicking in Visual Studio.

Notice that you can also run tests in the Debugger and with Coverage and with Performance.


Utah Open Source Conference 2012


Install Telnet.exe from the command line

I have a previous post about installing telnet.exe in windows 7, however, I explain how to do it using the UI. You may need to install telnet.exe from the command line.

To install telnet.exe on Windows 7 from the command line, run this command:

C:\Windows\system32>dism.exe /online /Enable-Feature:TelnetClient

Now telnet to a machine:

c:\> telnet 10.1.1.1

Yes, it is that easy. Of course, you may think about using ssh these days as telnet just isn’t that secure. However, telnet is used for other things, such as port testing.

You can telnet using a different port or test that a port is open just by adding the port number.

c:\> telnet 10.1.1.1 3389