How to install FreeBSD 9?

FreeBSD 9 comes with a new installer and installing it is quite fast.

Part 1 – Download the media

Step 1 – Download the DVD ISO

  1. Go to http://www.freebsd.org/where.html and click to the ISO link for FreeBSD 9 for you architecture. (x86, amd64, etc…)
  2. Click to download the FreeBSD-9.0-RELEASE-amd64-dvd1.iso.

Step 2 – Burn the ISO to a DVD

I am not going to give you steps for burning an ISO, as you could be on Windows, Linux, OS X, and you could be using any of the DVD burning tools out there.

I’ll give you this hint though…Do not burn the ISO file onto the disk as a file.

Note: Skip this step if you are installing to  a virtual machine.

Part 2 – Install FreeBSD

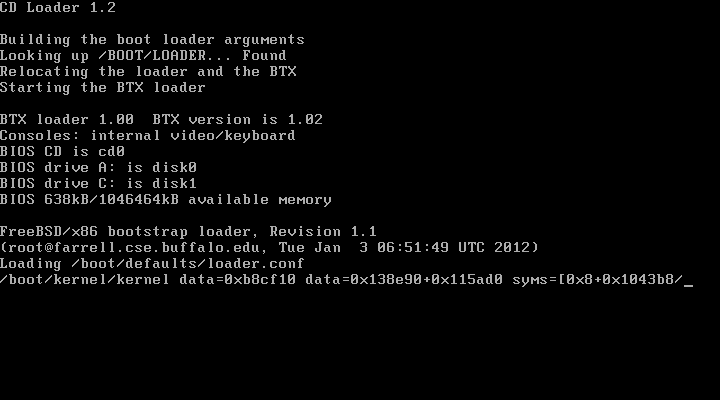
Step 1 – Boot off the DVD

  1. Put the DVD in your drive. (Or if using a virtual machine, point the virtual machine’s DVD drive to the ISO file.)
  2. Boot your system.
    Note: If you system doesn’t boot off the DVD check the BIOS settings or try pressing F12 to select the boot device

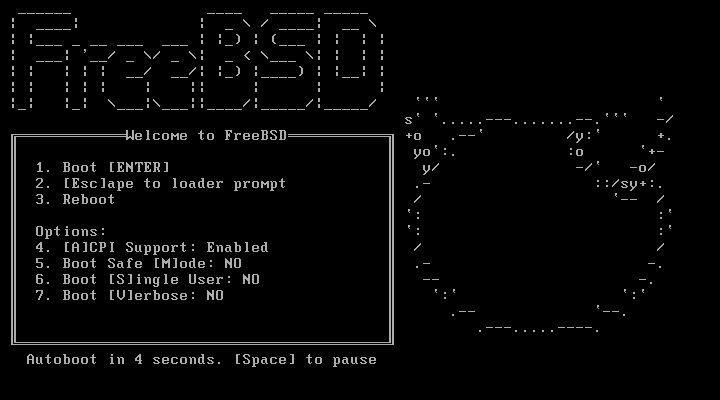
  3. The next screen will automatically boot but delays 9 seconds.
    Press enter to continue without waiting.


    Your now booting to the installer.

Step 2 – Install FreeBSD

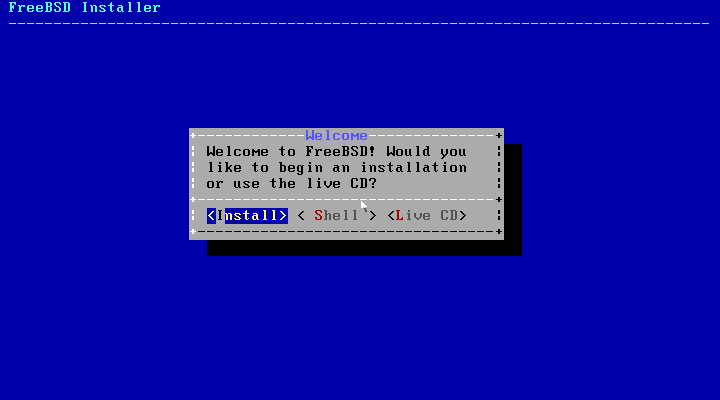
  1. Click Install on the first screen.

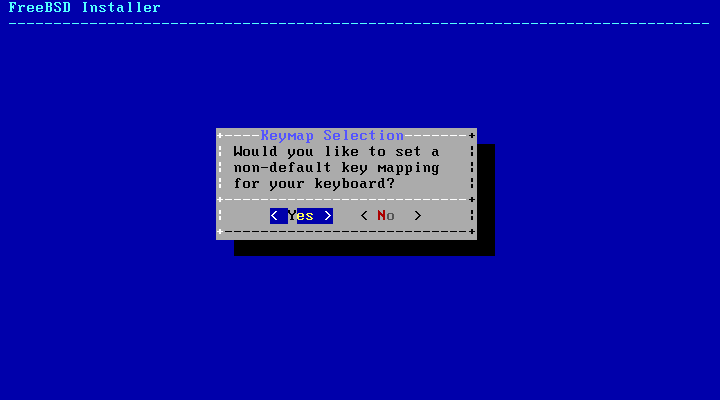
  2. If you need a special keyboard layout, click yes, otherwise, click no. I clicked no.
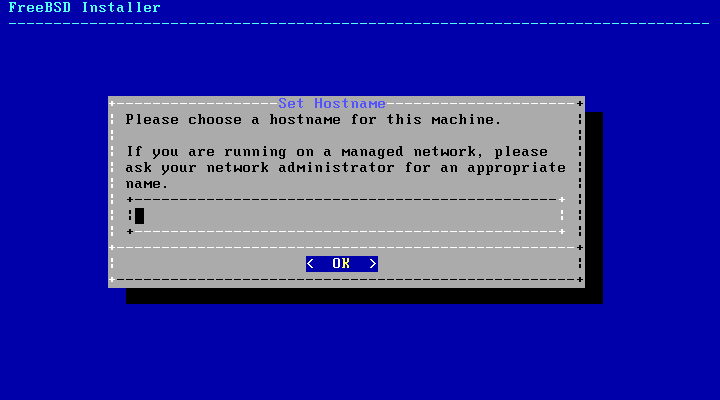
  3. Enter the host name for this new installation.
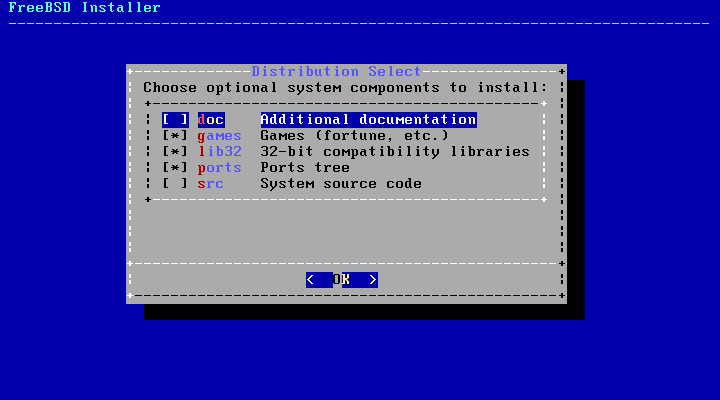
  4. Select the optional system components and press enter.

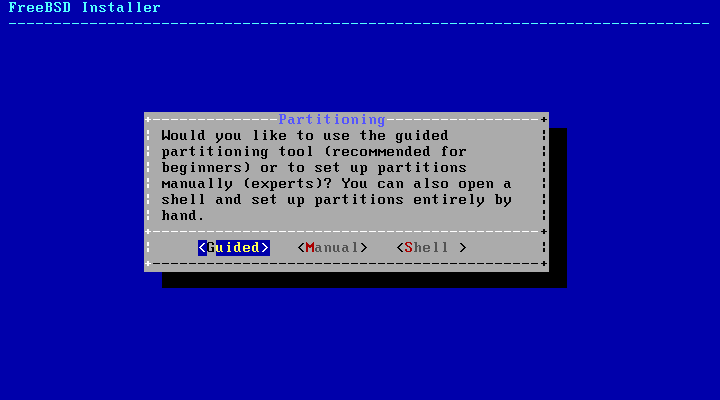
  5. Partitioning can be done for you with Guided or you can do it yourself with Manual.Note: With todays hard drives, there is little to no benefit from having  multiple partitions as there was in the past. Just use Guided and the root partition will fill the drive.Note: Doesn’t look like we have ZFS options yet.

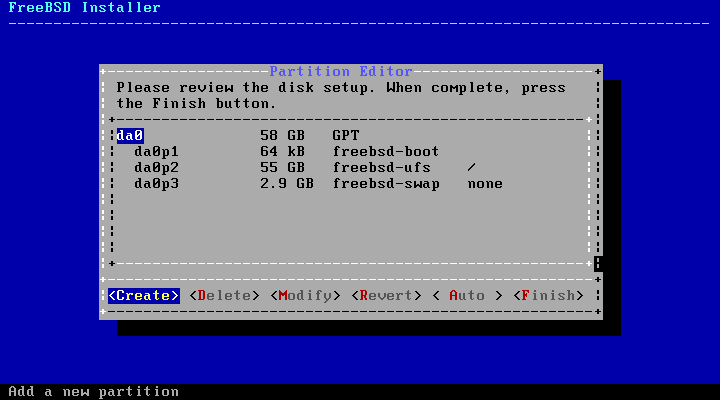
  6. Look over the guided partition settings.
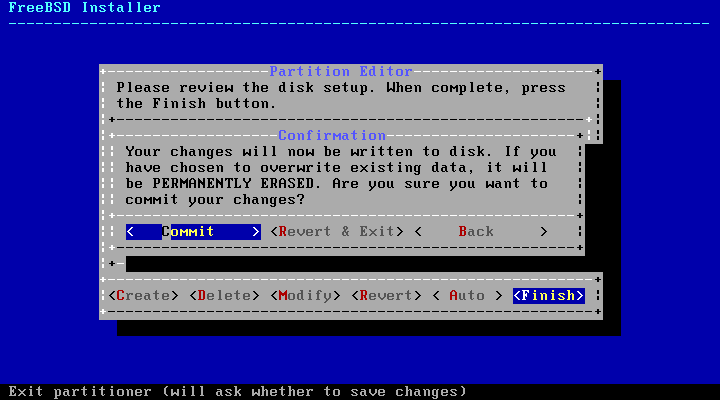
  7. Click Commit to perform the installation.

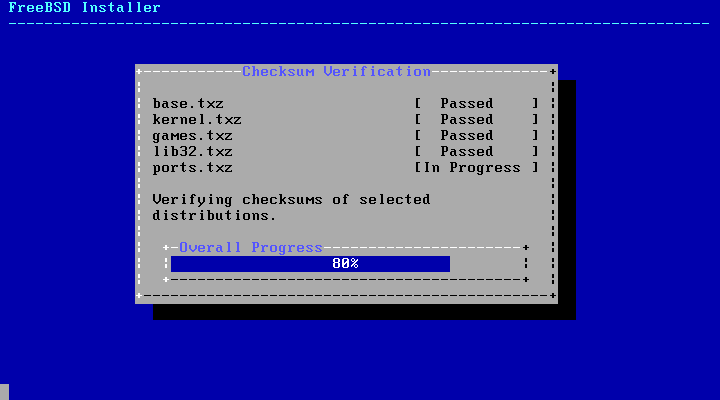
    It runs the checksum verification to make sure media is valid.


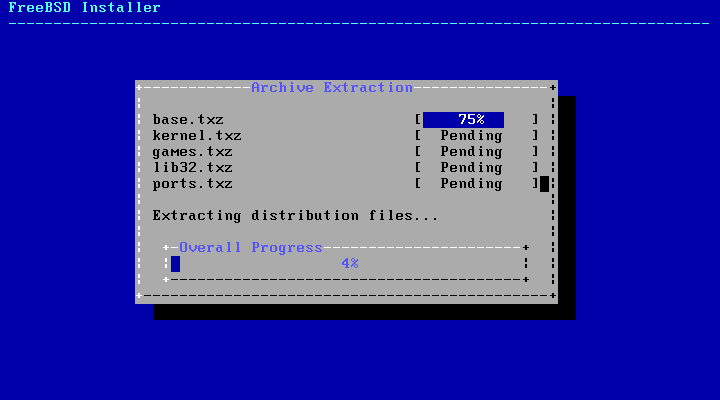
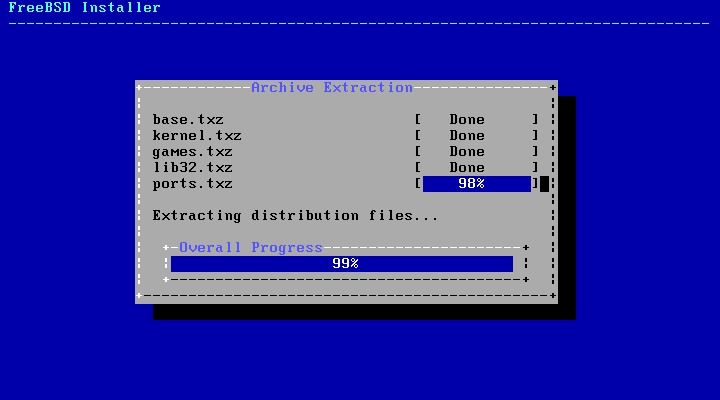
    It then commits the install.

    It is actually not that long of a wait before you are pretty much done.

    The installation has committed. You will now be asked post-installation configuration questions.

Step 3 – Configure Post-installation settings

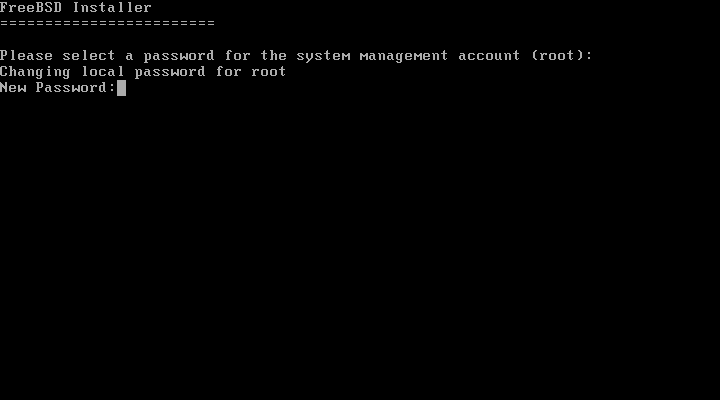
  1. Enter a password for the root account when prompted. Enter it again to verify it.
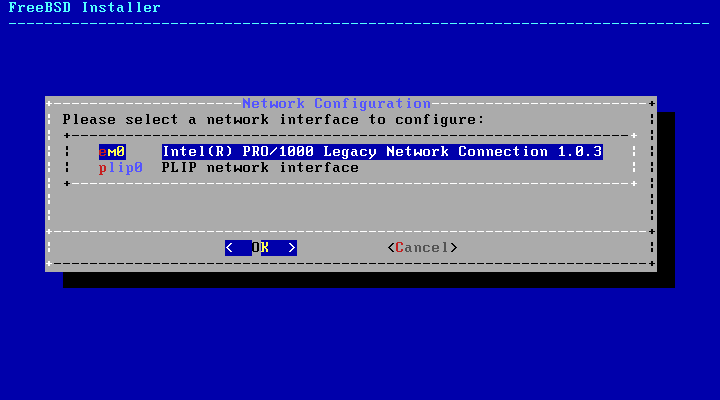
  2. Select your network card.
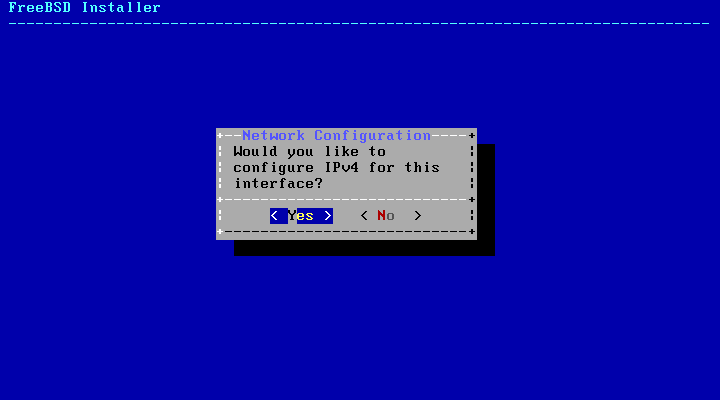
  3. Unless you know for sure you are going to use IPv6 only, say Yes to enabling IPv4.
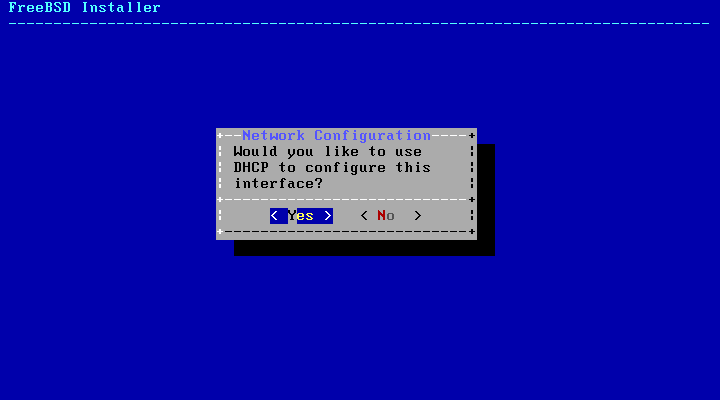
  4. Unless you have been given a specific IP address to use, say Yes to enabling DHCP.
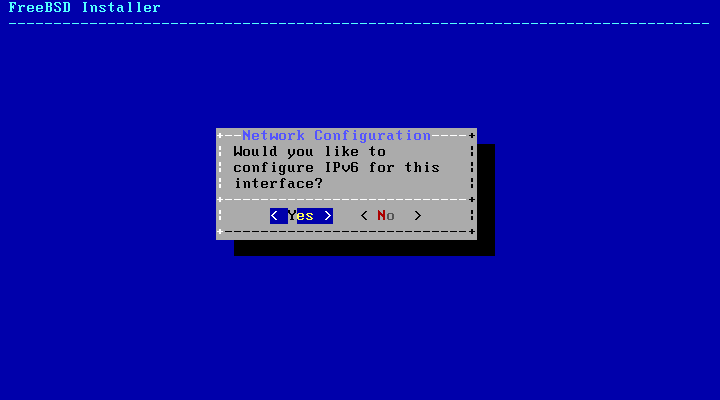
  5. Lately I like to enable IPv6 because all my operating systems now support it. But you probably don’t need it unless you know you need it.
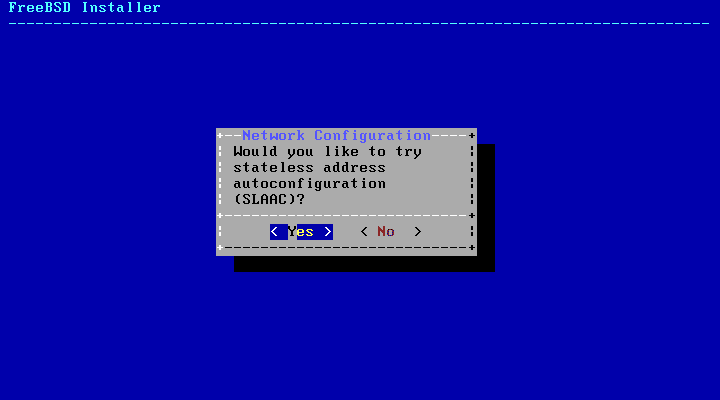
  6. If you enabled IPv6, you probably want this option, unless you have a specific IPv6 address you need to use.

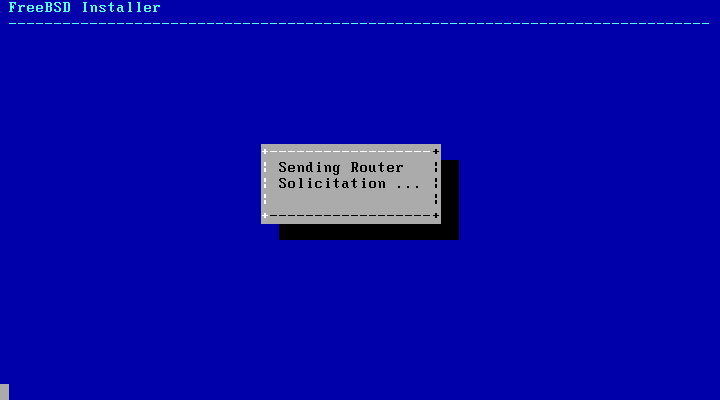
    Your dynamic network settings are determined.
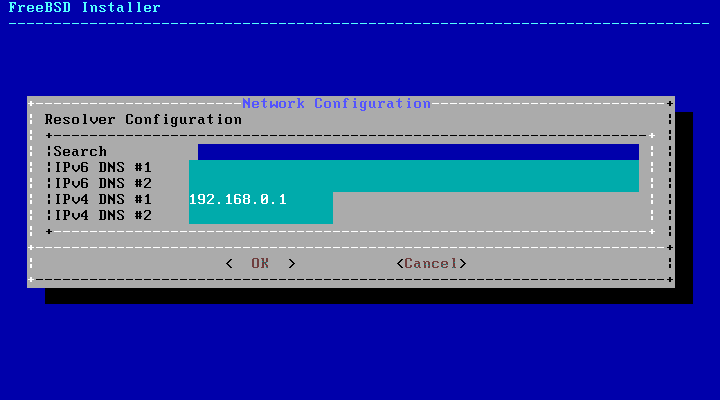
  7. Your DNS setting may be detected for you, but if not, you can enter your DNS settings manually. I only entered a single DNS entry for IPv4.
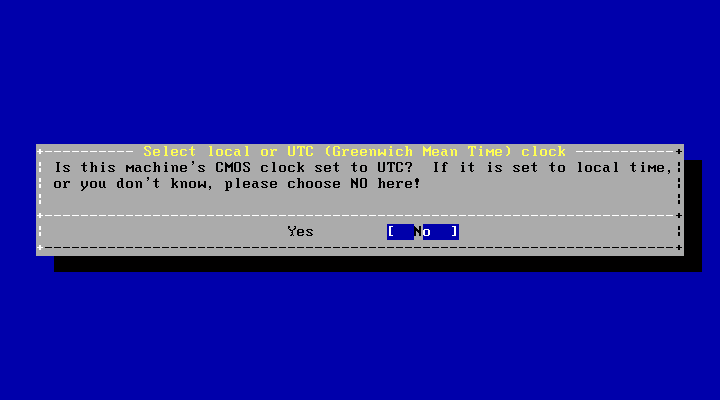
  8. Unless you have a server that needs its clocked synchronized to UTC, select No when prompted.
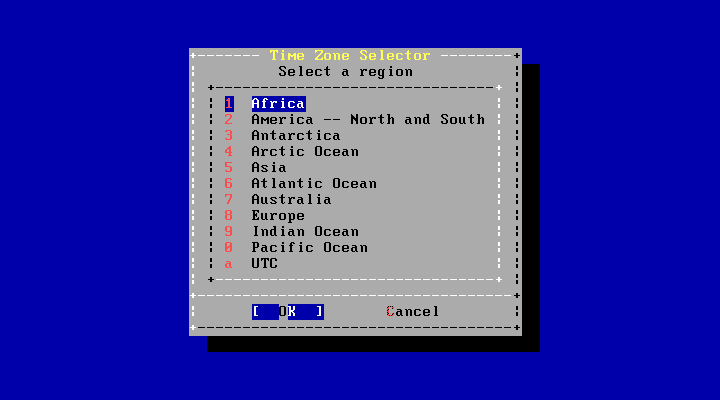
  9. Select your time Region.
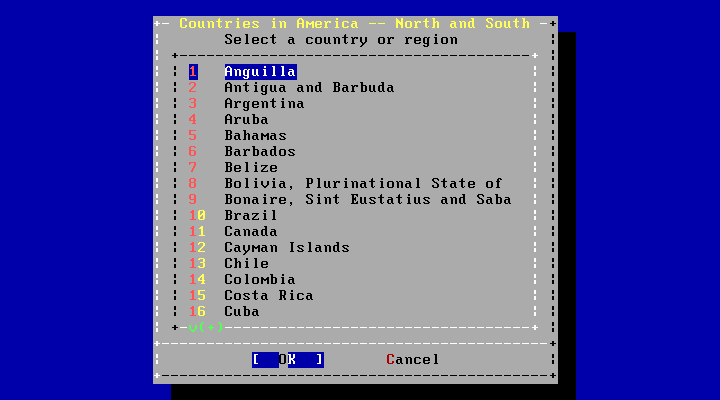
  10. Select your Country.
    Note: United States is number 49.
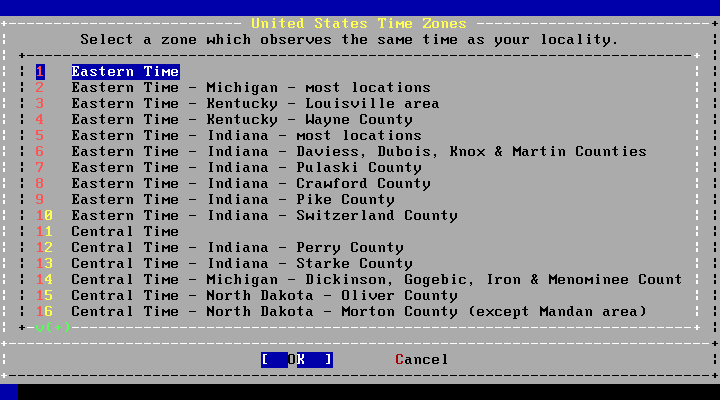
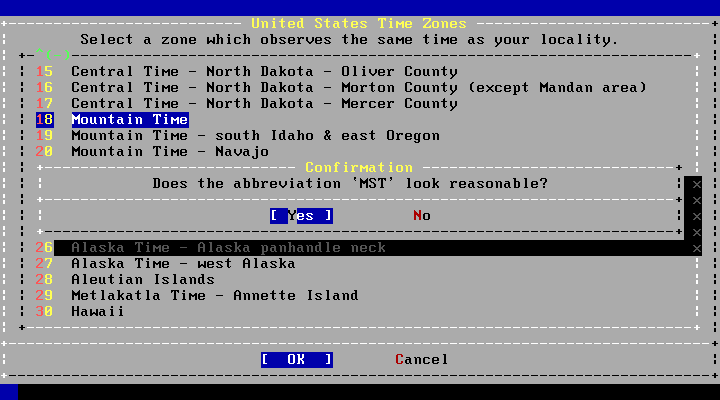
  11. Select your Time Zone.
  12. You may get a prompt to very whether the Time Zone you selected is correct. Select Yes if it is correct.
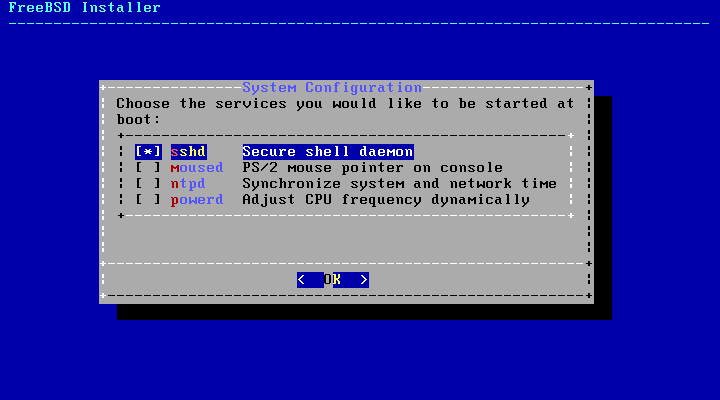
  13. Choose what to install.
    Note: If you are on a laptop you consider selecting powerd.
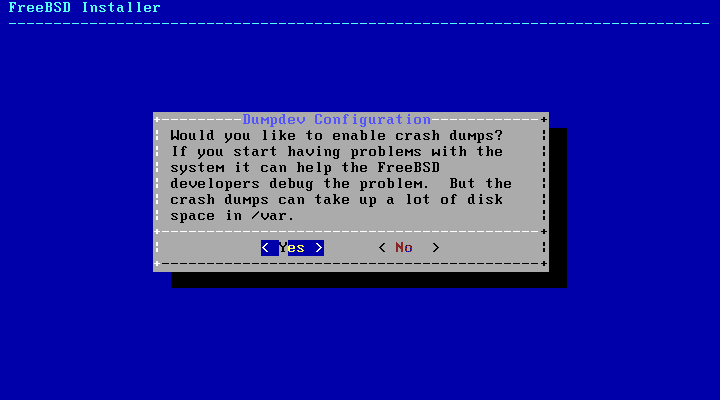
  14. If you want to contribute to FreeBSD and help them resolve bugs (especially yours) select yes. Otherwise, select No.
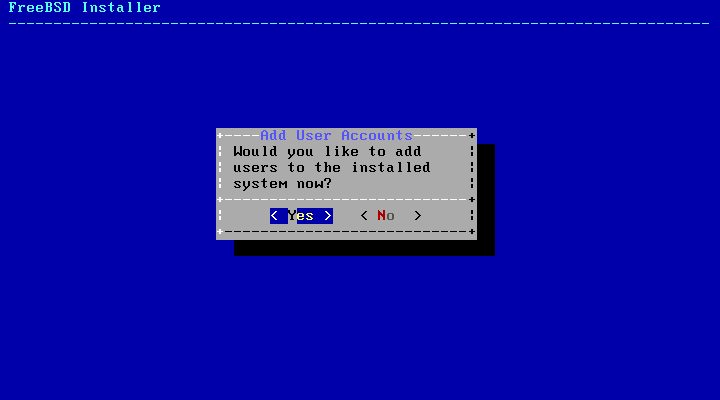
  15. Select Yes when prompted to Add user accounts.
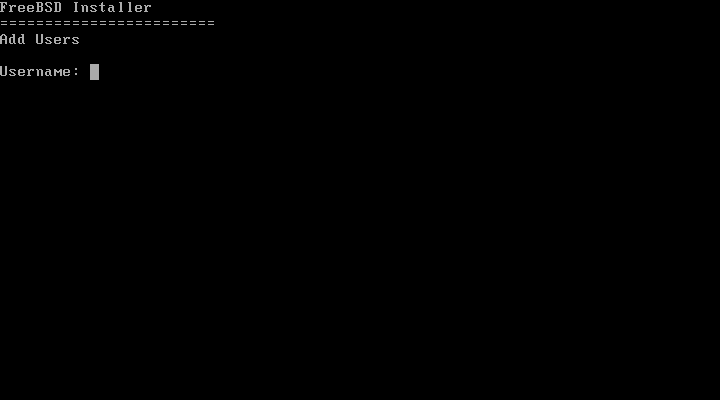
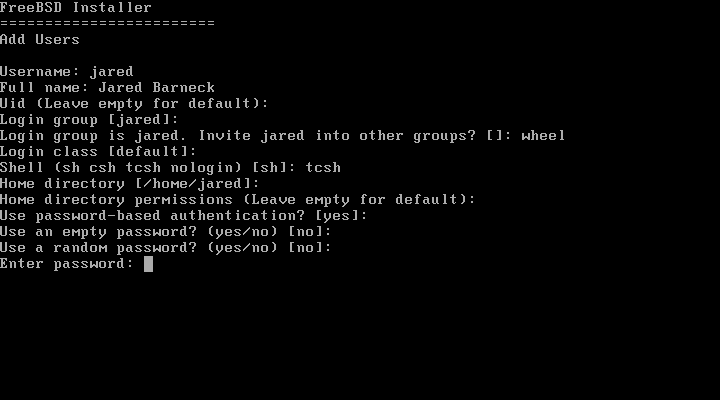
  16. Enter a user name and follow the prompts.


    Note: Don’t forget to invite the user to the wheel group if they are going su to root.
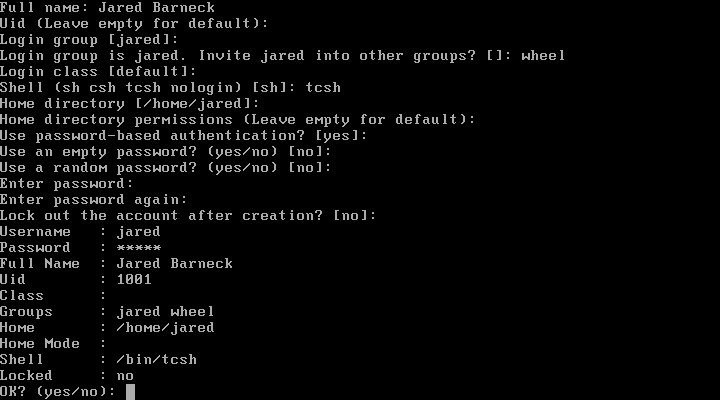
  17. Enter Yes when all the settings are correct.
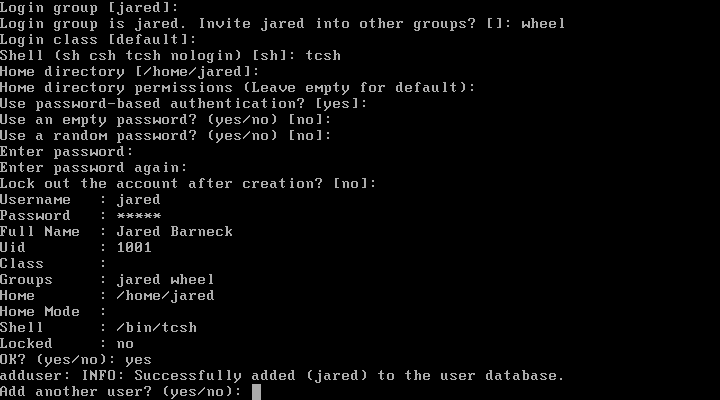
  18. Select Yes if you want to add more users and repeat these steps. Once you are done adding users, select No.
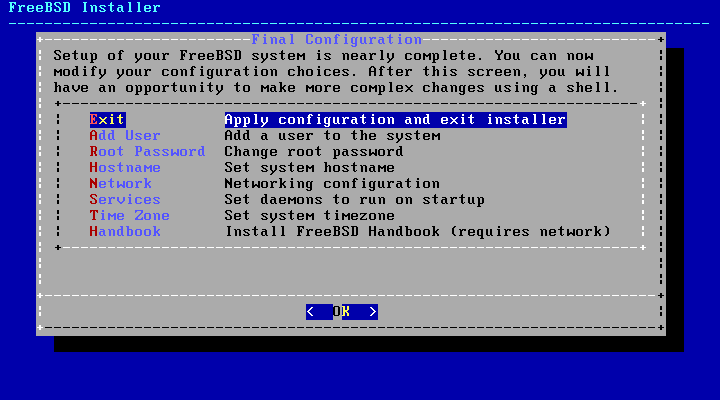
  19. Press Enter to Exit.
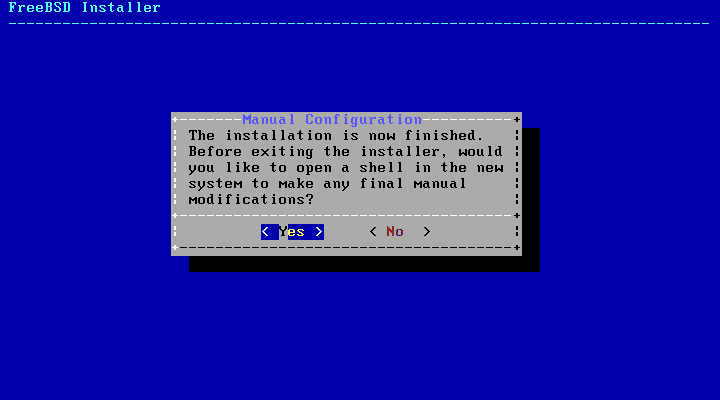
  20. I don’t have any special settings to make, so I select No here.
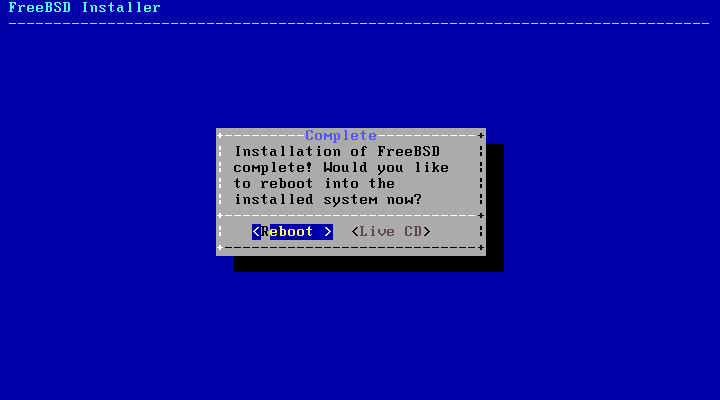
  21. Go ahead an press Enter to reboot.

    Important! Do not boot of the DVD again!

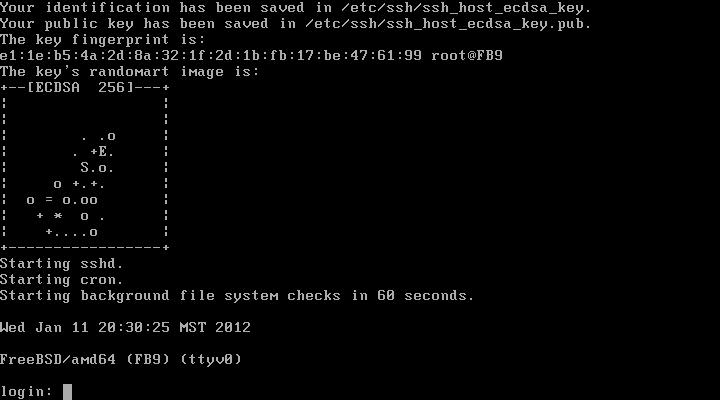
    Your system will now boot and create an SSH key on its own and give you a login prompt.


    FreeBSD is now installed.

Part 3 – Configure Your FreeBSD Install as Desired

What do you want to do next?


Why a developer’s next computer should be an Apple

It is not because OS X is better

Let me start by saying that I do not fall into the “my os is better than yours” mantra. I like to talk about the right tool for the job.

  • For a home user, Windows 7 and OS X still beat Linux (yes, even Ubuntu).
  • For a geeky home user, Ubuntu or any other OS might be more fun.
  • If you want to give away your old computer but not give away your Operating System license, put Ubuntu or PC-BSD on it.
  • Similarly if you get a free computer without an OS and you don’t want to buy one, put Ubuntu or PC-BSD on it.
  • For most businesses, Windows 7 is the better solution for a lot of reasons, many of which are IT related and not even user related.
  • For an artist, OS X is the right choice. Sure Windows has caught up in graphic tools, but not in peer knowledge.
  • For a Web Server, I would never run windows or MAC, I would recommend BSD or Linux.
  • For a NAS server, I would use FreeNAS.
  • For an enterprise to sell a secure appliance I would recommend a BSD derivative.

Those are just a generalizations based on the idea of using the right tool for the job. In every case others have different opinions and there are always exceptions. The appropriate thought is that you should use the right tool for the job.
So if you are a developer, what is the right tool for the job? Here is my new generalization.

  • For a Developer, I now recommend Apple hardware.

Notice I said Apple Hardware, but I didn’t say that I recommend OS X. Run whatever OS you need.

It is not because Apple Hardware is better

Also, this has nothing to do with saying that Apple hardware is better. Dell, HP, Lenovo, Sony, and others all make some great hardware for running whatever OS you can run.

Many argue that Alienware makes the best hardware, not any of the above vendors.  It is not about the best hardware.  So if it was a hardware issue, I would be recommending Alienware. But it is not.

Let me repeat.

  • For a Developer, I now recommend Macintosh hardware.

Notice, I qualified this by saying For a developer. I am not telling everybody to get Apple hardware.

Answer #1: It is simply a licensing issue

Legally you cannot run OS X on any hardware other than Apple hardware (an no Hacintosh is not legal) . Since iOS development realistically can only happen on OS X, you cannot legally run iOS on hardware designed for windows either.

Answer #2 – The cross-platform world

You need every Operating System today.

Lets talk about where development has taken us.  We have gone from not really cross-platform (Windows only and sometimes support Macintosh too), to having to be able to code on Windows, Windows Phone 7, OS X, iOS, Android, and possibly Linux and Unix as well.

Lets list these in a table and you will see why buying an Apple Laptop frees you to develop on all those platforms.

Operating System Apple Hardware Windows Hardware
Windows Run OS and Develop for it Run OS and Develop for it
BSD/Linux Run OS and Develop for it Run OS and Develop for it
Android Emulate OS and Develop for it Emulate OS and Develop for it
OS X Run OS and Develop for it Not supported*
iOS Emulate OS and Develop for it Not supported*

* While it can be done it is illegal and breaks license agreements.

Only Apple hardware allows you to install on all the popular Operating Systems that exist today.

So Apple has put themselves in an interesting position where cross-platform development on all popular operating systems can only occur on Apple hardware. It is this position that has me making this statement.

  • For a Developer, I now recommend Macintosh hardware.

As for the operating system that I recommend, you probably have guessed from this post my recommendation: If you are a developer, run them all.


How to compile WinNFSd with Visual Studio?

Recently I needed an NFS server on Windows, preferably written in C++. A long time ago I had used WinNFSd and sure enough the project still exists on Sourceforge, though unfortunately it hasn’t been updated since 2005.

However, I found that someone had updated it here: https://github.com/noodle1983/winnfsd-nd

So the big question, how do you compile this on windows with Visual Studio?

Step 1 – Download and extract the WinNFSd source

  1. Go to https://sourceforge.net/projects/winnfsd and download the source.
    Note: You can alternately download the git hub source as it has an update you might like:
    https://github.com/noodle1983/winnfsd-nd
  2. Click the Zip button at the top of the page to download the source as a zip.
    Note: Alternately if you have git working already you can clone this repo.
  3. Extract the zip file to a directory.  Remember where you extracted it as we will copy the source files later.

Step 2 – Create a new Visual Studio solution

  1. In Visual Studio, go to File | New | Project.
  2. Select Other Languages | Visual C++ | Empty Project.
    Note: Depending on your Visual Studio configuration you may Visual C++ in a different place.
  3. Name the solution WinNFSd.
  4. Click Ok.

Step 3 – Add the WinNFSd files to your solution

  1. In Visual Studio, right-click on your Project and click Open Folder in Windows Explorer.
  2. Create a new folder to hold your source code.
    Note: I simply named my folder src.
  3. Copy the source you extracted in Step 1 into the src directory.
  4. Highlight all the files in the src directory.
  5. Drag the files into Visual Studio and drop them on your project.
Note: If you try to build now, you will get 22 errors in debug mode and maybe 17 in release mode.

Step 4 – Configure the project properties

  1. In Visual Studio, right-click on your project and choose Properties.
    Note: The Configuration should say Active(Debug) currently.
  2. Go to Configuration Properties | Linker | Input.
  3. Add ws2_32.lib to the Additional Dependencies.
  4. Change the Configuration to Release and add ws2_32.lib for release as well.

Step 5 – Handle the Visual Studio C++ Runtime

If you were to compile now, and try to run your project on a different machine (not the one running Visual Studio) you would likely get an error due to a missing dll.  Here is the error you will likely receive.

The program can’t start because MSVCR100.dll is missing from your computer. Try reinstalling the program to fix this problem.

I am not going to explain the solution again here, because it is all documented here:
Avoiding the MSVCR100.dll or MSVCR100D.dll is missing error

Choose the best of the three solutions for you from the link above.

Note: For this single file exe, I prefer the statically linked option.

Step 6 – Build WinNFSd

  1. You should now be able to click Build | Build Solution and it should build.

You should be able to test both debug and release.

Note: I received 37 warnings, which would be nice to resolve, but I wouldn’t worry too much about them.


LANDesk Support Tools – Android Edition (Demo)

This is my first real project written for Android. Yes, I wrote it in C# using Mono for Android.


How to connect to the LANDesk MBSDK using C#?

This article is to demonstrate to LANDesk admins how to connect to the LANDesk MBSDK with C#.

Prerequisites

LANDesk

  1. A LANDesk Core Server accessible via the network.
  2. Credentials to connect to the LANDesk Core Server.

Basically if you can hit the MBSDK with a browser and login, you are good to go.
http://CoreServer/mbsdkservice/msgsdk.asmx

Visual Studio

  1. It is assumed that you have Visual Studio Professional installed

Step 1 – Create a Visual Studio Project

  1. In Visual Studio, Go to File | New | Project.
  2. Select that project type.
    Note: For this example I chose Console Application.
  3. Give the Project a name.
    Note: I named my project TalkToMBSDK.
  4. Click OK.
    Note: I went ahead and left my client application configured for .NET 4 even though I know the server currently is .NET 3.5 Sp1.

Step 2 – Add a Web Reference to the MBSDK

  1.  In you new Visual Studio project, right-click on the project and click Add Service Reference.
    Note: We actually need a Web  Reference but this is how we get there.
  2. Click Advanced on the bottom left.
  3. Click on Add Web Reference, also on the bottom left.
  4. Enter the URL to the MBSDK on your Core Server: http://CoreServer/mbsdkservice/msgsdk.asmx
  5. Change the Web Reference Name (on the right) to mbsdk.
    Note: You can name it whatever you want, but because there is an object called MBSDK (all uppercase), I chose to make the namespace mbsdk (all lowercase).
  6. Click Add Reference.

Step 3 – Test using the LANDesk SDK

  1. In the Program.cs add the following code.  You next steps are in the code comments.
using System.Net;
using TalkToMBSDK.mbsdk;

namespace TalkToMBSDK
{
    class Program
    {
        static void Main(string[] args)
        {
            // Step 1 - You need to use your credentials
            string user = "SomeUser";
            string password = "SomePassword";
            string domain = "SomeDomain.tld";

            // Step 2 - Configure a CredentialCache object with the URL and your creds
            string uri = "http://CoreServer/MBSDKService/MsgSDK.asmx";
            CredentialCache MyCredentialCache = new System.Net.CredentialCache();
            MyCredentialCache.Add(new System.Uri(uri), "NTLM", new NetworkCredential(user, password, domain));

            // Step 3 - Create an MBSDK object and set its CredentialCache object to the one you just created
            MBSDK sdk = new MBSDK();
            sdk.Credentials = MyCredentialCache;

            // Step 4 - Go ahead an call methods from the MBSDK
            // Note: If you get 401 unathorized, are you a LANDesk Administrator?
            string[] configs = sdk.GetClientConfigurations();
            DeviceList list = sdk.ListMachines("");
            string who = sdk.WhoAmI();
        }
    }
}

Have fun LANDesk Admins.


A test of encapsulation security in C#

I am taking a Computer Security course as part of my Masters of Computer Science and a specific question inspired the idea of testing the security of Encapsulation in C#.

I was curious, if exposing an object that is not exposed would be as simple as changing a single bit with a hex editor.

So I created two projects:

A dll that doesn’t expose two objects.

namespace EncapsulatedLibrary
{
    class Class1
    {
        public int i = 27;
    }

    class Class2
    {
        public int i = 29;
    }
}

An executable that references the dll and tries to use objects that are not exposed.

using EncapsulatedLibrary;

namespace TestLink
{
    class TestLinkProgram
    {
        static void Main(string[] args)
        {
            Class1 c1 = new Class1();
            int val1 = c1.i;
            Class2 c2 = new Class2();
            int val2 = c2.i;
        }
    }
}

Ok, now if you compile these, the dll compiles fine, but the exe fails to build.

Now try to use a hex editor to change the compiled version of the dll to expose these objects.

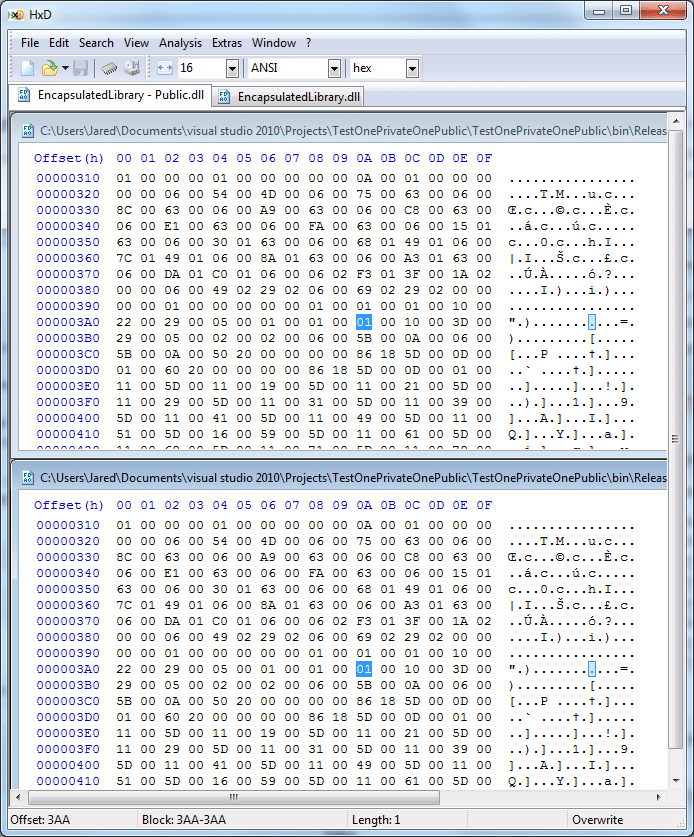
So real quick, I copied the dll and then changed the classes to public and recompiled. Then using a hex editor, HxD, I compared the two files.

Sure enough, on row 00000390, the 13th octet, I changed it from 00 to 01 and now Class1 is public.
On the very next row, 000003A0, the 10th octet, I changed it from 00 to 01 and now Class2 is public.

With this simple hack, I have made two objects public that should not be public. While in this example, this is not malicious, there are ways this could be used maliciously. Imagine if you had functionality limitations on users and they should not have rights to do certain processes but due to exposing a library, they can do these processes.

So now the next question left to be answered is this: What tools exist as controls to prevent such an attack?


How to find the duplicate in an array using Big O of N?

Question

Write an algorithm that finds the duplicate in an array using Big O of N, not Big O of N^2.

Information

The array is an integer array and has a MAX_VALUE items (lets just use 1000 as an example). All integers are between 0 and MAX_VALUE (pretend the input is limited to values between 0 and MAX_VALUE). There is only one duplicate and you are not sure where it is. What is the most efficient way to find it.

    int[] i = new int[1000];

There is one duplicate and it is the worst case duplicate.  You can simulate a worst case duplicate as follows:

    for (int i = 0; i < 999; i++)
    {
        array[i] = i+1;
    }
    array[999] = 999;

So the duplicates are the second to last and the last.

Answer

This is one possible answer that assumes the values are between 0 and MAX_VALUE.

    /// <summary>
    /// Efficient because it has a Big O of n.
    /// </summary>
    public int FindDuplcate(int[] inArray)
    {
        bool[] tmpArray = new bool[1000];
        for (int i = 0; i < inArray.Length; i++)
        {
            if (tmpArray[inArray[i]] == true)
                return i;
            tmpArray[inArray[i]] = true;
        }
        return -1;
    }

Incorrect answers

Here is a little test app with two incorrect answers and two possible correct answer. Feel free to comment with your answers.

using System;
using System.Collections.Generic;
using System.Linq;
using System.Text;
using System.Collections;

namespace FindDuplicateInArray
{
    class Program
    {
        const int MAX_VALUE = 1000;        

        static void Main(string[] args)
        {
            // Worst case
            int[] array = new int[MAX_VALUE];
            for (int i = 0; i < MAX_VALUE - 1; i++)
            {
                array[i] = i + 1;
            }
            array[MAX_VALUE - 1] = MAX_VALUE - 1;

            // Incorrect answer: Big O of N^2
            //IFindADuplicateInArrays dupFinder1 = new BruteForceDupFinder();
            //int dup = dupFinder1.FindDuplcate(array);

            // Incorrect answer: Big O of N^2
            //IFindADuplicateInArrays dupFinder2 = new LessBruteForceDupFinder();
            //int dup = dupFinder2.FindDuplcate(array);

            // Possible correct answer: Big O of N but with a limitation
            //IFindADuplicateInArrays dupFinder3 = new EfficientDupFinderWithLimitation();
            //int dup = dupFinder3.FindDuplcate(array);

            // Possbile correct answer: Big O of N
            IFindADuplicateInArrays dupFinder3 = new EfficientDupFinder();
            int dup = dupFinder3.FindDuplcate(array);

            Console.WriteLine(dup);
        }

        public interface IFindADuplicateInArrays
        {
            int FindDuplcate(int[] inArray);
        }

        /// <summary>
        /// Incorrect Answer: This is simple N*N alogithm. Big 0 = N^2
        /// </summary>
        public class BruteForceDupFinder : IFindADuplicateInArrays
        {
            #region IFindADuplicateInArrays Members

            public int FindDuplcate(int[] inArray)
            {
                for (int i = 0; i < inArray.Length; i++)
                {
                    for (int j = 0; j < inArray.Length; j++)
                    {
                        if (i != j && inArray[i] == inArray[j])
                            return j;
                    }
                }
                return -1;
            }

            #endregion
        }

        /// <summary>
        /// Incorrect Answer: This is N(N-1)/2 which is N*N/2-n/2 so remove the constants N^2-N. 
        /// When there is N^2-N you can keep the N that grows fastest: Big O = N2
        /// But the original alrogithm is less N^2 than just N^2.
        /// </summary>
        public class LessBruteForceDupFinder : IFindADuplicateInArrays
        {
            #region IFindADuplicateInArrays Members

            public int FindDuplcate(int[] inArray)
            {
                for (int i = 0; i < inArray.Length; i++)
                {
                    for (int j = i + 1; j < inArray.Length; j++)
                    {
                        if (inArray[i] == inArray[j])
                            return j;
                    }
                }
                return -1;
            }

            #endregion
        }

        /// <summary>
        /// Possible Answer: Efficient because it has a Big O of n.
        /// Limitation: If an item in the array is greater than the MAX_VALUE, 
        ///             an ArrayIndexOutOfBoundsException occurs.
        /// </summary>
        public class EfficientDupFinderWithLimitation : IFindADuplicateInArrays
        {
            #region IFindADuplicateInArrays Members

            public int FindDuplcate(int[] inArray)
            {
                bool[] tmpArray = new bool[1000];
                for (int i = 0; i < inArray.Length; i++)
                {
                    if (tmpArray[inArray[i]] == true)
                        return i;
                    tmpArray[inArray[i]] = true;
                }
                return -1;
            }

            #endregion
        }

        /// <summary>
        /// Possible Answer: Efficient because it has a Big O of n.
        /// </summary>
        public class EfficientDupFinder : IFindADuplicateInArrays
        {
            #region IFindADuplicateInArrays Members
            public int FindDuplcate(int[] inArray)
            {
                Dictionary<int, bool> table = new Dictionary<int, bool>();
                for (int i = 0; i < inArray.Length; i++)
                {
                    if (table.Keys.Contains(inArray[i]))
                        return i;
                    table.Add(inArray[i], true);
                }
                return -1;
            }
            #endregion
        }
    }
}

Run this through Visual Studio’s Performance Analysis tool once for each answer (comment and uncomment). To really see the difference, change MAX_VALUE to 1 million.


WPF MVVM Tutorial


Using Open Source in Proprietary Software

I was consulted by a Lawyer about open source licenses and since it is not that difficult, I thought I would share some of the simplicity with you.

Open Source software might seem like a nightmare only lawyers can understand. But this is not actually true. Determining if an Open Source library is usable in a commercial product is can become a simple task.

I am going to make this easy for you.

Think of Open source license as you would a traffic light. Green is good to go, yellow is proceed with caution but be ready to stop, Red is stop but with time may become green.

  • Green licenses
    BSD/MIT/Apache licenses (and a few others)
  • Yellow Licenses
    LGPL, Sun/Oracle
  • Red Licenses
    GPL, 3rd Party Commercial

Green licenses

These are close to 100% free but not quite…usually the only restrictions are simple things…like things you should not do but wouldn’t do anyway:

• “don’t remove license from the code files”
• “don’t use the name of the author or their place of business to promote your product”.

Which since we don’t do anyway, the code is essentially 100% free.

These licenses are usually short and don’t require a lawyer as anyone can pretty much read and understand them.

You don’t even have to include these licenses in any “pop-up” license agreements. As long as internally where we store these files the license remains in the source, we are fine.

You usually don’t even have to provide a mirror for this code and you can ignore requests for the source.

Yellow Licenses

LGPL or Oracle isn’t as bad, but they can be a pain. Usually you are free to use these. You cannot link using the source or static link to the library, or you are essentially GPL (a Red license) but if you dynamically link to an LGPL library, then you can be free to go. Any changes to the library can be made, but you have to treat them as GPL.

So basically if you ship their software using their installer or a loose file but you don’t change the file, you are likely good to go with minimal effort.

You have to include these licenses often times in a popup or when your own license is used.

Red Licenses

GPL
GPL means that anything you write that touches the GPL code must be licensed with GPL as well. Also, if you distribute GPL code, you must provide a “mirror” or be able to provide the GPL code when asked for it. You must also provide your own code (which is now GPL) when asked for it.

People often call GPL a virus as anything that touches it is infected by the GPL as well. However, from another point of view, someone has spent a lot of time giving their code/knowledge to the world and they deserve the right to keep this knowledge free and it is just a way to prevent someone from stealing their knowledge.

Your company can use GPL just fine if two things are true: 1) The feature is isolated and 2) the feature is not really a “differentiator” in our market. For example, a TFPT service. It really wouldn’t matter if a commercial company use GPL because TFTP is isolated to its own service and TFTP is ubiquitous and there are hundreds of different TFPT servers out there.

It may also be possible to that GPL won’t hurt you if you are first to market. If you release code and become a dominate player or market share leader, it might not matter that others can see your code.
3rd Party Commercial
3rd Party Commercial licenses absolutely cannot be used unless the company is willing to sell us the license and we are willing to pay the license fee. There may also be other agreements made in the license negotiation.

You have to include these licenses often times in a popup.

Track your licenses

It is a simple task to track the software you use and the license you use.  Create three lists, Green, Yellow, and Red lists and life will be easy for you. You may only need to review a license once. Once you have places a license in the green list, any software that uses the license is in the green list.

It is also important to keep a copy of the software you use and the license you used to obtain this software. This can be important to do. Imagine if your software uses a BSD licensed tool that is re-licensed using GPL in the next version. You can keep the old BSD licensed version and continue to use it.

Conclusion

Any license but the 3rd party Commercial licenses are possibilities all the time. Only 3rd Party Commercial licenses may be denied you but usually for enough money they are available.

Be thorough and be careful.

Just be aware of the license and know when to use them an when not to.

See a previous post of mine:

Differences between the BSD/FreeBSD Copyrights and the GNU Public License (GPL)

DISCLAIMER

I am not a lawyer. I am not responsible in any way for the misuse of a license based on this post, even if the post is has some piece of data that is blatantly wrong. It is the responsibility of the user of licensed or copyrighted software to make sure the license agreement or copyright is adhered to properly.


Decoupling in all 7 areas of development

There are 7 main development areas and decoupling, especially decoupling using interface-based design, will be most successful when it occurs in all possible areas.

  1. Code – writing code, sharing code, linking to libraries
  2. Test Code – Unit Tests, Mocked tests, coded functional tests
  3. User Experience – UI design.  The UI should be decoupled from code.
  4. Source Control – Code repositories, branching
  5. Build – compiling, versioning, signing, publishing
  6. Install – Any install method such as MSI, EXE, RPM. Any updates or patches.
  7. Localization – Make this independent of build/compiling

If you decouple everywhere, it is easy to remain decoupled. This leads to good architecture – the overall design of your software.

Code

Code should be easy to write and maintain always.

Let’s face it. Coupled code is often the easiest to start with. However, while it is easy to start out using coupled code, it becomes very difficult to use coupled code as a project grows.

Interface-based design is one method of decoupling code. You are still coupled, just instead of coupled to code, you are coupled to an interface that rarely changes and the code that implements that interface is free to be refactored as long as the tests against the interface pass.

If your code is decoupled, you are free to write your code as you will.

Test Code

I often hear someone say they don’t need to use interface-based design because their code is never going to be an API.  This is not true. If you are Unit Testing properly, your code is always going to be an API even if only your Unit Tests and Functional Tests interface with your code/API.

In decoupled code using interface-based design, your interfaces should have 400% coverage.

100% for each of the following:

  • Expected values
  • Null values
  • Empty values
  • Exception causing values

Write Unit Tests that are exhaustive for your interfaces.  The object that implements the interface will be easier to refactor this way because the new refactoring can implement the interface either directly or through an adapter and you will know nothing can be broken in your refactored code because all the tests pass.

All code that touches the system or requires resources not on a clean build system should be mockable. If you use interface-based design your are mockable by default. For your development language, do a search for mocking libraries such as RhinoMocks for C#.  Also, be aware of how to use an adapter or wrapper to allow for mocking, such as SystemWrapper for C#.

User Experience

User Interfaces (UIs) should be developed independent of the back-end code. They should be developed first or at least simultaneously to the back-end code.  This allows for user experience tests to occur early in the process and changes based on the feedback to be easy and quick. Tools to design UIs that allow for customer feedback already exist, such as SketchFlow for rich Windows WPF UIs.

The UI should be decoupled from the code. You should probably have two separate UIs just so you can switch between them to show how the UI is not coupled to the code and can be switched at any time.

Source Control

Decouple your source control. I don’t mean that one team uses Subversion, another GIT, and another TFS. I mean that your project is in its own repository, and has few as possible prerequisites projects as possible. This is made possible by interface-based design. If you have a 10 features, all on top of core functionality, you should have one core functionality repository and 10 feature repositories.

Also, if you source is not decoupled you are tempted to couple your code with other code.  This lead us to build.

Build

Build does not just mean on a build system. Lets start with the developer building on their local machine. A developer should be able to check out a project and build it without any effort beyond the checkout.  Ok, maybe if you are C# developer you need to at least install Visual Studio. But then you should be able to check out a solution, open it, and press F5 to build it and the build should work. If not, your process is broken and developers’ time is wasted.

Now to the build system or CI builds.

Coupled code is hard to build. Dependency loops can occur. Builds have to occur in specific order, and this takes longer.

With interface-based design, you build your interface libraries first and they build almost instantly as they have no real code. Then you simultaneously build everything else.  Your build is extremely fast because you can build everything with different threads simultaneously (or even on different build machines), even for extremely large applications because they only link to the interfaces.

Different parts of your project can and should have different versions. Just because you release YourProduct 3.0 doesn’t mean that the a library hasn’t already matured beyond to 5.1.  And because of your decoupled interface-based design, you can upgrade YourProduct 3.0 to use version 5.2 of the library and it won’t know the difference. This leads right into install.

Install

Installing should be decoupled. If your project is big enough, it is ok to have 100 different installs. Sure, for Windows don’t show 100 items in Add / Remove Programs, just one or a few.  But that doesn’t mean that you don’t have each piece of your product separately installable, patchable, and upgradeable.

Think of a product with four different parts. You should be able to install, upgrade, and patch each of the four parts separately.  The product as a whole can be version 3.0 but different parts can be different versions. You may have a piece that is very mature, at version 5.1 and a piece that was just refactored for your 3.0 release and it is version 1.0.  Your four products could be: 3.0, 5.1, 1.0, 3.0.

If you are properly decoupled and using interface-based design, you can upgrade any of the four parts to a new version without the other three parts having any adverse affects at all.

Localization

It is frustrating to have to wait for a build to see and test your localization.  Sure some people only have to wait for the first build and then can generate their satellite assemblies from there. However, I disagree with any localization strategy that involves build. I cringe when I hear “localization lock down” because the release is soon.  Really? Does it have to be this way?

How can you do this? Decouple text from the software.

Text should stay where text belongs, in text files. Whether it be a property-value-list or an XML, localization should be dynamic. Let the software pull in text dynamically from a text file. Then switching language in a UI is just a matter of changing from one text file set to another (probably as simple as changing a two, three, or five-letter path).

And the text is patchable without build risk.  If you are 1 day from shipping and you realize you have a completely erroneous string, you can edit a text file to fix it without little to no risk.

Edit the text file(s) without a build and run time just picks up the corrected text.

Since the UI was done before or simultaneous to the back-end code, the localization will be done early and changing may be made often.

Conclusion

Decoupling is a massive undertaking and doesn’t just mean to decouple code. Decoupling is methodology that should be used everywhere in all aspects of the software development life cycle.


Feature branching fits the Kanban model – Branching by MMF

I have to say I am a fan of branching for feature or for team.  I think branching for feature, or branching for a Minimal Marketable Feature (MMF), really fits into the Kanban model.

However, decouple first. This article was really good about talking about a decoupling branching strategy.

http://continuousdelivery.com/2011/05/make-large-scale-changes-incrementally-with-branch-by-abstraction/

Once decouple, branch by feature or in the Kanban world, Branch by MMF.

Here are the positive and negatives.

Branch by feature or team (team and feature are similar)

Positive

Indifferent

Negative

Having read all of these. The negatives are important to read.

It seems that a lot of the negatives are eliminated by the following.

  1. Decoupled code
  2. Using Interface-based design (which is a method for decoupling code)
  3. Keeping MMFs as small as possible (which they should be anyway: “Minimal” marketable feature
  4. Merging main to the feature branch daily/weekly
  5. Running tests on CI on feature branches as well as on main
  6. Checkin’s are gated so a failed build/test prevents check in.

Also read the comments as there are real experiences shared there (assuming the author of the comments are sincere).

A successful branch by MMF strategy can be done with any source control tool.

Side Note 1:

I’ve been using GIT lately for a project in my Masters of Computer Science’s Security course. I finally understand why GIT has become the de facto source control for Open Source, because branching on your local machine can be helpful and efficient. The local check out on your dev box IS A BRANCH and can be branched and you can branch by feature or by task locally.

I recently wrote something I couldn’t check in and couldn’t branch it locally with our source control, but I could have with GIT.

Side Note 2:

Another side note: TortoiseGit and TortoiseSVN are both on my dev box now and explorer.exe is constantly at 45% CPU slowing my system.


Visual Studio Black Theme

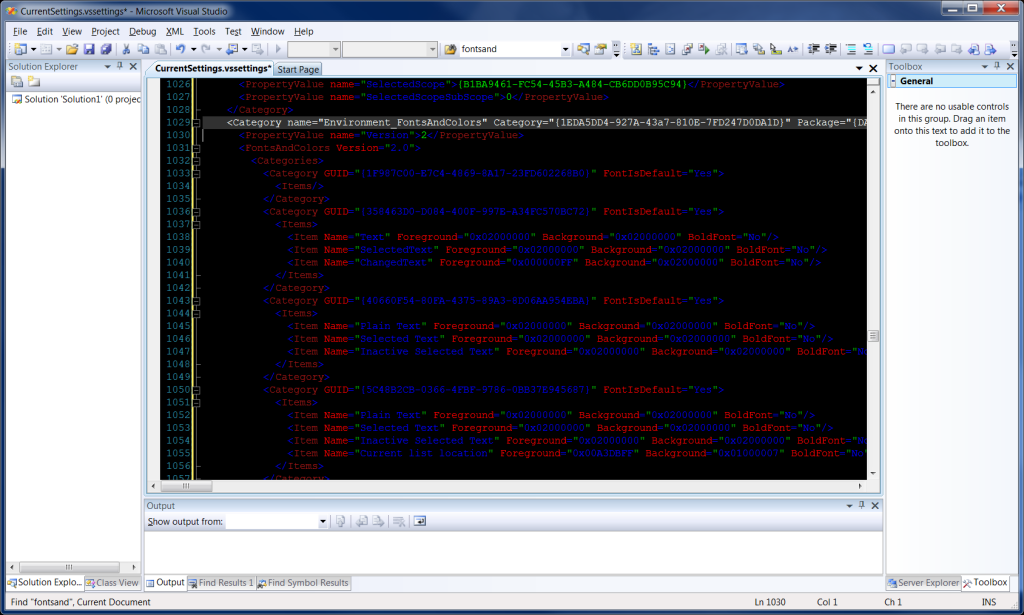
For those of you who want a black background in Visual Studio with colored text as shown in the image below, go ahead and download the settings here.

DOWNLOAD: Visual Studio Black.zip

Here is a screen shot of what this looks like.

Visual Studio 2008 Text Editor with black background

Visual Studio 2008 Text Editor with black background

How to import the theme

  1. Extract the zip file.
  2. In Visual Studio, go to Tools | Import and Export Settings.
  3. Choose Import selected environment settings and click Next.
  4. Choose yes to save your settings and click Next (you never know if you don’t like the theme and you want to go back).
  5. Browse to the extracted Black.vssettings file, make sure it is highlighted, and click Finish.
Happy colors on black.


Unwrapping a packet with Pcap and tcpdump (Part 1 – Ethernet Header)

If you are familiar with the OSI model, you are aware that network packets are wrapped in layers called headers.
Note: Don’t confuse these with C++ headers, these are network packet headers and I will try to always clarify by saying “packet headers” or “C++ headers”.
The goal of this article to demonstrate how to unwrap these packet headers using C++ and the Pcap and tcpdump libraries.

Prerequisites

  • You have read the previous Pcap posts.
  • Basic understanding of the OSI model
  • Basic knowledge of networking

Packet Headers

The first layer of a valid packet will contain an ethernet layer and it will be the first 14 octets. Each octet is a pair of hex numbers.  If you look at a standard TCP Syn packet in Wireshark, it will be displayed in Hex view as follows:

00 18 e7 dc e7 29 00 1f 3b 69 4f 29 08 00 45 00
00 34 0c 93 40 00 80 06 aa 86 c0 a8 00 0f 41 30
41 c3 39 22 00 50 c9 bc 46 2b 00 00 00 00 80 02
20 00 c2 11 00 00 02 04 05 b4 01 03 03 02 01 01
04 02

But you could display the octets in bits using the Bits View to see the binary representation of the packet:

00000000 00011000 11100111 11011100 11100111 00101001 00000000 00011111
00111011 01101001 01001111 00101001 00001000 00000000 01000101 00000000
00000000 00110100 00001100 10010011 01000000 00000000 10000000 00000110
10101010 10000110 11000000 10101000 00000000 00001111 01000001 00110000
01000001 11000011 00111001 00100010 00000000 01010000 11001001 10111100
01000110 00101011 00000000 00000000 00000000 00000000 10000000 00000010
00100000 00000000 11000010 00010001 00000000 00000000 00000010 00000100
00000101 10110100 00000001 00000011 00000011 00000010 00000001 00000001
00000100 00000010

I will use Hex unless demonstrating something that is easier to explain in binary.

Because this is a TCP Syn packet, there actually is no data or payload, just packet headers really, because it is just the first packet of a TCP handshake, but we can still demonstrate the idea of packet headers (and it is easier since the packet is smaller).

The first 14 octets comprises the first packet header and it has three items of data:

00 18 e7 dc e7 29 - (6 octets) Destination Mac Address
00 1f 3b 69 4f 29 - (6 octets) Source Mac Address<
08 00             - (2 octets) Ethertype

So our first job in C++ is to get this packet header data into a struct. Structs are already created in the tcpdump library if you want to use them, but if you want, you can create your own.

We will continue the project we started here: How to read a PCap file from Wireshark with C++

Step 1 – Download tcpdump

  1. Go to the tcpdump developer page:
    http://www.tcpdump.org/#latest-release
  2. Download the latest stable version of WinPcap.
  3. Extract to your solution directory.

Step 2 – Add tcpdump to Additional Include Directories

  1. In Visual Studio, right-click on your project and go to Properties.
  2. Go to Configuration Properties | C/C++ | General.
  3. Note: If you don’t see the C/C++ option, did you forget to do Step 2 above?
  4. For Additional Include Directories add the relative path to the tcpdump-4.2.0 directory you just extracted:
    ..\tcpdump-4.2.0

Step 3 – Add #include statements for packet headers and enums

The ether.h file that comes with tcpdump code has a small amount of code that include three #define and one struct (BSD license and comments omitted for brevity).

#define	ETHERMTU	1500
#define	ETHER_ADDR_LEN		6
struct	ether_header {
	u_int8_t	ether_dhost[ETHER_ADDR_LEN];
	u_int8_t	ether_shost[ETHER_ADDR_LEN];
	u_int16_t	ether_type;
};
#define ETHER_HDRLEN		14

However, there are other C++ headers that provide struct for packet headers as well as useful #define statements and enumerations. Here is a list of some of the tcpdump c++ headers you should become familiar with.

// These provide Packet Headers and Enums
#include <ether.h>
#include <ip.h>
#include <ipproto.h>
#include <tcp.h>
#include <udp.h>
#include <ethertype.h>

Add these to the main.cpp.

We are now ready to start unwrapping the packet headers with c++ code.

Step 4 – Create some helper functions

Let’s move the printing of the packet into its own function, this will get it out of our way.

Lets also create a function to only print parts of the packet.

Also, add a function to convert ethertype values to strings.

First declare them…

// Declare helper functions
void PrintPacket(pcap_pkthdr * header, const u_char *data);
void PrintData(u_int startOctet, u_int endOctet, const u_char *data);
char * get_ethertype(const u_int16_t ethertype);

Then define them….

void PrintPacket(pcap_pkthdr * header, const u_char *data)
{
	// Print using printf. See printf reference:
	// http://www.cplusplus.com/reference/clibrary/cstdio/printf/

	// Show the packet number
	printf("Packet # %i\n", ++packetCount);

	// Show the size in bytes of the packet
	printf("Packet size: %ld bytes\n", header->len);

	// Show a warning if the length captured is different
	if (header->len != header->caplen)
		printf("Warning! Capture size different than packet size: %ld bytes\n", header->len);

	// Show Epoch Time
	printf("Epoch Time: %ld:%ld seconds\n", header->ts.tv_sec, header->ts.tv_usec);

	// loop through the packet and print it as hexidecimal representations of octets
	// We also have a function that does this similarly below: PrintData()
	for (u_int i=0; (i < header->caplen ) ; i++)
	{
		// Start printing on the next after every 16 octets
		if ( (i % 16) == 0) printf("\n");

		// Print each octet as hex (x), make sure there is always two characters (.2).
		printf("%.2x ", data[i]);
	}
	printf("\n\n");
}

void PrintData(u_int startOctet, u_int endOctet, const u_char *data)
{
	for (u_int i = startOctet; i <= endOctet; i++)
	{
		// Print each octet as hex (x), make sure there is always two characters (.2).
		printf("%.2x ", data[i]);
	}
	printf("\n");
}

// Returns a string representation of the common Ethertype
char * get_ethertype(const u_int16_t ethertype)
{
	switch(ethertype)
	{
	case ETHERTYPE_IP:
		return "IPv4";
	case ETHERTYPE_IPV6:
		return "IPv6";
	case ETHERTYPE_ARP:
		return "ARP";
	default:
		return "Unknown";
	}
}

Step 5 – Unwrapping the first packet header with the ether_header struct

Once we have printed the packet out, we are now going to print details of the packet.

  1. Create a pointer to an ether_header struct.
  2. Assign it the same memory address as the data pointer.
const struct ether_header *ethernet;
ethernet = (struct ether_header*)(data);

Now print out the three items in the struct: Destination Mac, Source Mac, and Ethertype.

// Print Destination Mac Address
printf("Dst MAC: ");
PrintData(0,5,ethernet->ether_dhost);

// Print Source Mac Address
printf("Src MAC: ", ethernet->ether_shost);
PrintData(0,5,ethernet->ether_shost);

// Print EtherType
printf("Ethertype: %s (%#.4x)\n", get_ethertype(ethernet->ether_type), ethernet->ether_type);

Everything should print fine except the ethertype. It is 0x0080 instead of 0x8000. In the next step we will fix this.

Step 6 – Fix the bit order of the ether_type

We are going to use the ntohs() function to fix the bits. This is defined on windows in the Ws2_32.lib library, which is not included, so we must include it.

  1. In Visual Studio, right-click on your project and go to Properties.
  2. Go to Configuration Properties | Linker | Input.
  3. For Additional Dependencies, add the following:
    Ws2_32.lib;

Now we can go ahead and use the ntohs() function in our code.

// Print EtherType
u_short ethertype = ntohs(ethernet->ether_type);
printf("Ethertype: %s (%#.4x)\n", get_ethertype(ethertype), ethertype);

Lets end here for now. We have successfully unwrapped the first packet header.

Here is the full main.cpp file.

/*
	Copyright 2011 Rhyous. All rights reserved.

	Redistribution and use in source and binary forms, with or without modification, are
	permitted provided that the following conditions are met:

	   1. Redistributions of source code must retain the above copyright notice, this list of
		  conditions and the following disclaimer.

	   2. Redistributions in binary form must reproduce the above copyright notice, this list
		  of conditions and the following disclaimer in the documentation and/or other materials
		  provided with the distribution.

	THIS SOFTWARE IS PROVIDED BY Rhyous ''AS IS'' AND ANY EXPRESS OR IMPLIED
	WARRANTIES, INCLUDING, BUT NOT LIMITED TO, THE IMPLIED WARRANTIES OF MERCHANTABILITY AND
	FITNESS FOR A PARTICULAR PURPOSE ARE DISCLAIMED. IN NO EVENT SHALL Rhyous OR
	CONTRIBUTORS BE LIABLE FOR ANY DIRECT, INDIRECT, INCIDENTAL, SPECIAL, EXEMPLARY, OR
	CONSEQUENTIAL DAMAGES (INCLUDING, BUT NOT LIMITED TO, PROCUREMENT OF SUBSTITUTE GOODS OR
	SERVICES; LOSS OF USE, DATA, OR PROFITS; OR BUSINESS INTERRUPTION) HOWEVER CAUSED AND ON
	ANY THEORY OF LIABILITY, WHETHER IN CONTRACT, STRICT LIABILITY, OR TORT (INCLUDING
	NEGLIGENCE OR OTHERWISE) ARISING IN ANY WAY OUT OF THE USE OF THIS SOFTWARE, EVEN IF
	ADVISED OF THE POSSIBILITY OF SUCH DAMAGE.

	The views and conclusions contained in the software and documentation are those of the
	authors and should not be interpreted as representing official policies, either expressed
	or implied, of Rhyous.
/*

/*
* How to read a packet capture file.
*/

/*
* Step 1 - Add includes and namespace
*/
#include <string>
#include <iostream>
#include <pcap.h>

// These provide headers and enums
#include <ether.h>
#include <ip.h>
#include <ipproto.h>
#include <tcp.h>
#include <udp.h>
#include <ethertype.h>

using namespace std;

// Declare helper functions
void PrintPacket(pcap_pkthdr * header, const u_char *data);
void PrintData(u_int startOctet, u_int endOctet, const u_char *data);
u_short get_ethertype_value(const u_char *data);
char * get_ethertype(const u_int16_t ethertype);

// static values
static u_int packetCount = 0;

// Defines
#define SIZE_ETHERNET 14

int main(int argc, char *argv[])
{
	/*
	* Step 2 - Get a file name
	*/

	string file = "C:\\users\\jared\\testfiles\\smallcapture.pcap";

	/*
	* Step 3 - Create an char array to hold the error.
	*/

	// Note: errbuf in pcap_open functions is assumed to be able to hold at least PCAP_ERRBUF_SIZE chars
	//       PCAP_ERRBUF_SIZE is defined as 256.
	// http://www.winpcap.org/docs/docs_40_2/html/group__wpcap__def.html
	char errbuff[PCAP_ERRBUF_SIZE];

	/*
	* Step 4 - Open the file and store result in pointer to pcap_t
	*/

	// Use pcap_open_offline
	// http://www.winpcap.org/docs/docs_41b5/html/group__wpcapfunc.html#g91078168a13de8848df2b7b83d1f5b69
	pcap_t * pcap = pcap_open_offline(file.c_str(), errbuff);

	/*
	* Step 5 - Create a header and a data object
	*/

	// Create a header object:
	// http://www.winpcap.org/docs/docs_40_2/html/structpcap__pkthdr.html
	struct pcap_pkthdr *header;

	// Create a character array using a u_char
	// u_char is defined here:
	// C:\Program Files (x86)\Microsoft SDKs\Windows\v7.0A\Include\WinSock2.h
	// typedef unsigned char   u_char;
	const u_char *data;

	/*
	* Step 6 - Loop through packets and print them to screen
	*/
	while (int returnValue = pcap_next_ex(pcap, &header, &data) >= 0)
	{
		// I moved the code for printing the packet as hex values
		// to a function
		PrintPacket(header, data);

		// Print the packet in details
		printf("Packet Details\n");

		// Unwrap ether_header (first 14 bytes)
		const struct ether_header *ethernet;
		ethernet = (struct ether_header*)(data);

		// Print Destination Mac Address
		printf("Dst MAC: ");
		PrintData(0,5,ethernet->ether_dhost);

		// Print Source Mac Address
		printf("Src MAC: ", ethernet->ether_shost);
		PrintData(0,5,ethernet->ether_shost);

		// Print EtherType
		u_short ethertype = ntohs(ethernet->ether_type);
		printf("Ethertype: %s (%#.4x)\n", get_ethertype(ethertype), ethertype);

		// Add two lines between packets
		printf("\n\n");
	}
}

void PrintPacket(pcap_pkthdr * header, const u_char *data)
{
	// Print using printf. See printf reference:
	// http://www.cplusplus.com/reference/clibrary/cstdio/printf/

	// Show the packet number
	printf("Packet # %i\n", ++packetCount);

	// Show the size in bytes of the packet
	printf("Packet size: %ld bytes\n", header->len);

	// Show a warning if the length captured is different
	if (header->len != header->caplen)
		printf("Warning! Capture size different than packet size: %ld bytes\n", header->len);

	// Show Epoch Time
	printf("Epoch Time: %ld:%ld seconds\n", header->ts.tv_sec, header->ts.tv_usec);

	// loop through the packet and print it as hexidecimal representations of octets
	// We also have a function that does this similarly below: PrintData()
	for (u_int i=0; (i < header->caplen ) ; i++)
	{
		// Start printing on the next after every 16 octets
		if ( (i % 16) == 0) printf("\n");

		// Print each octet as hex (x), make sure there is always two characters (.2).
		printf("%.2x ", data[i]);
	}
	printf("\n\n");
}

void PrintData(u_int startOctet, u_int endOctet, const u_char *data)
{
	for (u_int i = startOctet; i <= endOctet; i++)
 	{
		// Print each octet as hex (x), make sure there is always two characters (.2).
		printf("%.2x ", data[i]);
	}
	printf("\n");
}

u_short get_ethertype_value(const u_char *data)
{
	u_short ethertype = data[12] << 8;
	ethertype += data[13];
	return ethertype;
}

// Returns a string representation of the common Ethertype
char * get_ethertype(const u_int16_t ethertype)
{
	switch(ethertype)
	{
	case ETHERTYPE_IP:
		return "IPv4";
	case ETHERTYPE_IPV6:
		return "IPv6";
	case ETHERTYPE_ARP:
		return "ARP";
	default:
		return "Unknown";
	}
}

Stay tuned for Unwrapping a packet with Pcap and tcpdump (Part 2 – IP Header)


How to read a PCap file from Wireshark with C++

In my Computer Security class I am taking as part of my Masters of Computer Science course, we need to parse a Pcap dump file.

Prerequisites

It is expected you have Visual Studio 2010 already. It may work the same with Visual C++ 2010.

Step 1 – Install Wireshark

We are going to use Wireshark to get a packet capture. Wireshark is a nice easy tool to get a packet capture.

http://www.wireshark.org

Make sure to install Wireshark and let Wireshark install WinPcap when it prompts you.

Step 2 – Create a new project in Visual Studio

I already have post on creating a WinPcap project in Visual Studio and getting it to compile, so follow it.

How to compile WinPcap with Visual Studio 2010?

Step 3 – Get a packet capture.

  1. Open Wireshark and start capturing file.
  2. Open your browser or go to a few sites.
  3. Stop the packet capture.
  4. Save the packet capture to a file.
    I named my file smallcapture.pcap.

Step 4 – Add C++ code to read the packet capture

I am going to paste the code for you and put the comments and steps in the code.

/*
* How to read a packet capture file.
*/

/*
* Step 1 - Add includes
*/
#include <string>
#include <iostream>
#include <pcap.h>

using namespace std;

int main(int argc, char *argv[])
{
	/*
	* Step 2 - Get a file name
	*/

	string file = "C:\\users\\jared\\testfiles\\smallcapture.pcap";

	/*
	* Step 3 - Create an char array to hold the error.
	*/

	// Note: errbuf in pcap_open functions is assumed to be able to hold at least PCAP_ERRBUF_SIZE chars
	//       PCAP_ERRBUF_SIZE is defined as 256.
	// http://www.winpcap.org/docs/docs_40_2/html/group__wpcap__def.html
	char errbuff[PCAP_ERRBUF_SIZE];

	/*
	* Step 4 - Open the file and store result in pointer to pcap_t
	*/

	// Use pcap_open_offline
	// http://www.winpcap.org/docs/docs_41b5/html/group__wpcapfunc.html#g91078168a13de8848df2b7b83d1f5b69
	pcap_t * pcap = pcap_open_offline(file.c_str(), errbuff);

	/*
	* Step 5 - Create a header and a data object
	*/

	// Create a header object:
	// http://www.winpcap.org/docs/docs_40_2/html/structpcap__pkthdr.html
	struct pcap_pkthdr *header;

	// Create a character array using a u_char
	// u_char is defined here:
	// C:\Program Files (x86)\Microsoft SDKs\Windows\v7.0A\Include\WinSock2.h
	// typedef unsigned char   u_char;
	const u_char *data;

	/*
	* Step 6 - Loop through packets and print them to screen
	*/
	u_int packetCount = 0;
	while (int returnValue = pcap_next_ex(pcap, &header, &data) >= 0)
	{
		// Print using printf. See printf reference:
		// http://www.cplusplus.com/reference/clibrary/cstdio/printf/

		// Show the packet number
		printf("Packet # %i\n", ++packetCount);

		// Show the size in bytes of the packet
		printf("Packet size: %d bytes\n", header->len);

		// Show a warning if the length captured is different
		if (header->len != header->caplen)
			printf("Warning! Capture size different than packet size: %ld bytes\n", header->len);

		// Show Epoch Time
		printf("Epoch Time: %d:%d seconds\n", header->ts.tv_sec, header->ts.tv_usec);

		// loop through the packet and print it as hexidecimal representations of octets
		// We also have a function that does this similarly below: PrintData()
		for (u_int i=0; (i < header->caplen ) ; i++)
		{
			// Start printing on the next after every 16 octets
			if ( (i % 16) == 0) printf("\n");

			// Print each octet as hex (x), make sure there is always two characters (.2).
			printf("%.2x ", data[i]);
		}

		// Add two lines between packets
		printf("\n\n");
	}
}

You are now reading packets in C++. Now you can start working on differentiating the packet types.

Resources

  • http://www.tcpdump.org/pcap.html
  • http://www.tcpdump.org/pcap3_man.html

How to compile WinPcap with Visual Studio 2010?

The documentation for WinPcap was pretty poor. The last update for Visual Studio was for 2005, so this hasn’t been updated for Visual Studio 2008 or Visual Studio 2010.

Also, the steps don’t say what type of C++ project was created. This is probably why it missing information, such as the fact that WIN32 must be defined.

So I thought I would get it working and provide a post someone could actually find. I had to read the pcap.h file myself to figure out what was missing in the documentation.

Prerequisites

It is expected you have Visual Studio 2010 already. It may work the same with Visual C++ 2010.

Step 1 – Create a new empty project

  1. In Visual Studio go to File | New | Project.
  2. Select Other Languages | Visual C++ | General | Empty Project
  3. Enter a Project name, Location, and Solution Name.
  4. Take note of the solution directory.
  5. Click OK.

This creates the following directory structure:

.\WinPcapExample\WinPcapExample.sdf
.\WinPcapExample\WinPcapExample.sln
.\WinPcapExample\WinPcapExample\
.\WinPcapExample\WinPcapExample\WinPcapExample.vcxproj
.\WinPcapExample\WinPcapExample\WinPcapExample.vcxproj.filters
.\WinPcapExample\WinPcapExample\WinPcapExample.vcxproj.user

Step 2 – Create a main.cpp file

  1. Right-click on the project and choose Add | New Item.
  2. Select C++ File (.cpp)
  3. Enter the name as Main.cpp.
  4. Click Ok.
  5. Add the standard main function to the file:
    int main(int argc, char *argv[])
    {
    }
    
  6. Save the file.

Step 3 – Download and extract WinPCap

  1. Go to the WinPcap developer page:
    http://www.winpcap.org/devel.htm
  2. Download the latest stable version of WinPcap.
  3. Extract to your solution directory.

Step 4 – Configure the Project properties

Now that the needed resources are in your solution directory, you can configure your project to access them.

  1. In Visual Studio, right-click on your project and choose Properties.
  2. Make the following configuration changes to your project:

Configuration 1 – Add Additional Include Directories

  1. Go to Configuration Properties | C/C++ | General.
    Note: If you don’t see the C/C++ option, did you forget to do Step 2 above?
  2. For Additional Include Directories add the relative path:
    ..\WpdPack\Include

Configuration 2 – Add Preprocessor Definitions

  1. Go to Configuration Properties | C/C++ | Preprocessor.
  2. For Preprocessor Definitions, add these three:
    WIN32;WPCAP;HAVE_REMOTE.

Preprocessor Definintions

Important: If you fail to add WIN32, your compile will fail as follows:

Error	1	error C1083: Cannot open include file: 'sys/time.h': No such file or directory	c:\users\jared\documents\visual studio 2010\projects\c++\readpcapexample\libs\winpcap-4.1.2\include\pcap\pcap.h	47	1	ReadPCapExample

Configuration 3 – Add Additional Library Directories

  1. Go to Configuration Properties | Linker | General.
  2. For Additional Library Directories enter the following:
    ..\WpdPack\Lib
AdditionalLibraryDirectories

Configuration 4 – Add Additional Dependencies

  1. Go to Configuration Properties | Linker | Input.
  2. For Additional Dependencies, add the following:
    winpcap.lib;Packet.lib;

Additional Dependencies

Note: I removed the default libraries. You may need some of them:
kernel32.lib;user32.lib;gdi32.lib;winspool.lib;comdlg32.lib;advapi32.lib;shell32.lib;ole32.lib;oleaut32.lib;uuid.lib;odbc32.lib;odbccp32.lib;

Step 5 – Include pcap.h

  1. Open the Main.cpp file.
  2. Include pcap.h.
    #include
    
    int main(int argc, char *argv[])
    {
    }
    
  3. Try to compile and it should work.
You are now ready to develop using WinPcap.