How to make the WPF Canvas mouse click event work?

The problem with Canvas is that when you click on it, you don’t actually get the click event to occur unless you have a background that is not white.

One trick if you want white is to use white -1 or #FFFFFE or possibly Transparent (unless the parent is not white). So no one can tell it isn’t white, because it is as close to white as can be without actually being white.

Now your click event can occur.

Also you need to make the Canvas focusable.

Example 1 – Getting a Canvas to take keyboard focus from a TextBox with a mouse click

Here is how you make this happen.

  1. First create a new WPF Project.
  2. Add a Canvas and clear the any sizing.
  3. Change the Canvas Background to #FFFFFE.
  4. Set the Canvas to be Focusable.
  5. Add a TextBox in the Canvas.
  6. Create a mouse down event for the Canvas.

MainWindow.xaml

<Window x:Class="TextBoxInCanvas.MainWindow"
 xmlns="http://schemas.microsoft.com/winfx/2006/xaml/presentation"
 xmlns:x="http://schemas.microsoft.com/winfx/2006/xaml"
        Title="MainWindow" Height="350" Width="525">
    <Grid Name="MainGrid">
 <canvas name="<span class=" span="" class="hiddenSpellError" pre="class ">hiddenspellerror="" pre="">canvas1" Focusable="True" Background="#FFFFFE" MouseDown="canvas1_MouseDown"></canvas>
 <TextBox Height="23" Name="textBox1" Width="120" IsEnabled="True" Canvas.Left="81" Canvas.Top="115"
                     PreviewKeyDown="textBox1_PreviewKeyDown"/>
        </Canvas>
    </Grid>
</Window>

MainWindow.xaml.cs

using System.Windows;
using System.Windows.Input;
namespace TextBoxInCanvas
{
    /// <summary>
    /// Interaction logic for MainWindow.xaml
    /// </summary>
    public partial class MainWindow : Window
    {
        public MainWindow()
        {
            InitializeComponent();
        }

        private void canvas1_MouseDown(object sender, MouseButtonEventArgs e)
        {
            Keyboard.Focus(canvas1);
        }

        private void textBox1_PreviewKeyDown(object sender, KeyEventArgs e)
        {
            if (Key.Enter == e.Key)
                Keyboard.Focus(canvas1);
        }
    }
}

Now your click event occurs when the Canvas is clicked and keyboard focus is taken from the TextBox.


C# is

C# is

…a higher level programming language.

…a developer friendly language.

…your garbage man, because it cleans up your garbage for you.

…a cross-platform language that can run anywhere the framework exists…use Mono for non-windows platforms.

…the development language of business.

…the fastest growing development language.

…an object-oriented programming language.

…the most popular language for interacting with .NET Framework.


A Hello World Android App in C#

This post is a continuation of Writing Android apps in C# using MonoDroid.

Writing your first MonoDroid project

Now that you have installed and configured MonoDroid and its prerequisites, you are ready to create your first project.

  1. Open Visual Studio.
  2. Go to File | New | Project.
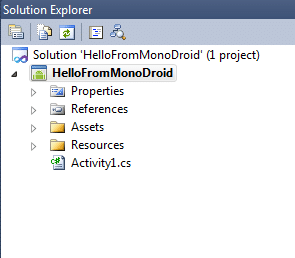
  3. Choose “Mono for Android”. This is a new project type added by the Mono for Android Visual Studio 2010 Plugin.
  4. Give the project a name and click OK.

You now have a sample MonoDroid app.

Running your first MonoDroid App in an Emulator

Now that you have a sample MonoDroid app, learning to deploy it to an Android device and to test it is the next step.

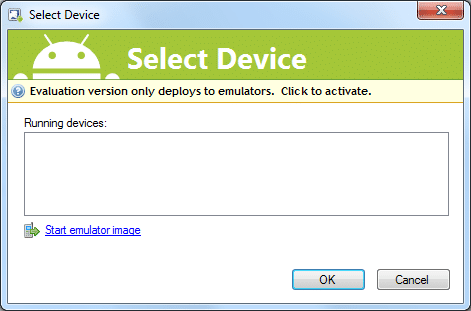
  1. Simply press F5 in your “Mono for Android” Visual Studio project. The following screen appears however, there are no running Android devices.
  2. Click the link to “Start emulator image”.
  3. Wait until your Android emulator starts and you see the graphical display and not just a text display.
  4. Select your emulator from the Running Devices list and click OK.
  5. Wait. It is going to deploy the mono library to your emulator and deploy your app and this can take time.

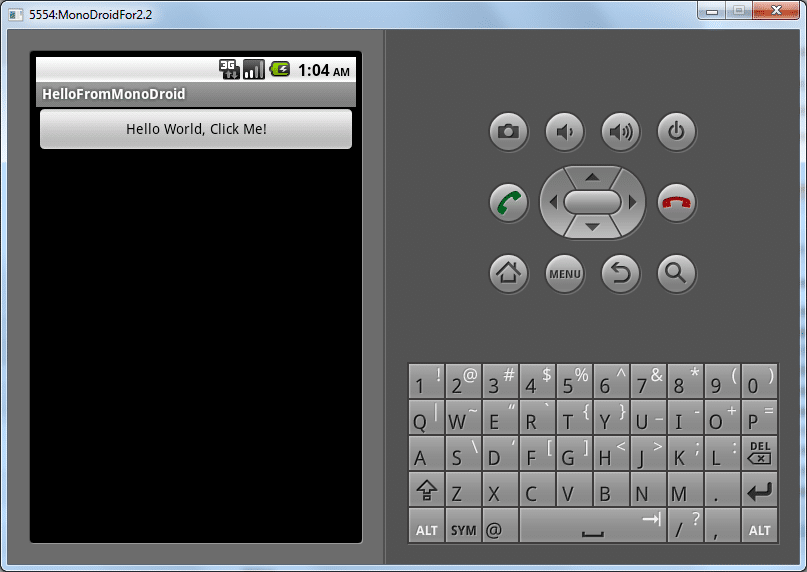
You application should now be running in your Android emulator.

This is just a sample application that increments a counter and displays how many times you have click the button.

You are now ready to start writing your own application.

More Tutorials

Xamarin has multiple Tutorials to help you get a little further along.

MonoDroid Tutororials by Xamarin


Writing Android apps in C# using MonoDroid

As C# developers, many of us would prefer to write Android Apps in C# as well. Novell had promised us MonoDroid, but we were quite concerned as to whether MonoDroid would ever be released when Novell was dismantled.

However, Xamarin spawned from the ashes like a phoenix to restore the viability of MonoDroid, restoring our hopes to writing in C# for the Android platform.

Though I am hopeful that MonoDroid will become popular allowing C# to be a commonly used language for Android devices, there is still some question as to whether Xamarin and its MonoDroid product will survive.

Xamarin is a new company and needs to survive first. Its business is to sell MonoDroid, which is not open source, but is a proprietary product. Unfortunately, MonoDroid may cost too much, preventing adoption among app developers. Xamarin requires a customer base and a continual adoption rate if it is going to survive. If the company folds, what is going to happen to the library and the apps that use it?

Is Development with MonoDroid Free? Yes and No!

Yes and no.

Yes because anybody can use and develop with MonoDroid at no cost. It isn’t until you need to publish an app to the app store that you need to buy a license. You can use the MonoDroid trial for as long as you want. Here is a quote from the trial website. [2]

The evaluation version of Mono for Android does not expire, but enables development and testing against the Android Emulator only.

No, because you need to buy a license once either of the following become true:

  1. You need to test your code directly on a real device and not just an emulated device
  2. You are ready to publish an app to the app store

So what is the cost of MonoDroid? Depends on if you buy Professional, Enterprise, or Enterprise Priority. On the Xamarin store, the following table can be found. To see it you have to add MonoDroid to your cart and then click the “Show product comparison” link. [1]

Professional Enterprise Enterprise Priority
Deploy to your devices Has this feature Has this feature Has this feature
Publish to app stores Has this feature Has this feature Has this feature
Enterprise distribution Has this feature Has this feature
Priority support queue Has this feature
Guaranteed response time Has this feature
License expiration Never Never Never
Update subscription 1 Year 1 Year 1 Year
License usage Original User Seat Seat
Price (USD) $399 $999 $2,499

These costs are very low for business or enterprise customers who have C# developers and want to write Android apps.  The cost of training a C# developer to develop apps for Android in Java may be far greater than training them to develop apps for Android using C# and buying a MonoDroid license.

Is MonoDroid easy to set up?

Update
MonoDroid is not down to a one-click installer.

Here is the old method of Installing without the One-click Installer

MonoDroid is simple to set up.  Xamarin has some simple steps that can be found on their web site. They have MonoDroid installation instructions for installing MonoDroid for use with any of three environments.

  1. Visual Studio  (Important! Visual Studio Express is not supported)
  2. MonoDevelop on Windows
  3. MonoDevelop on Mac OSX

If you don’t have a Visual Studio license and you can’t afford one, then go with MonoDevelop because Visual Studio Express is noted to be enough [3].

However, the Visual Studio install is four simple steps.

  1. Install the Java SDK
  2. Install the Android SDK
  3. Configure your simulator
  4. Install the Mono for Android Visual Studio 2010 Plugin

These are very easy steps to complete, and I won’t repeat the steps here, but once you complete them, you are ready to start writing Android apps in C#.

Once you feel you have everything installed, click the following link to continue reading.

Writing your first MonoDroid project

http://android.xamarin.com/Installation/Windows


In C#, how to determine if a class or an instance of the class implements an interface

I needed to determine if a class or one of its instances implements and interface.  So I created this test project to see if this works.

Turns out it is really easy to do. Here is a test project that I used to learn. Just create a new console project and stick this code in the Program.cs and check it out.

namespace TestIfThisImplementsInterface
{
    class Program
    {
        static void Main(string[] args)
        {
            // Test if the type or its parent implements the interface
            bool bCarClass = typeof(IDrivable).IsAssignableFrom(typeof(Car));             // True
            bool bFordFocusClass = typeof(IDrivable).IsAssignableFrom(typeof(FordFocus)); // True
            bool bJunkerClass = typeof(IDrivable).IsAssignableFrom(typeof(Junker));       // False

            // Test if the exact type and not its parent implements the derived type
            bool bCarClassEx = typeof(Car).GetInterface(typeof(IDrivable).FullName) != null;           // True
            bool bFordFocusClassEx = typeof(Vehicle).GetInterface(typeof(IDrivable).FullName) != null; // False
            bool bJunkerClassEx = typeof(Junker).GetInterface(typeof(IDrivable).FullName) != null;     // True

            // Test if an instance implements or derivces from an oject that implements the interface
            bool bCarInstance = new Car() is IDrivable;             // True
            bool bFordFocusInstance = new FordFocus() is IDrivable; // True
            bool bJunkerInstance = new Junker() is IDrivable;       // False

            // Test if an instance implements or derivces from an oject that implements the interface
            bool bCarInstanceEx = new Car().GetType().GetInterface(typeof(IDrivable).FullName) != null;             // True
            bool bFordFocusInstanceEx = new FordFocus().GetType().GetInterface(typeof(IDrivable).FullName) != null; // False
            bool bJunkerInstanceEx = new Junker().GetType().GetInterface(typeof(IDrivable).FullName) != null;       // False

            // Show that the test can be in the parent class but the actual class is what is tested
            // This is actually what I needed. Glad it worked!
            bool bCarParentFunction = new Car().IsDrivable;             // True
            bool bFordFocusParentFunction = new FordFocus().IsDrivable; // True
            bool bJunkerParentFunction = new Junker().IsDrivable;       // False
        }
    }

    public interface IDrivable
    {
        void Drive();
    }

    public class Vehicle
    {
        public virtual bool IsDrivable
        {
            get { return this is IDrivable; }
        }
    }

    public class Car : Vehicle, IDrivable
    {
        #region IDrivable Members
        public void Drive()
        {
            // Drive code here
        }
        #endregion
    }

    public class FordFocus : Car
    {
    }

    public class Junker : Vehicle
    {

    }
}

Resource:
http://www.hanselman.com/blog/DoesATypeImplementAnInterface.aspx


LANDesk Support Tools vs Windows Side by Side (SXS)

I work for LANDesk, in case you have forgotten, and I have this LANDesk add-on called LANDesk Support Tools.

So I couldn’t figure out why my Send Message command in my LANDesk Support Tools wouldn’t work in 64 bit. It kept saying that msg.exe wasn’t on the remote client. Of course, I checked and it was right there in c:\windows\system32\msg.exe.

However, I was able to spend some more time on this and it turns out that if a 32 bit application (such as the LANDesk agent) goes to work, an executable that only exists in 64 bit form, such as msg.exe, is not exactly “visible” to the 32 bit application.

So I have to call it using c:\windows\sysnative\msg.exe. Now I just have to figure out how best to implement this difference in my LANDesk Support Tools so the command works for both 32 bit and 64 bit versions of Windows 7.


How to authenticate and access the registry remotely using C#

Connecting to the remote registry of another workstation or server can be done as long as authentication has been done first.

Here is an example for connecting to remote registry.

  1. Create a new C# Console project in Visual Studio.
  2. Add a new class called NetworkShare. I know I got this from another site sometime last year and added to it, but I didn’t document the source web site.
    using System;
    using System.Runtime.InteropServices;
    
    using BOOL = System.Int32;
    
    namespace NetworkConnection
    {
        public class NetworkShare
        {
            #region Member Variables
            [DllImport("mpr.dll")]
            private static extern int WNetAddConnection2A(ref NetResource refNetResource, string inPassword, string inUsername, int inFlags);
            [DllImport("mpr.dll")]
            private static extern int WNetCancelConnection2A(string inServer, int inFlags, int inForce);
    
            private String _Server;
            private String _Share;
            private String _DriveLetter = null;
            private String _Username = null;
            private String _Password = null;
            private int _Flags = 0;
            private NetResource _NetResource = new NetResource();
            BOOL _AllowDisconnectWhenInUse = 0; // 0 = False; Any other value is True;
            #endregion
    
            #region Constructors
            /// <summary>
            /// The default constructor
            /// </summary>
            public NetworkShare()
            {
            }
    
            /// <summary>
            /// This constructor takes a server and a share.
            /// </summary>
            public NetworkShare(String inServer, String inShare)
            {
                _Server = inServer;
                _Share = inShare;
            }
    
            /// <summary>
            /// This constructor takes a server and a share and a local drive letter.
            /// </summary>
            public NetworkShare(String inServer, String inShare, String inDriveLetter)
            {
                _Server = inServer;
                _Share = inShare;
                DriveLetter = inDriveLetter;
            }
    
            /// <summary>
            /// This constructor takes a server, share, username, and password.
            /// </summary>
            public NetworkShare(String inServer, String inShare, String inUsername, String inPassword)
            {
                _Server = inServer;
                _Share = inShare;
                _Username = inUsername;
                _Password = inPassword;
            }
    
            /// <summary>
            /// This constructor takes a server, share, drive letter, username, and password.
            /// </summary>
            public NetworkShare(String inServer, String inShare, String inDriveLetter, String inUsername, String inPassword)
            {
                _Server = inServer;
                _Share = inShare;
                _DriveLetter = inDriveLetter;
                _Username = inUsername;
                _Password = inPassword;
            }
            #endregion
    
            #region Properties
            public String Server
            {
                get { return _Server; }
                set { _Server = value; }
            }
    
            public String Share
            {
                get { return _Share; }
                set { _Share = value; }
            }
    
            public String FullPath
            {
                get { return string.Format(@"\\{0}\{1}", _Server, _Share); }
            }
    
            public String DriveLetter
            {
                get { return _DriveLetter; }
                set { SetDriveLetter(value); }
            }
    
            public String Username
            {
                get { return String.IsNullOrEmpty(_Username) ? null : _Username; }
                set { _Username = value; }
            }
    
            public String Password
            {
                get { return String.IsNullOrEmpty(_Password) ? null : _Username; }
                set { _Password = value; }
            }
    
            public int Flags
            {
                get { return _Flags; }
                set { _Flags = value; }
            }
    
            public NetResource Resource
            {
                get { return _NetResource; }
                set { _NetResource = value; }
            }
    
            public bool AllowDisconnectWhenInUse
            {
                get { return Convert.ToBoolean(_AllowDisconnectWhenInUse); }
                set { _AllowDisconnectWhenInUse = Convert.ToInt32(value); }
            }
    
            #endregion
    
            #region Functions
            /// <summary>
            /// Establishes a connection to the share.
            ///
            /// Throws:
            ///
            ///
            /// </summary>
            public int Connect()
            {
                _NetResource.Scope = (int)Scope.RESOURCE_GLOBALNET;
                _NetResource.Type = (int)Type.RESOURCETYPE_DISK;
                _NetResource.DisplayType = (int)DisplayType.RESOURCEDISPLAYTYPE_SHARE;
                _NetResource.Usage = (int)Usage.RESOURCEUSAGE_CONNECTABLE;
                _NetResource.RemoteName = FullPath;
                _NetResource.LocalName = DriveLetter;
    
                return WNetAddConnection2A(ref _NetResource, _Password, _Username, _Flags);
            }
    
            /// <summary>
            /// Disconnects from the share.
            /// </summary>
            public int Disconnect()
            {
                int retVal = 0;
                if (null != _DriveLetter)
                {
                    retVal = WNetCancelConnection2A(_DriveLetter, _Flags, _AllowDisconnectWhenInUse);
                    retVal = WNetCancelConnection2A(FullPath, _Flags, _AllowDisconnectWhenInUse);
                }
                else
                {
                    retVal = WNetCancelConnection2A(FullPath, _Flags, _AllowDisconnectWhenInUse);
                }
                return retVal;
            }
    
            private void SetDriveLetter(String inString)
            {
                if (inString.Length == 1)
                {
                    if (char.IsLetter(inString.ToCharArray()[0]))
                    {
                        _DriveLetter = inString + ":";
                    }
                    else
                    {
                        // The character is not a drive letter
                        _DriveLetter = null;
                    }
                }
                else if (inString.Length == 2)
                {
                    char[] drive = inString.ToCharArray();
                    if (char.IsLetter(drive[0]) && drive[1] == ':')
                    {
                        _DriveLetter = inString;
                    }
                    else
                    {
                        // The character is not a drive letter
                        _DriveLetter = null;
                    }
                }
                else
                {
                    // If we get here the value passed in is not valid
                    // so make it null.
                    _DriveLetter = null;
                }
            }
            #endregion
    
            #region NetResource Struct
            [StructLayout(LayoutKind.Sequential)]
            public struct NetResource
            {
                public uint Scope;
                public uint Type;
                public uint DisplayType;
                public uint Usage;
                public string LocalName;
                public string RemoteName;
                public string Comment;
                public string Provider;
            }
            #endregion
    
            #region Enums
            public enum Scope
            {
                RESOURCE_CONNECTED = 1,
                RESOURCE_GLOBALNET,
                RESOURCE_REMEMBERED,
                RESOURCE_RECENT,
                RESOURCE_CONTEXT
            }
    
            public enum Type : uint
            {
                RESOURCETYPE_ANY,
                RESOURCETYPE_DISK,
                RESOURCETYPE_PRINT,
                RESOURCETYPE_RESERVED = 8,
                RESOURCETYPE_UNKNOWN = 4294967295
            }
    
            public enum DisplayType
            {
                RESOURCEDISPLAYTYPE_GENERIC,
                RESOURCEDISPLAYTYPE_DOMAIN,
                RESOURCEDISPLAYTYPE_SERVER,
                RESOURCEDISPLAYTYPE_SHARE,
                RESOURCEDISPLAYTYPE_FILE,
                RESOURCEDISPLAYTYPE_GROUP,
                RESOURCEDISPLAYTYPE_NETWORK,
                RESOURCEDISPLAYTYPE_ROOT,
                RESOURCEDISPLAYTYPE_SHAREADMIN,
                RESOURCEDISPLAYTYPE_DIRECTORY,
                RESOURCEDISPLAYTYPE_TREE,
                RESOURCEDISPLAYTYPE_NDSCONTAINER
            }
    
            public enum Usage : uint
            {
                RESOURCEUSAGE_CONNECTABLE = 1,
                RESOURCEUSAGE_CONTAINER = 2,
                RESOURCEUSAGE_NOLOCALDEVICE = 4,
                RESOURCEUSAGE_SIBLING = 8,
                RESOURCEUSAGE_ATTACHED = 16,
                RESOURCEUSAGE_ALL = 31,
                RESOURCEUSAGE_RESERVED = 2147483648
            }
    
            public enum ConnectionFlags : uint
            {
                CONNECT_UPDATE_PROFILE = 1,
                CONNECT_UPDATE_RECENT = 2,
                CONNECT_TEMPORARY = 4,
                CONNECT_INTERACTIVE = 8,
                CONNECT_PROMPT = 16,
                CONNECT_NEED_DRIVE = 32,
                CONNECT_REFCOUNT = 64,
                CONNECT_REDIRECT = 128,
                CONNECT_LOCALDRIVE = 256,
                CONNECT_CURRENT_MEDIA = 512,
                CONNECT_DEFERRED = 1024,
                CONNECT_COMMANDLINE = 2048,
                CONNECT_CMD_SAVECRED = 4096,
                CONNECT_CRED_RESET = 8192,
                CONNECT_RESERVED = 4278190080
            }
            #endregion
        }
    }
    

    Note: This class actually is to map a drive, but authenticating to a share and authenticating to connect to remote registry are done the same way.

  3. Now here is a Program.cs that shows how to use the NetworkShare class to connect to a device and access the remote registry.
    using System;
    using Microsoft.Win32;
    using NetworkConnection;
    using System.Management;
    
    namespace RemoteRegistryExample
    {
        class Program
        {
            static void Main(string[] args)
            {
                String ServerName = "Server1";
    
                // Create an object that can authenticate to a network share when you
                // already have credentials
                NetworkShare share = new NetworkShare(ServerName, "ipc$");
    
                // Create an object that can authenticate to a network share when you
                // do NOT already have credentials
                //NetworkShare share = new NetworkShare(ServerName, "C$", "User", "SomePasswd");
    
                // Connect to the remote drive
                share.Connect();
    
                // Note: another connection option is to add a reference to System.Management,
                // Then add a using statement for System.Management and use ConnectionOptions
                // and ManagementScope objects. For more information see this link:
                // http://msdn.microsoft.com/en-us/library/system.management.managementscope%28v=VS.100%29.aspx
    
                // If these same credentials allow remote registry, you are now authenticated
                // Get the Windows ProductName from HKEY_LOCAL_MACHINE\SOFTWARE\Microsoft\Windows NT\CurrentVersion
                String ProductName = string.Empty;
                RegistryKey key = RegistryKey.OpenRemoteBaseKey(RegistryHive.LocalMachine, ServerName);
                if (key != null)
                {
                    key = key.OpenSubKey(@"SOFTWARE\Microsoft\Windows NT\CurrentVersion");
                    if (key != null)
                        ProductName = key.GetValue("ProductName").ToString();
                }
    
                // Display the value
                Console.WriteLine("The device " + ServerName + " is running " + ProductName + ".");
    
                // Disconnect the share
                share.Disconnect();
            }
        }
    }
    

    You now are reading from remote registry.


Why Technical Support Engineers are not all the same!

Technical Support Engineers are not all the same. There is an inclination in the industry to look down on Technical Support Engineers.

Recently the following article was published:
10 IT positions ranked by prestige

This article didn’t exactly identify the Technical Support Engineer role, but it was unfortunately encompassed in the bottom two positions with the lowest prestige, Technical and Help Desk Analyst.

Should a Technical Support Engineer have the lowest prestige of all technical jobs in the industry? If you think so, you might want to reconsider after read this.

There are multiple levels of technical support and you should know what level of technical support a person is in because that should significantly change your view of this persons technical skills and ability.

What they support and to what level they support it makes a major difference in how to view a Technical Support Engineers background.

Obviously there is a difference between someone who does tech support for a company like Cisco, Microsoft, LANDesk than someone who does technical support for a BowFlex. But this is an obvious difference. A chart that is more of gradient is needed.

Here is some information to help guide you in determining what experience a Technical Support Engineer really has in the technology industry.

1 – Complex product that requires knowledge of an entire area of technology, including both software and hardware environments

These engineers are often not just support engineers. Along with being an expert on their product, they must understand many other concepts such as Networking, Servers and server-side software such as Web Servers, Database Servers, DNS servers, DHCP servers and more. It is not enough to just know how to set up their software, they have to know how to set up the environment around it. They also have to know how to troubleshoot to deep levels both their software and the environment around it.

Usually these engineers practice during portions of their job being Systems Analysts, Consultants, Sales Engineers, IT administrators, Change Controls administrators, developers, and more. They deal will the full gamut of technology and all the areas around it.

Example companies

Desktop Management companies such as LANDesk, SCCM, Kace.
Network Manager Software such as HP OpenView

2 – Specialized product that requires knowledge of one major portion of an IT or Software Environment

These engineers are often not just support engineers. Along with being an expert on their product, they must understand many other concepts in the technology world. It is not enough to just know how to set up their software, they have to know how to set up some portion, though not all, of the environment around it. They also have to know how to troubleshoot to deep levels both their software and their portion of the environment around it.

Like above, these engineers have some limited consulting experience and are gaining understanding of change control and IT administrative processes along with being technology experts.

Example companies

Support for Network Equipment such as Cisco, Juniper Networks, etc…

3 – Specialized product that requires knowledge of a single area of an IT or Software Environment

This person is an expert on their software or hardware product as well as an expert in one or more areas surrounding it.

Individuals who excel here are usually are ready to explode into a new technology after a little as one year in this position.

Example Companies

Business intelligence software, such as QlikView.
Dell, HP and other computer resellers.
Simple Appliances, such as a NAS.
Any company’s internal Computer Help Desk (but be aware of glorified password resetters)

4- Specialized product that requires technical knowledge but only for that exact product

This person is an expert on their software or hardware product but there is not indication they know anything else about technology from this position, which doesn’t mean they don’t, just that this position doesn’t indicate it.

Example Companies

Home consumer products such as Wireless Routers from D-Link, Linksys, etc.

5 – Specialized product that requires knowledge in an area outside of IT but still somewhat technical

This person is an expert on their software or hardware product as well as an expert in one or more areas surrounding it.
Usually this product has interfaces into other technology that not used commonly but Technical Support Engineers usually don’t take the common calls for things that just work, they learn the tough issues, which usually involves integrating with something else. However, they don’t always know that area of technology, just the minimal knowledge to make their product work with it.

Example companies

Software Applications outside of IT: Microsoft Word, Excel.

6 – Specialized product that requires knowledge in an area outside of IT but not exactly technical

This person is an expert on their software or hardware product as well as an expert in one or more areas surrounding it. This expertise is beneficial outside the position but only in limited areas.

Example companies

Software Applications outside of IT:
Adobe Photoshop
Dentrix
gaming software

7 – Specialized product that requires knowledge that is technical but not really related to software or IT at all

This person is an expert product but it is just a simple product that being an expert on it really has no value anywhere else.

Example companies

Television
Cable box companies
radios and sound systems
Cell-phones

8 – Generic product that requires little technical knowledge

This person usually supports something that is sold on a made-for-tv ad, such as an exercise appliance. They usually have a script they follow and this position can be filled by almost anyone who can read and speak.

Example companies

BowFlex
Clock Radios


C# Class to establish a network connection with credentials

using System;
using System.Runtime.InteropServices;

using BOOL = System.Int32;

namespace NetworkConnection
{
    public class NetworkShare
    {
        #region Member Variables
        [DllImport("mpr.dll")]
        private static extern int WNetAddConnection2A(ref NetResource refNetResource, string inPassword, string inUsername, int inFlags);
        [DllImport("mpr.dll")]
        private static extern int WNetCancelConnection2A(string inServer, int inFlags, int inForce);

        private String _Server;
        private String _Share;
        private String _DriveLetter = null;
        private String _Username = null;
        private String _Password = null;
        private int _Flags = 0;
        private NetResource _NetResource = new NetResource();
        BOOL _AllowDisconnectWhenInUse = 0; // 0 = False; Any other value is True;
        #endregion

        #region Constructors
        /// <summary>
        /// The default constructor
        /// </summary>
        public NetworkShare()
        {
        }

        /// <summary>
        /// This constructor takes a server and a share.
        /// </summary>
        public NetworkShare(String inServer, String inShare)
        {
            _Server = inServer;
            _Share = inShare;
        }

        /// <summary>
        /// This constructor takes a server and a share and a local drive letter.
        /// </summary>
        public NetworkShare(String inServer, String inShare, String inDriveLetter)
        {
            _Server = inServer;
            _Share = inShare;
            DriveLetter = inDriveLetter;
        }

        /// <summary>
        /// This constructor takes a server, share, username, and password.
        /// </summary>
        public NetworkShare(String inServer, String inShare, String inUsername, String inPassword)
        {
            _Server = inServer;
            _Share = inShare;
            _Username = inUsername;
            _Password = inPassword;
        }

        /// <summary>
        /// This constructor takes a server, share, drive letter, username, and password.
        /// </summary>
        public NetworkShare(String inServer, String inShare, String inDriveLetter, String inUsername, String inPassword)
        {
            _Server = inServer;
            _Share = inShare;
            _DriveLetter = inDriveLetter;
            _Username = inUsername;
            _Password = inPassword;
        }
        #endregion

        #region Properties
        public String Server
        {
            get { return _Server; }
            set { _Server = value; }
        }

        public String Share
        {
            get { return _Share; }
            set { _Share = value; }
        }

        public String FullPath
        {
            get { return string.Format(@"\\{0}\{1}", _Server, _Share); }
        }

        public String DriveLetter
        {
            get { return _DriveLetter; }
            set { SetDriveLetter(value); }
        }

        public String Username
        {
            get { return String.IsNullOrEmpty(_Username) ? null : _Username  ; }
            set { _Username = value; }
        }

        public String Password
        {
            get { return String.IsNullOrEmpty(_Password) ? null : _Username; }
            set { _Password = value; }
        }

        public int Flags
        {
            get { return _Flags; }
            set { _Flags = value; }
        }

        public NetResource Resource
        {
            get { return _NetResource; }
            set { _NetResource = value; }
        }

        public bool AllowDisconnectWhenInUse
        {
            get { return Convert.ToBoolean(_AllowDisconnectWhenInUse); }
            set { _AllowDisconnectWhenInUse = Convert.ToInt32(value); }
        }

        #endregion

        #region Functions
        /// <summary>
        /// Establishes a connection to the share.
        /// 
        /// Throws:
        /// 
        /// 
        /// </summary>
        public int Connect()
        {
            _NetResource.Scope = (int)Scope.RESOURCE_GLOBALNET;
            _NetResource.Type = (int)Type.RESOURCETYPE_DISK;
            _NetResource.DisplayType = (int)DisplayType.RESOURCEDISPLAYTYPE_SHARE;
            _NetResource.Usage = (int)Usage.RESOURCEUSAGE_CONNECTABLE;
            _NetResource.RemoteName = FullPath;
            _NetResource.LocalName = DriveLetter;

            return WNetAddConnection2A(ref _NetResource, _Password, _Username, _Flags);
        }

        /// <summary>
        /// Disconnects from the share.
        /// </summary>
        public int Disconnect()
        {
            int retVal = 0;
            if (null != _DriveLetter)
            {
                retVal = WNetCancelConnection2A(_DriveLetter, _Flags, _AllowDisconnectWhenInUse);
                retVal = WNetCancelConnection2A(FullPath, _Flags, _AllowDisconnectWhenInUse);
            }
            else
            {
                retVal = WNetCancelConnection2A(FullPath, _Flags, _AllowDisconnectWhenInUse);
            }
            return retVal;
        }

        private void SetDriveLetter(String inString)
        {
            if (inString.Length == 1)
            {
                if (char.IsLetter(inString.ToCharArray()[0]))
                {
                    _DriveLetter = inString + ":";
                }
                else
                {
                    // The character is not a drive letter
                    _DriveLetter = null;
                }
            }
            else if (inString.Length == 2)
            {
                char[] drive = inString.ToCharArray();
                if (char.IsLetter(drive[0]) && drive[1] == ':')
                {
                    _DriveLetter = inString;
                }
                else
                {
                    // The character is not a drive letter
                    _DriveLetter = null;
                }
            }
            else
            {
                // If we get here the value passed in is not valid
                // so make it null.
                _DriveLetter = null;
            }
        }
        #endregion

        #region NetResource Struct
        [StructLayout(LayoutKind.Sequential)]
        public struct NetResource
        {
            public uint Scope;
            public uint Type;
            public uint DisplayType;
            public uint Usage;
            public string LocalName;
            public string RemoteName;
            public string Comment;
            public string Provider;
        }
        #endregion

        #region Enums
        public enum Scope
        {
            RESOURCE_CONNECTED = 1,
            RESOURCE_GLOBALNET,
            RESOURCE_REMEMBERED,
            RESOURCE_RECENT,
            RESOURCE_CONTEXT
        }

        public enum Type : uint
        {
            RESOURCETYPE_ANY,
            RESOURCETYPE_DISK,
            RESOURCETYPE_PRINT,
            RESOURCETYPE_RESERVED = 8,
            RESOURCETYPE_UNKNOWN = 4294967295
        }

        public enum DisplayType
        {
            RESOURCEDISPLAYTYPE_GENERIC,
            RESOURCEDISPLAYTYPE_DOMAIN,
            RESOURCEDISPLAYTYPE_SERVER,
            RESOURCEDISPLAYTYPE_SHARE,
            RESOURCEDISPLAYTYPE_FILE,
            RESOURCEDISPLAYTYPE_GROUP,
            RESOURCEDISPLAYTYPE_NETWORK,
            RESOURCEDISPLAYTYPE_ROOT,
            RESOURCEDISPLAYTYPE_SHAREADMIN,
            RESOURCEDISPLAYTYPE_DIRECTORY,
            RESOURCEDISPLAYTYPE_TREE,
            RESOURCEDISPLAYTYPE_NDSCONTAINER
        }

        public enum Usage : uint
        {
            RESOURCEUSAGE_CONNECTABLE = 1,
            RESOURCEUSAGE_CONTAINER = 2,
            RESOURCEUSAGE_NOLOCALDEVICE = 4,
            RESOURCEUSAGE_SIBLING = 8,
            RESOURCEUSAGE_ATTACHED = 16,
            RESOURCEUSAGE_ALL = 31,
            RESOURCEUSAGE_RESERVED = 2147483648
        }

        public enum ConnectionFlags : uint
        {
            CONNECT_UPDATE_PROFILE = 1,
            CONNECT_UPDATE_RECENT = 2,
            CONNECT_TEMPORARY = 4,
            CONNECT_INTERACTIVE = 8,
            CONNECT_PROMPT = 16,
            CONNECT_NEED_DRIVE = 32,
            CONNECT_REFCOUNT = 64,
            CONNECT_REDIRECT = 128,
            CONNECT_LOCALDRIVE = 256,
            CONNECT_CURRENT_MEDIA = 512,
            CONNECT_DEFERRED = 1024,
            CONNECT_COMMANDLINE = 2048,
            CONNECT_CMD_SAVECRED = 4096,
            CONNECT_CRED_RESET = 8192,
            CONNECT_RESERVED = 4278190080
        }
        #endregion
    }
}

Hopefully I will get time to explain what is going on here.


Loading rich text file links in a browser from a WPF Navigation Application

Previously, I discussed loading a rich text file in a regular WPF Application in this post.
Loading a RichTextBox from an RTF file using binding or a RichTextFile control

UPDATE: If you use the new version of RichTextFile located at this link, then you don’t even need to do this.

The following use cases must be met:

  1. Load and display a rich text file in read only mode
  2. The links must open inside a browser and not in the application

We created a RichTextFile control that inherits RichTextBox and configured it to support binding. Now we are going to use this same object in a WPF Navigation Application.

A WPF Navigation Application is going to react differently. Links are going work by default, so the Hyperlink.Click event doesn’t have to be used. However, there is a problem, the links open in the actual application’s window and not in a browser. Lets fix this.

Part 2 – Using the RichTextFile class in a WPF Navigation Application

Use Case 1 – Loading a rich text file

Create a new WPF Application in Visual Studio.

Add a Frame element and set the source to RTF.xaml, which we will create next.

<Window x:Class="RichTextFileTest.MainWindow"
        xmlns="http://schemas.microsoft.com/winfx/2006/xaml/presentation"
        xmlns:x="http://schemas.microsoft.com/winfx/2006/xaml"
        Title="MainWindow" Height="350" Width="525">
    <Grid>
        <Frame Source="RTF.xaml" />
    </Grid>
</Window>

There is no code behind for this, yet.

Create a new WPF Page called RTF.xaml.

Add the above RichTextFile object to the project.

Add an xmlns reference to our new object. Then add our new object. Notice in our new object that we set IsReadOnly=”True” but we also set IsDocumentEnabled=”True”. This allows for clicking a link even though the document is read only.

<Page x:Class="RichTextFileTest.RTF"
      xmlns="http://schemas.microsoft.com/winfx/2006/xaml/presentation"
      xmlns:x="http://schemas.microsoft.com/winfx/2006/xaml"
      xmlns:mc="http://schemas.openxmlformats.org/markup-compatibility/2006" 
      xmlns:d="http://schemas.microsoft.com/expression/blend/2008" 
      mc:Ignorable="d" 
      d:DesignHeight="300" d:DesignWidth="300"
      Title="RTF"
      xmlns:controls="clr-namespace:System.Windows.Controls">
    <Grid>
        <controls:RichTextFile File="{Binding File}" IsReadOnly="True" IsDocumentEnabled="True"/>
    </Grid>
</Page>

Code Behind

using System;
using System.Diagnostics;
using System.Windows;
using System.Windows.Controls;
using System.Windows.Documents;

namespace RichTextFileTest
{
    /// <summary>
    /// Interaction logic for RTF.xaml
    /// </summary>
    public partial class RTF : Page
    {
        public RTF()
        {
            InitializeComponent();
            Example example = new Example() { File = "File.rtf" };
            DataContext = example;
        }
    }

    public class Example
    {
        public String File { get; set; }
    }
}

Now the first use case is complete, the rich text file is loading into the RichTextFile control and is visible in the application. However, the second use case is incomplete, but not because the links aren’t loading, but because they are not loading in a browser. Instead they are loading inside the Frame element.

Use Case 2 – Getting the links to open in a browser

Getting the links to open in a browser is not straight forward and it took me quite some time to find an easy solution. Somehow, the link must be open in a browser and then the Navigation event must be canceled.

The easiest way to do this is to implement the Nagivating function on the Frame element in our MainWindow.

<Window x:Class="RichTextFileTest.MainWindow"
        xmlns="http://schemas.microsoft.com/winfx/2006/xaml/presentation"
        xmlns:x="http://schemas.microsoft.com/winfx/2006/xaml"
        Title="MainWindow" Height="350" Width="525">
    <Grid>
        <Frame Source="RTF.xaml" Navigating="Frame_Navigating"/>
    </Grid>
</Window>

Now implement the code behind for the Frame_Navigating method.

using System.Diagnostics;
using System.Windows;
using System.Windows.Controls;

namespace RichTextFileTest
{
    /// <summary> 
    /// Interaction logic for MainWindow.xaml
    /// </summary>
    public partial class MainWindow : Window
    {
        public MainWindow()
        {
            InitializeComponent();
        }

        private void Frame_Navigating(object sender, System.Windows.Navigation.NavigatingCancelEventArgs e)
        {
            Frame frame = sender as Frame;
            if (frame != null && frame.Source != null)
            {
                // See if we are hitting a link using HTTP or HTTPS
                if (frame.Source.ToString().StartsWith("http://", System.StringComparison.CurrentCultureIgnoreCase)
                    || frame.Source.ToString().StartsWith("https://", System.StringComparison.CurrentCultureIgnoreCase))
                {
                    // Open the URL in a browser
                    Process.Start(frame.Source.ToString());

                    // Cancel the Navigation event
                    e.Cancel = true;
                }
            }
        }
    }
}

The links should now be opening in your browser and not in your application.

Here is the sample project that demonstrates this.
RichTextFileNavigation.zip


Loading a RichTextBox from an RTF file using binding or a RichTextFile control

Sometimes you have a rich text document that exists as an actual file and you simply want to load the file and display it.

My exact use cases are these:

  1. Load and display a rich text file in read only mode
  2. The links must open inside a browser and not in the application

I like to use MVVM, so my goal is to use binding to pass in the file name. Unfortunately the RichTextBox class is not designed to bind to a file name. However, extending this control to have this functionality is quite easy.

RichTextFile extending RichTextBox

Here is my new class. I have extended RichTextBox with four additional items in a new derived class called RichTextFile.

  1. Added a String Property called File.
  2. Added a DependecyProperty called FileProperty
  3. Added a PropertyChangedCallback function called OnFileChanged
  4. Added a ReadFile function that reads a .rtf file into a FlowDocument
  5. Added a Constructor that adds a handler for the Hyperlink.RequestNavigateEvent.
  6. Added a Property called OpenLinksInBrowser.
using System.Diagnostics;
using System.IO;
using System.Windows.Documents;

namespace System.Windows.Controls
{
    internal class RichTextFile : RichTextBox
    {

        public RichTextFile()
        {
            AddHandler(Hyperlink.RequestNavigateEvent, new RoutedEventHandler(HandleHyperlinkClick));
        }

        private void HandleHyperlinkClick(object inSender, RoutedEventArgs inArgs)
        {
            if (OpenLinksInBrowser)
            {
                Hyperlink link = inArgs.Source as Hyperlink;
                if (link != null)
                {
                    Process.Start(link.NavigateUri.ToString());
                    inArgs.Handled = true;
                }
            }
        }

        #region Properties
        public bool OpenLinksInBrowser { get; set; }

        public String File
        {
            get { return (String)GetValue(FileProperty); }
            set { SetValue(FileProperty, value); }
        }

        public static DependencyProperty FileProperty =
            DependencyProperty.Register("File", typeof(String), typeof(RichTextFile),
            new PropertyMetadata(OnFileChanged));

        private static void OnFileChanged(DependencyObject d, DependencyPropertyChangedEventArgs e)
        {
            RichTextFile rtf = d as RichTextFile;
            if (rtf == null)
                return;

            ReadFile(rtf.File, rtf.Document);
        }
        #endregion

        #region Functions
        private static void ReadFile(string inFilename, FlowDocument inFlowDocument)
        {
            if (System.IO.File.Exists(inFilename))
            {
                TextRange range = new TextRange(inFlowDocument.ContentStart, inFlowDocument.ContentEnd);
                FileStream fStream = new FileStream(inFilename, FileMode.Open, FileAccess.Read, FileShare.Read);

                range.Load(fStream, DataFormats.Rtf);
                fStream.Close();
            }
        }
        #endregion
    }
}

You can use this new object to load a .rtf file quite easily. I am going to show you how I am succeeding in my two use cases using both a regular WPF Application and a WPF Navigation Application.

Part 1 – Using the RichTextFile class in a WPF Application

Use Case 1 – Loading a rich text file

Create a new WPF Application in Visual Studio.

Add the above RichTextFile object to the project.

Add an xmlns reference to our new object. Then add our new object. Notice in our new object that we set IsReadOnly=”True” but we also set IsDocumentEnabled=”True”. This allows for clicking a link even though the document is read only.

<Window x:Class="RichTextFileTest.MainWindow"
        xmlns="http://schemas.microsoft.com/winfx/2006/xaml/presentation"
        xmlns:x="http://schemas.microsoft.com/winfx/2006/xaml"
        Title="MainWindow" Height="350" Width="525"
        xmlns:controls="clr-namespace:System.Windows.Controls">
    <Grid>
        <controls:RichTextFile File="{Binding File}" IsReadOnly="True" IsDocumentEnabled="True" />
    </Grid>
</Window>

Code Behind

using System;
using System.Diagnostics;
using System.Windows;
using System.Windows.Documents;

namespace RichTextFileTest
{
    /// <summary>
    /// Interaction logic for MainWindow.xaml
    /// </summary>
    public partial class MainWindow : Window
    {
        public MainWindow()
        {
            InitializeComponent();
            Example example = new Example() { File = "File.rtf" };
            DataContext = example;
        }
    }

    public class Example
    {
        public String File { get; set; }
    }
}

Now the first use case is complete, the rich text file is loading into the RichTextFile control and is visible in the application. However, the second use case is incomplete as clicking the link does nothing.

Use Case 2 – Getting the links to open in a browser

The links can easily made to open in a browser now by simply setting OpenLinksInBrowser=”True” on the RichTextFile object.

<Window x:Class="RichTextFileTest.MainWindow"
        xmlns="http://schemas.microsoft.com/winfx/2006/xaml/presentation"
        xmlns:x="http://schemas.microsoft.com/winfx/2006/xaml"
        Title="MainWindow" Height="350" Width="525"
        xmlns:controls="clr-namespace:System.Windows.Controls">
    <Grid>
        <controls:RichTextFile File="{Binding File}" IsEnabled="True" IsReadOnly="True" IsDocumentEnabled="True" OpenLinksInBrowser="True"/>
    </Grid>
</Window>

The links should now be opening in your browser.

Here is the sample project that demonstrates this.
RichTextFileTest.zip

Part 2 – Using the RichTextFile class in a WPF Navigation Application


How to get a job in software development in as little as 6 months

Hello. I keep hearing about the number of unemployed.  Many have been unemployed for more than 6 months and are likely to be unemployed for another 6 months.

Well, technology is not going away so here is a solution for some of you.

Many of you think that you need a degree in Computer Science to become a Software Developer.  This is just not true.  Many of the Software Developers that I know do not have a degree in Computer Science.  However, most love technology and so they learn it on their own.

If you love technology and you can learn on your own, you could become a Software Developer in 6 months.

While this article is for Software Development, the pattern I describe here work with IT as well, and many other careers in many fields.

Disclaimer: I can’t promise that everyone who does this method will succeed in 6 months, but at least it is a pattern that you can try. And if you end up getting a job outside of technology the skills you learned here will still be beneficial for the rest of your life as computers are likely to still be here well past your retirement.

Month 1

Step 1 – Get access to a computer and the internet

Yes you need a computer to become a software developer.  You even need one to study. You need the internet to have access to the nearly unlimited amount of free training material about development.

Step 2 – Choose one of the top programming languages

The top languages for writing code today and probably will continue to increase in popularity in the future are these:

  • Java
  • PHP
  • C# or ASP.NET

Other languages that are popular are C++, Objective C, Perl, Python, etc…

Web development is fun too. HTML, CSS, JavaScript, etc. One language that is likely to become more popular now and in the near future are HTML5. You have probably heard buzz about it.

However, these are no the only languages you could learn.

Maybe you would like to work with databases. You could learn to about SQL.  There are many databases to choose from, the top being these:

  • MySQL
  • MS SQL
  • Oracle
  • PostgreSQL

Maybe you are into business technology. You could become an expert at a specific piece of software, such as how to create business intelligence reports with QlikView. There are hundred of products that require technology experts to use them and specializing in any one of them could lead to a stable career.

Step 3 – Find the Certification Preparation material

Here are some of the Certifications for the common languages.

Here is a list of certification sites for database software.

Many software applications have certification as well. You can find these certifications with a simple search on the internet.

Once you have the certification material, there should be some information on what to study and what to learn to complete the certification. It is your goal to pass a certification in 6 months.

Step 4 – Download any free or trial software

Almost all software has either open source, or a shareware, express, or trial versions of their software that you can use for free.  Sometimes, like in the case of trial software, there is a time limit.  But that doesn’t prevent you from learning as much as you can before the trial expires.

To become a developer, one of the most basic tools is an Integrated Development Environment (IDE).  Here is a list of the free or open source IDEs you can get.

You can find free or open source version of other software for other languages with a simple search on the internet.

With this free software you are set free to practice as you learn.

Step 5 – Access the free documentation and training on the internet

There are a lot of free tutorials, videos, blog posts and more on the internet.  You can become an expert in something without ever buying a book or paying from a training class.

The following site has a quick tutorial on almost all programming languages: http://www.w3schools.com/

You can use this information to study and prepare for your certification.

Make a list of all the tutorials you have found and that you plan to study. Put this in a spreadsheet in a nice way, maybe a separate line for each chapter or section, so you can see your progress.  If you want, email the spread sheet and I will post it for the next person.

Month 2 – 3

Study and practice. You now ave all the software you need and all the training material you need.  Go through it.  This takes time.

Do the sample development projects, don’t just look at them, code them up, compile them, and run them.

Month 4

Step 1 – Pick a development project and work on it.

There are so many open source projects in the world and you can pick any of them. Or you can start your own. Or maybe you have an idea for some software that you can sell and you can start your own business. Whatever, just pick something and start working on it.

Here is a good way to figure out what project to choose.

  1. Ask yourself, what interests me outside of development? (Maybe you are a mechanic and you tinker with cars, or maybe you like to collect stamps, or maybe you like horses)
  2. Is there an open source software project in this area? If not, is there an opportunity to create one? Or better yet, is there a software opportunity that could inspire a small business in this area.

Another option, if you have any connections with any company at all, offer to do something to help their company for free.  Maybe your hair stylist needs you to develop something to help her with her clients.  Even though you are doing it for free, you are writing code that will go into production in a business environment.  This experience is invaluable.

Step 2 – Keep learning

As you start working on this project, you will start using what you have already learned. However, you aren’t done learning. And you will have to solve some tough problems. Keep learning.

Month 5

Step 1 – Schedule the certification exam you have chosen for the end of the month

Keep learning. Keep working on your development project. However, take some time to focus on the certification exam. Find practice tests, sample question.

Most people fail the exam on the first try.  This is why you are taking it once in Month 5.

Step 2 – Start the job hunt

Start looking for companies that are hiring Jr. Developers or entry-level developers in your position.

Add to your resume all that you have done, your project, you training, your certification if you passed it.

Month 6

Keep up the job hunt.

If you didn’t pass the certification in Month 5, repeat month 5 steps.

Take the first job you can get, no matter the pay. You are on your way to becoming an experience developer.

Month 7 and later

Keep it up.  Just because you didn’t quite make it 6 months doesn’t mean the work you have done isn’t valuable and isn’t going to pay off.

Still not passing the certification exam. Don’t worry, these test are hard and I know people who understand the technology of a certification that still fail multiple times.  Keep trying.

The long term career

Developers with 1-3 years experience can make 38k to 59k. With 4-8 years experience they can make 60 to 80k. And if you have worked hard to become a senior developer, your salary can skyrocket towards 6 figures and beyond.


Software Business Ideas

There are many ideas for starting a business and I have a nice list myself. If you are interested in an idea that you think could become a successful selling piece of software, I am will to help you an consult with you.  Just hit me up on the contact page.

Not into development?

Trying applying this pattern other careers. I think you find it works for many other career paths as well.  This could also apply to the medical field, housing market, and many other fields.


String extension methods

Here is a list of string extension methods. If you know of any more cool extension methods, please comment.

using System;
using System.Runtime.InteropServices;
using System.Text.RegularExpressions;
using System.Security;

namespace LANDesk.Install.Common.Extenders
{
    /// <summary>
    /// This class adds methods to String that are useful
    /// </summary>
    public static class StringExtender
    {
        #region DLL Imports
        [DllImport("ldmsinst.dll", CharSet = CharSet.Ansi, EntryPoint = "Decrypt", CallingConvention = CallingConvention.Cdecl)]
        public static extern void Decrypt(int pwdLen, byte[] pwd);

        [DllImport("ldmsinst.dll", CharSet = CharSet.Ansi, EntryPoint = "Encrypt", CallingConvention = CallingConvention.Cdecl)]
        public static extern void Encrypt(int length, byte[] data);
        #endregion

        /// <summary>
        /// This adds a function to a string object that will convert the string
        /// to a SecureString.
        /// </summary>
        /// <param name="password">The string to convert to a secure string.</param>
        /// <returns>SecureString</returns>
        public static SecureString ConvertToSecureString(this string password)
        {
            SecureString ss = new SecureString();
            if (password == null)
                throw new ArgumentNullException("password");

            foreach (Char c in password)
            {
                ss.AppendChar(c);
            }
            return ss;
        }

        /// <summary>
        /// Checks if the string contains any of a list of characters
        /// entered as a string.
        /// </summary>
        /// <param name="password">Any string.</param>
        /// <param name="listofcharacters">Any string representing a list of characters.</param>
        /// <returns>bool</returns>
        public static bool ContainsAnyOf(this string password, char[] listofcharacters)
        {
            foreach (char c in listofcharacters)
            {
                if (password.Contains(c.ToString()))
                    return true;
            }
            return false;
        }

        /// <summary>
        /// Checks if the string contains any of a list of characters
        /// entered as a string.
        /// </summary>
        /// <param name="password">Any string.</param>
        /// <param name="listofcharacters">Any string representing a list of characters.</param>
        /// <returns>bool</returns>
        public static bool ContainsAnyOf(this string password, string listofcharacters)
        {
            return password.ContainsAnyOf(listofcharacters.ToCharArray());
        }

        /// <summary>
        /// Checks if the string has a space.
        /// </summary>
        /// <param name="txt">Any string.</param>
        /// <returns>bool</returns>
        public static bool HasSpaces(string txt)
        {
            if (txt.Contains(" "))
            {
                return true;
            }
            return false;
        }

        /// <summary>
        /// To be a strong password, Must have 3 out of 4 of the following conditions:
        /// Uppercase, lowercase, numberic, symbol
        /// </summary>
        /// </summary>
        /// <param name="password"></param>
        /// <returns></returns>
        public static bool IsPasswordStrong(this string password)
        {
            int numTypes = 0;

            if (HasUppercaseCharacter(password) == true)
            {
                numTypes = numTypes + 1;
            }
            if (HasLowercaseCharacter(password) == true)
            {
                numTypes = numTypes + 1;
            }
            if (HasNonAlphaNumeric(password) == true)
            {
                numTypes = numTypes + 1;
            }
            if (HasDigit(password) == true)
            {
                numTypes = numTypes + 1;
            }

            if (numTypes > 2)
            {
                return true;
            }
            else
            {
                return false;
            }
        }

        public static bool HasUppercaseCharacter(string str)
        {
            if (str == str.ToLower())
                return false;
            return true;
        }

        public static bool HasLowercaseCharacter(string str)
        {
            if (str == str.ToUpper())
                return false;
            return true;
        }

        public static bool HasDigit(string str)
        {
            Regex regexNums = new Regex("[0-9]");
            return regexNums.IsMatch(str);
        }

        public static bool HasNonAlphaNumeric(string str)
        {
            string newString = str;

            Regex regexNums = new Regex("[0-9]");
            Regex regexAlphas = new Regex("[a-z]", RegexOptions.IgnoreCase);

            newString = regexNums.Replace(newString, "");
            newString = regexAlphas.Replace(newString, "");

            return (newString.Length > 0);
        }

        /// <summary>
        /// This adds a function to a string object that RC4 Encrypts a password.
        /// </summary>
        /// <param name="password">A password as a string.</param>
        /// <returns>A byte[] representation of an RC4 password.</returns>
        public static byte[] Encrypt(this string password)
        {
            try
            {
                // Encode the password
                System.Text.ASCIIEncoding encoding = new System.Text.ASCIIEncoding();
                byte[] encryptedPwd = encoding.GetBytes(password);

                // encrypt password
                Encrypt(encryptedPwd.Length, encryptedPwd);
                return encryptedPwd;
            }
            catch (Exception ex)  
            {
                throw ex;
            }
        }

        /// <summary>
        /// This adds a function to a byte[] object that decrypts an RC4 password.
        /// and returns the password as a string.
        /// </summary>
        /// <param name="encryptedPwd">A byte[] representation of an RC4 password.</param>
        /// <returns>The password as a string.</returns>
        static public string Decrypt(this byte[] encryptedPwd)
        {
            string password = string.Empty;
            try
            {                
                    // decrypt password
                    Decrypt(encryptedPwd.Length, encryptedPwd);

                    // convert from byte array to string
                    password = System.Text.ASCIIEncoding.Default.GetString(encryptedPwd);
                    password = password.Replace("\0", string.Empty);                
            }
            catch (Exception ex) 
            {
                throw ex;
            }
            return password;
        }

        public static string FirstLetterUpperCase(this string inString)
        {
            if (string.IsNullOrEmpty(inString))
                return string.Empty;

            string newString = inString.Substring(0, 1).ToUpper();
            newString += inString.Substring(1, inString.Length - 1);
            return newString;
        }

        public static string LimitTo(this string data, int length) 
        {
            return data.Length < length ? data : data.Substring(0, length);
        }
    }
}

How to have the TextBlock in a left column of a Grid in a ListView Template expand or shrink with text wrapping?

Ok, lets say you want to have a Grid where each item is a row of data in a Grid. The left most column should expand or shrink, and yes the text should wrap when it shrinks.

Not so easy…but it can be done if you use the right tools.

  • Use a DockPanel not a Grid
  • Make the left most column the last one added
<Window x:Class="ListBoxWithWrap.MainWindow"
        xmlns="http://schemas.microsoft.com/winfx/2006/xaml/presentation"
        xmlns:x="http://schemas.microsoft.com/winfx/2006/xaml"
        Title="MainWindow"
        mc:Ignorable="d" xmlns:d="http://schemas.microsoft.com/expression/blend/2008"
        xmlns:mc="http://schemas.openxmlformats.org/markup-compatibility/2006"
        d:DesignHeight="242"
        d:DesignWidth="388"
        >
    <Grid>
        <DockPanel Name="MainGrid" HorizontalAlignment="Stretch">
            <!-- These four blocks will have other content eventually, but only need to be 45 wide -->
            <TextBlock Text="X" Grid.Column="1" HorizontalAlignment="Center" Width="45" DockPanel.Dock="Right"/>
            <TextBlock Text="X" Grid.Column="2" HorizontalAlignment="Center" Width="45" DockPanel.Dock="Right"/>
            <TextBlock Text="X" Grid.Column="3" HorizontalAlignment="Center" Width="45" DockPanel.Dock="Right"/>
            <TextBlock Text="X" Grid.Column="4" HorizontalAlignment="Center" Width="45" DockPanel.Dock="Right"/>
            <!-- This is the TextBlock that needs to wrap its content (and
                             change the height of the row (so the full content is still
                             visible) to whatever the available space is, but should not
                             make overall ListView wider than the parent's width. -->
            <TextBlock Text="A very long string that should wrap when the window is small." Padding="20,6,6,6" TextWrapping="Wrap" DockPanel.Dock="Right"/>
        </DockPanel>
    </Grid>
</Window>

You will see that this works as you desire.

Now put this in a ListView’s Template and set it to use Binding.

<Window x:Class="ListBoxWithWrap.MainWindow"
        xmlns="http://schemas.microsoft.com/winfx/2006/xaml/presentation"
        xmlns:x="http://schemas.microsoft.com/winfx/2006/xaml"
        Title="MainWindow"
        mc:Ignorable="d"
        xmlns:d="http://schemas.microsoft.com/expression/blend/2008"
        xmlns:mc="http://schemas.openxmlformats.org/markup-compatibility/2006"
        d:DesignHeight="242"
        d:DesignWidth="388"
        SizeToContent="WidthAndHeight">
    <Grid>
        <ListView Name="lvWrap" ItemsSource="{Binding}">
            <ListView.ItemTemplate>
                <DataTemplate>
                    <DockPanel Name="MainGrid" HorizontalAlignment="Stretch">
                        <!-- These four blocks will have other content eventually, but only need to be 45 wide -->
                        <TextBlock Text="X" Grid.Column="1" HorizontalAlignment="Center" Width="45" DockPanel.Dock="Right"/>
                        <TextBlock Text="X" Grid.Column="2" HorizontalAlignment="Center" Width="45" DockPanel.Dock="Right"/>
                        <TextBlock Text="X" Grid.Column="3" HorizontalAlignment="Center" Width="45" DockPanel.Dock="Right"/>
                        <TextBlock Text="X" Grid.Column="4" HorizontalAlignment="Center" Width="45" DockPanel.Dock="Right"/>
                        <!-- This is the TextBlock that needs to wrap its content (and
                             change the height of the row (so the full content is still
                             visible) to whatever the available space is, but should not
                             make overall ListView wider than the parent's width. -->
                        <TextBlock Text="{Binding Content}" Padding="20,6,6,6" TextWrapping="Wrap" DockPanel.Dock="Right"/>
                    </DockPanel>
                </DataTemplate>
            </ListView.ItemTemplate>
        </ListView>
    </Grid>
</Window>

Now give it some data to bind to.

using System.Collections.Generic;
using System.Windows;
using System.Windows.Documents;

namespace ListBoxWithWrap
{
    /// <summary>
    /// Interaction logic for MainWindow.xaml
    /// </summary>
    public partial class MainWindow : Window
    {
        public MainWindow()
        {
            InitializeComponent();

            List<SomeItem> list = new List<SomeItem>();
            list.Add(new SomeItem() { Content = "Some very long string with so many words there should be some wrapping going on to prevent a line of text that is too long" });
            list.Add(new SomeItem() { Content = "Some very long string with so many words there should be some wrapping going on to prevent a line of text that is too long" });
            list.Add(new SomeItem() { Content = "Some very long string with so many words there should be some wrapping going on to prevent a line of text that is too long" });
            list.Add(new SomeItem() { Content = "Some very long string with so many words there should be some wrapping going on to prevent a line of text that is too long" });
            list.Add(new SomeItem() { Content = "Some very long string with so many words there should be some wrapping going on to prevent a line of text that is too long" });

            lvWrap.DataContext = list;
        }

        public class SomeItem
        {
            public string Content { get; set; }
        }
    }
}

The shrink with text wrapping no longer works once inside of the ListView. So that tells you that something to do with the ListView is breaking the feature you want.

Here is how you fix this:

1. Open your project in Expression Blend. (If you don’t have Expression Blend, maybe just look at my code below and copy it)

2. Right-Click on the ListView in the Object and Timeline tab and choose Edit Template | Edit a Copy.

3. Click OK on the next Window.

This will create the following resource code.

<Window.Resources>
		<SolidColorBrush x:Key="ListBorder" Color="#828790"/>
		<Style x:Key="ListViewStyle1" TargetType="{x:Type ListView}">
			<Setter Property="Background" Value="{DynamicResource {x:Static SystemColors.WindowBrushKey}}"/>
			<Setter Property="BorderBrush" Value="{StaticResource ListBorder}"/>
			<Setter Property="BorderThickness" Value="1"/>
			<Setter Property="Foreground" Value="{DynamicResource {x:Static SystemColors.ControlTextBrushKey}}"/>
			<Setter Property="ScrollViewer.HorizontalScrollBarVisibility" Value="Auto"/>
			<Setter Property="ScrollViewer.VerticalScrollBarVisibility" Value="Auto"/>
			<Setter Property="ScrollViewer.CanContentScroll" Value="true"/>
			<Setter Property="ScrollViewer.PanningMode" Value="Both"/>
			<Setter Property="Stylus.IsFlicksEnabled" Value="False"/>
			<Setter Property="VerticalContentAlignment" Value="Center"/>
			<Setter Property="Template">
				<Setter.Value>
					<ControlTemplate TargetType="{x:Type ListView}">
						<Border x:Name="Bd" BorderBrush="{TemplateBinding BorderBrush}" BorderThickness="{TemplateBinding BorderThickness}" Background="{TemplateBinding Background}" Padding="1" SnapsToDevicePixels="true">
							<ScrollViewer Focusable="false" Padding="{TemplateBinding Padding}">
								<ItemsPresenter SnapsToDevicePixels="{TemplateBinding SnapsToDevicePixels}"/>
							</ScrollViewer>
						</Border>
						<ControlTemplate.Triggers>
							<Trigger Property="IsEnabled" Value="false">
								<Setter Property="Background" TargetName="Bd" Value="{DynamicResource {x:Static SystemColors.ControlBrushKey}}"/>
							</Trigger>
							<Trigger Property="IsGrouping" Value="true">
								<Setter Property="ScrollViewer.CanContentScroll" Value="false"/>
							</Trigger>
						</ControlTemplate.Triggers>
					</ControlTemplate>
				</Setter.Value>
			</Setter>
		</Style>
	</Window.Resources>

4. Now look at what is surrounding the ItemPresenter. Yes, you see the ScrollViewer, which is your problem. Delete it.

5. Build you project.

Success! Now your feature to both expand or shrink with text wrapping is back.

Here is the final XAML.

<Window x:Class="ListBoxWithWrap.MainWindow"
        xmlns="http://schemas.microsoft.com/winfx/2006/xaml/presentation"
        xmlns:x="http://schemas.microsoft.com/winfx/2006/xaml"
        Title="MainWindow"
        mc:Ignorable="d"
        xmlns:d="http://schemas.microsoft.com/expression/blend/2008"
        xmlns:mc="http://schemas.openxmlformats.org/markup-compatibility/2006"
        d:DesignHeight="242"
        d:DesignWidth="388"
        SizeToContent="WidthAndHeight">
    <Window.Resources>
        <SolidColorBrush x:Key="ListBorder" Color="#828790"/>
        <Style x:Key="ListViewStyle1" TargetType="{x:Type ListView}">
            <Setter Property="Background" Value="{DynamicResource {x:Static SystemColors.WindowBrushKey}}"/>
            <Setter Property="BorderBrush" Value="{StaticResource ListBorder}"/>
            <Setter Property="BorderThickness" Value="1"/>
            <Setter Property="Foreground" Value="{DynamicResource {x:Static SystemColors.ControlTextBrushKey}}"/>
            <Setter Property="ScrollViewer.HorizontalScrollBarVisibility" Value="Auto"/>
            <Setter Property="ScrollViewer.VerticalScrollBarVisibility" Value="Auto"/>
            <Setter Property="ScrollViewer.CanContentScroll" Value="true"/>
            <Setter Property="ScrollViewer.PanningMode" Value="Both"/>
            <Setter Property="Stylus.IsFlicksEnabled" Value="False"/>
            <Setter Property="VerticalContentAlignment" Value="Center"/>
            <Setter Property="Template">
                <Setter.Value>
                    <ControlTemplate TargetType="{x:Type ListView}">
                        <Border x:Name="Bd" BorderBrush="{TemplateBinding BorderBrush}" BorderThickness="{TemplateBinding BorderThickness}" Background="{TemplateBinding Background}" Padding="1" SnapsToDevicePixels="true">
                            <ItemsPresenter SnapsToDevicePixels="{TemplateBinding SnapsToDevicePixels}"/>
                        </Border>
                        <ControlTemplate.Triggers>
                            <Trigger Property="IsEnabled" Value="false">
                                <Setter Property="Background" TargetName="Bd" Value="{DynamicResource {x:Static SystemColors.ControlBrushKey}}"/>
                            </Trigger>
                            <Trigger Property="IsGrouping" Value="true">
                                <Setter Property="ScrollViewer.CanContentScroll" Value="false"/>
                            </Trigger>
                        </ControlTemplate.Triggers>
                    </ControlTemplate>
                </Setter.Value>
            </Setter>
        </Style>
    </Window.Resources>
    <Grid>
        <ListView Name="lvWrap" ItemsSource="{Binding}" Style="{DynamicResource ListViewStyle1}">
            <ListView.ItemTemplate>
                <DataTemplate>
                    <DockPanel Name="MainGrid" HorizontalAlignment="Stretch">
                        <!-- These four blocks will have other content eventually, but only need to be 45 wide -->
                        <TextBlock Text="X" Grid.Column="1" HorizontalAlignment="Center" Width="45" DockPanel.Dock="Right"/>
                        <TextBlock Text="X" Grid.Column="2" HorizontalAlignment="Center" Width="45" DockPanel.Dock="Right"/>
                        <TextBlock Text="X" Grid.Column="3" HorizontalAlignment="Center" Width="45" DockPanel.Dock="Right"/>
                        <TextBlock Text="X" Grid.Column="4" HorizontalAlignment="Center" Width="45" DockPanel.Dock="Right"/>
                        <!-- This is the TextBlock that needs to wrap its content (and
                             change the height of the row (so the full content is still
                             visible) to whatever the available space is, but should not
                             make overall ListView wider than the parent's width. -->
                        <TextBlock Text="{Binding Content}" Padding="20,6,6,6" TextWrapping="Wrap" DockPanel.Dock="Right"/>
                    </DockPanel>
                </DataTemplate>
            </ListView.ItemTemplate>
        </ListView>
    </Grid>
</Window>

You should now have a little bit more understanding of the ListView template and how to manipulate it, which should translate to other objects in WPF as well.


How to copy a directory recursively in C#?

Today I had the task of copying a directory recursively in C#. The first thing I did was type into my project “Directory.” and see if intellisense brought up a function called Directory.Copy. Unfortunately there is not a Directory.Copy, which to me seems like an oversight, as copying a directory is fairly common. Maybe it is not an action commonly done in C#.

So next I went to my browser and did a search. Well, I am not the first, nor will I be the last to solve this. There are a number of solutions online and each seem to have both positive and negative comments.

Option 1 – A directory copy using recursion

Pros: This is simple and to the point and elegant.

Cons: One complaint is that this could cause a stack overly by using recursion but this might not be a valid con as the filesystem restrictions in Windows might prevent a stack overflow anyway.

Since I am dealing with a small controlled tree, the con will not affect me., but since we are dealing with a file system, this is likely not to occur.

        private static void CopyFilesRecursively(DirectoryInfo source, DirectoryInfo target)
        {
            foreach (DirectoryInfo dir in source.GetDirectories())
                CopyFilesRecursively(dir, target.CreateSubdirectory(dir.Name));
            foreach (FileInfo file in source.GetFiles())
                file.CopyTo(Path.Combine(target.FullName, file.Name));
        }

Option 2 – Use SearchOption.AllDirectories to create the directory structure then then copy all the files

Pros: Does not use recursion
Cons: Are there any?

        private static void CopyFilesRecursively(String SourcePath, String DestinationPath)
        {
            // First create all of the directories
            foreach (string dirPath in Directory.GetDirectories(SourcePath, "*", SearchOption.AllDirectories))
                Directory.CreateDirectory(dirPath.Replace(SourcePath, DestinationPath));

            // Copy all the files
            foreach (string newPath in Directory.GetFiles(SourcePath, "*.*", SearchOption.AllDirectories))
                File.Copy(newPath, newPath.Replace(SourcePath, DestinationPath));
        }

Option 3 – Use one of the methods recommended by MSDN

Unfortunately MSDN is not consistent, and recommends two different methods in two different places, which I am sure were written by different teams.

using System;
using System.IO;

class DirectoryCopyExample
{
    static void Main()
    {
        DirectoryCopy(".", @".\temp", true);
    }

    private static void DirectoryCopy(
        string sourceDirName, string destDirName, bool copySubDirs)
    {
      DirectoryInfo dir = new DirectoryInfo(sourceDirName);
      DirectoryInfo[] dirs = dir.GetDirectories();

      // If the source directory does not exist, throw an exception.
        if (!dir.Exists)
        {
            throw new DirectoryNotFoundException(
                "Source directory does not exist or could not be found: "
                + sourceDirName);
        }

        // If the destination directory does not exist, create it.
        if (!Directory.Exists(destDirName))
        {
            Directory.CreateDirectory(destDirName);
        }

        // Get the file contents of the directory to copy.
        FileInfo[] files = dir.GetFiles();

        foreach (FileInfo file in files)
        {
            // Create the path to the new copy of the file.
            string temppath = Path.Combine(destDirName, file.Name);

            // Copy the file.
            file.CopyTo(temppath, false);
        }

        // If copySubDirs is true, copy the subdirectories.
        if (copySubDirs)
        {

            foreach (DirectoryInfo subdir in dirs)
            {
                // Create the subdirectory.
                string temppath = Path.Combine(destDirName, subdir.Name);

                // Copy the subdirectories.
                DirectoryCopy(subdir.FullName, temppath, copySubDirs);
            }
        }
    }
}

Or the different one they posted here:

using System;
using System.IO;

class CopyDir
{
    public static void CopyAll(DirectoryInfo source, DirectoryInfo target)
    {
        if (source.FullName.ToLower() == target.FullName.ToLower())
        {
            return;
        }

        // Check if the target directory exists, if not, create it.
        if (Directory.Exists(target.FullName) == false)
        {
            Directory.CreateDirectory(target.FullName);
        }

        // Copy each file into it's new directory.
        foreach (FileInfo fi in source.GetFiles())
        {
            Console.WriteLine(@"Copying {0}\{1}", target.FullName, fi.Name);
            fi.CopyTo(Path.Combine(target.ToString(), fi.Name), true);
        }

        // Copy each subdirectory using recursion.
        foreach (DirectoryInfo diSourceSubDir in source.GetDirectories())
        {
            DirectoryInfo nextTargetSubDir =
                target.CreateSubdirectory(diSourceSubDir.Name);
            CopyAll(diSourceSubDir, nextTargetSubDir);
        }
    }

    public static void Main()
    {
        string sourceDirectory = @"c:\sourceDirectory";
        string targetDirectory = @"c:\targetDirectory";

        DirectoryInfo diSource = new DirectoryInfo(sourceDirectory);
        DirectoryInfo diTarget = new DirectoryInfo(targetDirectory);

        CopyAll(diSource, diTarget);
    }

    // Output will vary based on the contents of the source directory.
}

Option 4 – Use Microsoft.VisualBasic

Pros: One line.
Cons: You have to reference an additional dll that you otherwise do not need.
This additional dll is not available in Mono for cross-platform development.

new Microsoft.VisualBasic.Devices.Computer().
    FileSystem.CopyDirectory( sourceFolder, outputFolder );

There are various other methods:

Resources:
http://stackoverflow.com/questions/58744/best-way-to-copy-the-entire-contents-of-a-directory-in-c
http://msdn.microsoft.com/en-us/library/system.io.directoryinfo.aspx
http://msdn.microsoft.com/en-us/library/bb762914.aspx
http://xneuron.wordpress.com/2007/04/12/copy-directory-and-its-content-to-another-directory-in-c/
http://www.logiclabz.com/c/copy-directory-in-net-c-including-sub-folders.aspx