How to install VMWare-tools on FreeBSD 8 or PC-BSD 8?

I have documentation on how to create a FreeBSD 8 Desktop environment here:
How to install and configure a FreeBSD 8 Desktop with Xorg and KDE?

However, if you install FreeBSD or PC-BSD as a VMWare guest, you will want to install two additional pieces of software when you are finished:

  1. You need to install the VMWare X11 driver (no, it will not be installed when you install the VMWare tools)
  2. You need to install VMWare-tools

This guide is to walk you through resolving the second of these two issues. I assume you followed my article for building the FreeBSD desktop, and if you did, these steps will work for you. But if you didn’t, I can’t guarantee that there won’t be some steps that are slightly different for you.

In order for me to consider the VMWare-Tools installed and working, the following features must work:

  • Clipboard Synchonization
  • Grab/Release Mouse Input when mouse enters/leaves the guests screen
  • Autofit Guest (automatically making the guests screen resolution take all available space)
  • Time Synchronization (the time in the VMWare guest will match the hosts time).

In this document, I successfully get these features working.

I have VMWare Workstation 6.5.3 build 185404 and the host is Windows 7.

Part 1 – Installing and Configuring the VMWare X11 Driver

Already posted on this here:
How to install the vmware video card driver on a FreeBSD 8 guest virtual machine?

Part 2 – Installing and Configuring VMWare Tools

Step 1 – Mount the VMware Tools virtual cd

  1. On the VMWare hosts make sure that your FreeBSD guest is selected and that you are not full screen so you have the VMWare Workstation application surrounding the FreeBSD guest.
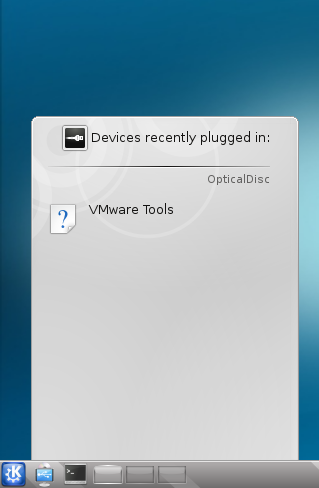
  2. From the VMWare Workstation application, choose VM | Install VMWare tools…You will see a pop-up inside FreeBSD on the bottom left.
  3. Click on the popup where it says VMWare Tools. This will open Dolphin file browser.
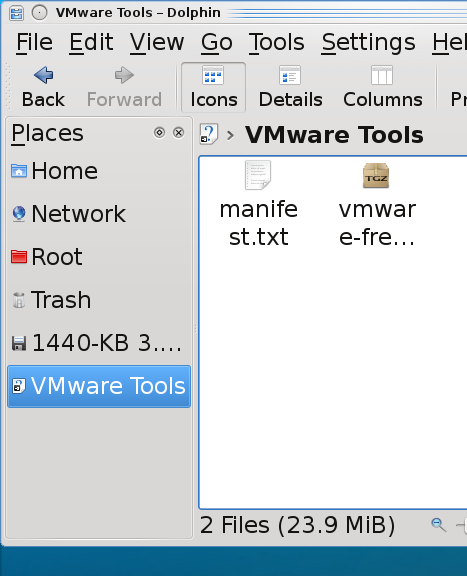
  4. In the Dolphin file browser on the bottom left, you should see the VMWare Tools media. Click on it.

Step 2 – Extract the vmware-freebsd-tools.tar.gz

  1. Right click on vmware-freebsd-tools.tar.gz and choose Extract Archive to… Now you can extract to where you want, as long as you have the folder permission to write to, but the next steps describe where I extracted it to.
  2. Click on Home at the left. There is no need to create a folder as the extacted files will all be in one folder called vmwware-tools-distrib when extracted.
  3. Click OK. The vmware-freebsd-tools.tar.gz is extracted.

Step 3 – Open a shell as root

  1. Cick K | Applications | System | Konsole to open the shell.
  2. Type in su$ su
    Password:
    #

Step 4 – Install the freebsd6 compatibility package.

  1. Determine your architecture or processor type. If you are 64 bit, it will be amd64 even it is intel 64 bit. If you are 32 bit, it is likely x86. Type uname -a to determine what your architecture is and look at the last piece of information provided.

    # uname -a
    FreeBSD FBSD8.hsd1.ut.comcast.net. 8.0-RELEASE-p2 FreeBSD 8.0-RELEASE-p2 #0: Tue Jan 5 21:11:58 UTC 2010 root@amd64-builder.daemonology.net:/usr/obj/usr/src/sys/GENERIC amd64
    #

  2. Install the compat6x-[arch].tgz package, where you replace [arch] with your architecture.  This is already installed on PC-BSD.
    # pkg_add -r compat6x-amd64

Step 5 – Compile and Install the vmware-freebsd-tools

  1. Change to the directory where you extracted the vmware-freebsd-tools.tar.gz.

    # cd /home/jared/vmware-tools-distrib

  2. Run vmware-install.pl.# ./vmware-install.pl

    Just keep hitting enter and accepting the defaults until the vmware-tools are installed.

Step 6 – Start vmware tools

  1. As root run the following:

    # /usr/local/etc/rc.d/vmware-tools.sh start

    Or you could just reboot.

    Note: Since vmware-tools doesn’t exactly integrate with rcNG, you don’t need to add anything to /etc/rc.conf. The just dump a script into /usr/local/etc/rc.d and it is just a shell script and isn’t formatted to require it to be enabled by /etc/rc.conf.

Step 7 – Enabling VMWare user features
The vmware-user process must be launched to enable vmware-user features.

  • Clipboard Synchonization
  • Grab/Release Mouse Input when mouse enters/leaves the guests screen
  • Autofit Guest (automatically making the guests screen resolution take all available space)
  1. Configure vmware-user to run at KDE login by copying the /usr/local/bin/vmware-user shell script to the ~/.kde4/Autostart directory.  You could also create a symlink.
    $ cp /usr/local/bin/vmware-user ~/.kde4/Autostart

    Note: You don’t have to use the command.  In the System Settings under Advanced |Autostart there is an option to Add Script that you can use.

  2. Logout of KDE and log back in.

Step 8 – Running the VMWare-Toolbox
There may be some vmware settings you want to change on the VMWare guest. Not many are configurable through the vmware-toolbox on FreeBSD but at least one is configurable here called Time Synchronization. This feature will synchronize your vmware guest’s time with the hosts time.

  1. Run vmware-toolbox

    $ vmware-toolbox

  2. Check the box to enable time synchronization
  3. Feel free to explore and become familiar with the other settings, there aren’t many and two of the settings can only run as root.

Tuning Recommendations
I found a lot of tuning recommendations. However, if you chose Other | FreeBSD or Other FreeBSD 64 when creating your vm, these first two are set by default.

  1. It is recommended to have kern.hz set to 100 and it is by default so nothing to do here.
  2. It was recommended that on the host, in the vmx config file for the guest, that the following be configured:
    • ethernet0.virtualDev = “e1000”

    Again, if you chose Other | FreeBSD or Other FreeBSD 64 when creating your vm, this is set by default.

  3. Some people will recommend this setting in the vmx config file as well:
    • tools.syncTime = “TRUE”

    However, this is the same as the time synchronization setting we configured with the vmware-toolbox. It is safer to make the configuration in the vmware-toolbox tool.

If you know of any further tuning options, please comment them to me.


Copyright ® Rhyous.com – Linking to this article is allowed without permission and as many as ten lines of this article can be used along with this link. Any other use of this article is allowed only by permission of Rhyous.com.

PDFForge released a new version of PDFCreator 0.9.9

Hey all,

PDFCreator is a nice tool that lets you

I am not sure if you noticed, but PDFForge released a new version of PDFCreator.

I just want everyone to know that I use PDFCreator with Windows 7.

PDFCreator allows me to print from any application to PDF, so if you thought you had to buy Adobe Acrobat Professional to get this feature, you are mistaken. PDFCreator gives you this feature at zero cost to you or your organization.

Save paper and print to PDF.


How to install the vmware video card driver on a FreeBSD 8 guest virtual machine?

Well, I have documentation on how to create a FreeBSD 8 Desktop environment here:
How to install and configure a FreeBSD 8 Desktop with Xorg and KDE?

However, if you install FreeBSD as a VMWare guest, you will want to install two additional pieces of software when you are finished:

  1. You need to install the VMWare X11 driver (no, it will not be installed when you install the VMWare tools)
  2. You need to install VMWare-tools

This guide is to walk you through resolving the first of these two issues. I assume you followed my article for building the FreeBSD desktop, and if you did, these steps will work for you. But if you didn’t, I can’t guarantee that there won’t be some steps that are slightly different for you.

Part 1 – Installing and Configuring the VMWare X11 Driver

Step 1 – Install the VMWare X11 driver

  1. Change to the appropriate ports directory.

    # cd /usr/ports/x11-drivers/xf86-video-vmware

  2. Make (compile) and install the VMWare X11 driver

    # make install

The VMWare X11 driver is now installed.

Step 2 – Modify the /etc/X11/xorg.conf
Note: If you didn’t create an xorg.conf file, then you don’t need to do this step, so skip it.

  1. If you auto-created your xorg.conf, auto create it again.
    # Xorg -configure
  2. Move the auto created /root/xorg.conf.new to /etc/X11/xorg.conf.

    # mv /root/xorg.conf.new /etc/X11/xorg.conf

If you have a custom xorg.conf, then it may be easier to edit it manually.

  1. Edit the /etc/x11/xorg.conf as root.

    # ee /etc/x11/xorg.conf

  2. Change the “Device” section to look as follows.
    Section "Device"
            ### Available Driver options are:-
            ### Values: <i>: integer, <f>: float, <bool>: "True"/"False",
            ### <string>: "String", <freq>: "<f> Hz/kHz/MHz"
            ### [arg]: arg optional
            #Option     "HWcursor"                  # [<bool>]
            #Option     "Xinerama"                  # [<bool>]
            #Option     "StaticXinerama"            # <str>
            Identifier  "Card0"
            Driver      "vmware"
            VendorName  "VMware"
            BoardName   "SVGA II Adapter"
            BusID       "PCI:0:15:0"
    EndSection
    

Step 3 – Restart Xorg
If you are still in KDE, you must logout and log back in. You can probably do this without instructions, but if this is your first time using FreeBSD and KDE 4, a quick screen shot of how to do this won’t hurt. I do like my walk-thru’s to be newbie proof.

  1. At the bottom left of your window, click on the K icon, then Leave, then Logout.

  2. After clicking the Leave option, KDE will exit, and xorg will restart and you should be returned to the login screen. Now log back in.

Note: If you aren’t using KDM, then you will be returned to your logged in shell and you will have to launch Xorg and KDE yourself using the startx command.
Step 4 – Configure your screen resolution

  1. Click the K icon, then Applications | System.
  2. When the menu shifts, the system options appears. Select Screen Resize & Rotate.

  3. Now don’t be confused when this doesn’t open a window. It does launch the program, but for some reason it starts up minimized and is an icon at the bottom right of the panel. It looks like a little monitor (the red arrow is pointing to it).
  4. Click on the monitor icon to get the Configure Display window.
  5. Click the Size drop down menu and choose your new resolution.
  6. Click Apply.
  7. If the resolution fails, it should return to the previous resolution after about ten or fifteen seconds. If the resolution works, click the option to accept the resolution.

You should now have the VMWare Driver installed.

Part 2 – Installing and Configuring VMWare Tools

This is in a separate post here:
How to install VMWare-tools on FreeBSD 8?


Copyright ® Rhyous.com – Linking to this article is allowed without permission and as many as ten lines of this article can be used along with this link. Any other use of this article is allowed only by permission of Rhyous.com.


How to compile and install K-3D 0.7.12 on FreeBSD 8? (Update K-3D 0.8.0.0)

Ok, so I found a port that is need of updating. K-3D. FreeBSD has K-3D version 6.7 in ports but K-3D is on release 7.11 and approaching their version 8 release. So lets see what we need to do to get this port updated.

To start out, I have informed both FreeBSD and K-3D that I am going to help with this using their forums.
http://forums.freebsd.org/showthread.php?t=10647
http://www.k-3d.org/forums/topic/updated-port-for-freebsd-8

Step 1 – Build a FreeBSD 8 Desktop Environment
Build yourself a desktop as described here (or however you want if you know what you are doing):
How to install and configure a FreeBSD 8 Desktop with Xorg and KDE?

Step 2 – Install dependencies
The following are dependencies that are required to build K-3D on FreeBSD 8.

  1. Install mercurial
    K-3D uses Mercurial as its version managed system for its code (it used to use subversion but now uses mercurial). So to download the code you need to install Mercurial.

    As root do this:

    # cd /usr/ports/devel/mercurial
    # make install

  2. Install cmake 2.8 or later.
    K-3D now uses cmake as its build management system as opposed to make or gmake. Since cmake is not installed on FreeBSD by default, lets install it.

    # cd /usr/ports/devel/cmake
    # make install

  3. Install cairomm.

    # cd /usr/ports/graphics/cairomm
    # make install

    Note: This will also install glibmm and sigc++.

  4. Install gnome-vfs.

    # cd /usr/ports/devel/gnome-vfs
    # make install

  5. Install gtkglex.

    # cd /usr/ports/x11-toolkits/gtkglext
    # make install

  6. Install gtkmm24.

    # cd /usr/ports/x11-toolkits/gtkmm24
    # make install

  7. Install gtksourceview2.

    # cd /usr/ports/x11-toolkits/gtksourceview2
    # make install

  8. Install gts.

    # cd /usr/ports/graphics/gts
    # make install

  9. Install ImageMagick.

    # cd /usr/ports/graphics/ImageMagick
    # make install

  10. Install e2fsprogs-libuuid.

    # cd /usr/ports/misc/e2fsprogs-libuuid
    # make install

  11. Install Doxygen.

    # cd /usr/ports/devel/doxygen
    # make install

    Note: This took quite a long time to compile because it also had a lot of large depencies.

  12. Install libexecinfo.

    # cd /usr/ports/devel/libexecinfo
    # make install

Step 3 – Download the code and build it

  1. As a regular user, run these commands:

    $ cd ~
    $ hg clone http://k3d.hg.sf.net/hgweb/k3d/k3d

    The code will take a minute or two (or more if you have a slow connection) to download.

  2. – Make a build directory
    K-3D cannot be built in the same directory where the code resides. So lets create a build directory and change to that directory.

    $ mkdir ~/k3d-build
    $ cd k3d-build

  3. Run cmake against k3d

    $ cmake ~/k3d

    Note: If you forget to install the dependencies, you will get errors. Here is the output of my attempt to compile before I installed the dependencies.

    $ cd k3d-build
    $ cmake ~/k3d
    -- checking the width of std::vector<>::size_type for this platform
    --   std::vector<>::size_type is 64 bits
    -- checking for module 'cairomm-1.0'
    gnome-config: not found
    --   package 'cairomm-1.0' not found
    -- checking for module 'dbus-glib-1'
    --   found dbus-glib-1, version 0.82
    -- checking for module 'freetype2'
    --   found freetype2, version 9.20.3
    -- checking for module 'glibmm-2.4'
    gnome-config: not found
    --   package 'glibmm-2.4' not found
    -- checking for module 'gnome-vfs-2.0'
    gnome-config: not found
    --   package 'gnome-vfs-2.0' not found
    -- checking for module 'gtkglext-1.0'
    gnome-config: not found
    --   package 'gtkglext-1.0' not found
    -- checking for module 'gtkmm-2.4'
    gnome-config: not found
    --   package 'gtkmm-2.4' not found
    -- checking for module 'gtksourceview-2.0'
    gnome-config: not found
    --   package 'gtksourceview-2.0' not found
    -- checking for module 'gts'
    gnome-config: not found
    --   package 'gts' not found
    -- checking for module 'ImageMagick++'
    gnome-config: not found
    --   package 'ImageMagick++' not found
    -- checking for module 'OpenEXR'
    --   found OpenEXR, version 1.6.1
    -- checking for module 'libpng12'
    --   found libpng12, version 1.2.40
    -- checking for module 'sigc++-2.0'
    gnome-config: not found
    --   package 'sigc++-2.0' not found
    CMake Error at cmake/modules/K3DDependencies.cmake:18 (MESSAGE):
      Couldn't find glibmm, which is required to build K-3D.  You can obtain
      glibmm from http://gtkmm.org.
    Call Stack (most recent call first):
      CMakeLists.txt:248 (K3D_CHECK_REQUIRED_DEPENDENCY)
    
    
    CMake Error at cmake/modules/K3DDependencies.cmake:18 (MESSAGE):
      Couldn't find libsigc++, which is required to build K-3D.  You can obtain
      libsigc++ from http://libsigc.sourceforge.net.
    Call Stack (most recent call first):
      CMakeLists.txt:251 (K3D_CHECK_REQUIRED_DEPENDENCY)
    
    
    -- checking for module 'uuid'
    gnome-config: not found
    --   package 'uuid' not found
    CMake Error at cmake/modules/K3DDependencies.cmake:18 (MESSAGE):
      Couldn't find uuid, which is required to build K-3D.  You can obtain uuid
      from http://www.ossp.org/pkg/lib/uuid.
    Call Stack (most recent call first):
      CMakeLists.txt:257 (K3D_CHECK_REQUIRED_DEPENDENCY)
    
    
    CMake Error at cmake/modules/K3DDependencies.cmake:28 (MESSAGE):
      Couldn't find the gtkglext library, which is required by
      K3D_BUILD_NGUI_MODULE.
    Call Stack (most recent call first):
      CMakeLists.txt:272 (K3D_CHECK_OPTIONAL_DEPENDENCY)
    
    
    CMake Error at cmake/modules/K3DDependencies.cmake:28 (MESSAGE):
      Couldn't find the gtkmm library, which is required by
      K3D_BUILD_NGUI_MODULE.
    Call Stack (most recent call first):
      CMakeLists.txt:273 (K3D_CHECK_OPTIONAL_DEPENDENCY)
    
    
    CMake Error at cmake/modules/K3DDependencies.cmake:28 (MESSAGE):
      Couldn't find the cairomm library, which is required by
      K3D_BUILD_NGUI_PIPELINE_PANEL_MODULE.
    Call Stack (most recent call first):
      CMakeLists.txt:274 (K3D_CHECK_OPTIONAL_DEPENDENCY)
    
    
    -- checking for module 'gthread-2.0'
    --   found gthread-2.0, version 2.20.5
    -- generating i18n catalog
    --   done
    -- Could NOT find Doxygen  (missing:  DOXYGEN_EXECUTABLE)
    -- Configuring incomplete, errors occurred!
    $
    

    Hopefully you installed the dependencies and didn’t see any of the above errors.

Step 4 – Test Running the application
We can test running this from the build directory before installing, so lets do that.

  1. From the k3d-build directory, type make run:

    $ make run

  2. Ok, so now that it is compiling it is failing to run…hopefully we can get that fixed. Stay tuned.

UPDATE: 2/2/2010

Ok, so I am back. Here is the what I have done.

Step 5 – Fixing run errors

  1. Compiled with debugging. I ran ccmake ~/k3d again and this time I set the CMAKE_BUILD_TYPE to Debug before choosing to configure. Once configure was done, I ran make again.
  2. Grepped for the error in the code. Specifically, this term:

    $ grep -Rn k3d::iuser_interface ~/k3d/*

    I found the problem code was in this file and line number:
    File: /home/jared/k3d/application/k3d_main.cpp
    line: 460

  3. Went to the problematic code and investigated it. It seems to be a simple check, so I commented that block of code out so it would continue:
    //      if(!dynamic_cast<k3d::iuser_interface*>(g_user_interface))
    //     {
    //              delete g_user_interface;
    //              g_user_interface = 0;
    //              handle_error("UI plugin module [" + module_name + "] does not impleme
    //              return;
    //      }
    
  4. I recompiled (everything remained compiled except the one part with the file I changed so compiling was quick).
  5. I launched make run again:

    # make run

    This time, as I had hoped, it loaded the application completely.

    However, I noticed some errors.

    The first two error lines occurred early in the load process. I am not sure but they seem to be unrelated:

    INFO: Gtk: Failed to load module “atk-bridge”: Shared object “libatk-bridge.so” not found, required by “k3d”
    :1: error: unexpected character `\241′, expected keyword – e.g. `style’

    ERROR: /home/jared/k3d/modules/virtual_opengl_painters/sds_point_painter.cpp line 73: assertion `delegate’ failed
    ERROR: Error creating document plugin: VirtualOpenGLSDSPointPainter
    ERROR: /home/jared/k3d/modules/virtual_opengl_painters/sds_edge_painter.cpp line 73: assertion `delegate’ failed
    ERROR: Error creating document plugin: VirtualOpenGLSDSEdgePainter
    ERROR: /home/jared/k3d/modules/virtual_opengl_painters/sds_face_painter.cpp line 73: assertion `delegate’ failed
    ERROR: Error creating document plugin: VirtualOpenGLSDSFacePainter

  6. I searched the ports tree for the libatk-bridge.so file.

    # /usr/ports
    # grep -R libatk-bridge *

    It looks like there is a at-spi package that provides this library.

  7. Install the at-spi package

    # cd /usr/ports/accessibility/at-spi
    # make install

  8. Tried to make run again.

    # exit
    $ cd ~/k3d-build
    $ make run

    The application loaded and the libatk-bridge error was gone but it was replaced with a warning:

    (k3d:55092): atk-bridge-WARNING **: AT_SPI_REGISTRY was not started at session startup.

    (k3d:55092): atk-bridge-WARNING **: IOR not set.

    (k3d:55092): atk-bridge-WARNING **: Could not locate registry

  9. Ok, so now that it is running, I think it is time to submit bugs to K-3d for the remaining errors.

As of right now, I don’t think it is worth the effort to create a port of version 7.11 as it has bugs for FreeBSD. I feel comfortable that when the next revision of K-3D comes out, version 8.x, the code will work well and we will create a port for it.

UPDATE: February 8, 2010

The main developer has made some changes so that K-3D launches now. The error that prevent the launch is gone (the others that seem somewhat benign are still occurring).

There is now a problem with K-3D on FreeBSD in that the faces cannot be properly selected, so the user-interface is not working perfectly.

Again, I will work on this problem and update this post.

Update: The problem is now resolved. There are couple lingering issues that you can read about at the K-3D forums.
http://www.k-3d.org/forums/topic/updated-port-for-freebsd-8

Hopefully all will be resolved when version 8 releases and we can make a new port.

Update: March 31, 2010

Ok, it looks like we need to move to Mesa 7.6.1 to get the latest versions of K-3D to work. Mesa 7.6.1 is available on FreeBSD.

You just have do make WITHOUT_NOUVEAU in order for the new version to be pulled. Here is what I did.

portsnap fetch update

cd /usr/ports/graphics/libGL/
make deinstall
make WITHOUT_NOUVEAU=yes install

cd /usr/ports/graphics/libGLU/
make deinstall
make WITHOUT_NOUVEAU=yes install

cd /usr/ports/graphics/libGLw/
make deinstall
make WITHOUT_NOUVEAU=yes install

cd /usr/ports/graphics/libglut/
make deinstall
make WITHOUT_NOUVEAU=yes install

cd /usr/ports/graphics/libdrm/
make deinstall
make WITHOUT_NOUVEAU=yes install

cd /usr/ports/graphics/dri/
make deinstall
make WITHOUT_NOUVEAU=yes install

Now things are working rather well, though the rendering with Aqsis is just giving me a black box. Hopefully I will fix that.

I fixed the black box just be restarting K-3D (I had installed Aqsis while K-3D was running).

However, now I am seeing a problem with Rendering the mug example. The handle does not appear to be rendered correctly.

It should look like this:

However, on FreeBSD it looks like this:


How to install the Code::Blocks IDE on FreeBSD 8?

Ok, so some developers are completely happy and content coding without an Integrated Development Environment (IDE), but I really like IDEs and think they provide a lot of ways to improve development speed and efficiency. I never have been able to get into vim or emacs though if you are into it, that’s cool for you, just doesn’t work for me.

So lets install the Code::Blocks IDE on FreeBSD and compile an application or two.

Step 1 – Setup a FreeBSD Desktop
Instructions for doing this are located here
How to install and configure a FreeBSD 8 Desktop with Xorg and KDE?
After following the linked-to guide, you should have FreeBSD with Xorg and KDE installed.

Step 2 – Install CodeBlocks from ports

  1. Login as root.
  2. Change to the ports directory.

    # cd /usr/ports

  3. Find the CodeBlocks port. There are a couple of commands that can help you find the port.

    Run this from anywhere:

    # whereis codeblocks

    Or from /usr/ports run this:

    # make search name=codeblocks

    The port location is /usr/ports/devel/codeblocks.

  4. Change to the directory for the codeblocks port.

    # cd /usr/ports/devel/codeblocks

  5. Type make install to compile and install Code::Blocks.

    # make install

    Note: If you pay attention while CodeBlocks is compiled, you will see that wxWidgets is installed as a dependency.

Step 3 - Launch CodeBlocks for the first time

  1. Click the K icon at the bottom left (similar to the Start icon in windows) and move the cursor over the Applications tab.
  2. Click Development and you will see the list of items. Yes, the Code::Blocks install places an icon to the Development section of the KMenu for you.

  3. Click the Code::Blocks icon.
  4. You will be prompted for a compiler. Select GNU GCC Compiler.

You now are running the Code::Blocks IDE on FreeBSD.

Note: Code::Blocks opens and gives you a "Tip of the day" window. These tips can be valuable, so unless you are a Code::Blocks expert, I recommend leaving them on and taking the short seconds it takes to read them. This goes along with my overall theme of becoming a little more of an expert each day.

Step 4 - Create a new project and compile it

  1. Click File | New | Project.
  2. Select Empty Project.
  3. The next screen is just a welcome screen and you can click a check box to never see it again and then click Next.
  4. Enter a project name. I just typed in hw (short for, yes you guessed it, Hello World).
  5. Enter a directory or click the ... icon to browse to a directory.
    Note: The bottom two fields are filled out for you.

  6. Click Next.
  7. On the next screen you have options, such as switching to a different compiler, but everything is pretty much set to defaults how you probably want. So unless you have a good reason, leave it as is and click Finish.
  8. Click File | New | Empty File.
  9. When prompted to add to the project, choose Yes.
  10. Enter a file name. I used main.cpp and click next.
  11. You will be prompted for the targets this file should be added to, such as debug and release. Click Select All and hit Ok.
  12. On the left, under Projects, expand Workspace, the expand the project Name ("hw" in this example), expand Sources.
  13. Open main.cpp by double-clicking on it.
  14. Enter your code (in this case I am entering in some simple hello world code).

    #include

    int main()
    {
    std::cout << "Hello World" << std::endl; return 0; } [/sourcecode]

  15. Select Build | Build or press Ctrl + F9 to build/compile your program.

Your program should now be compiled.

Step 5 - Run the program

  1. You can run the program in two ways:
    • Select Build | Run or press Ctrl + F10.
    • Open a shell and browse to the directory.

Step 6 - Debug the program
To debug a program you must first create a break point and then start debugging, in that order. So lets do it.

  1. Set a breakpoint by clicking just to the right of the line numbers just to the left of the line of code you want the program to break at. When you set the break point, a red circle is added. I am setting a breakpoint on line 3 of the Hello World code, which is the main() function.
  2. Click Debug | Start or press F8. The program will start and a yellow arrow will show up inside the red circle.
  3. Press F7 to cause the debugging to continue on to the next line. Notice the yellow arrow moves to the next line.

Congratulations you are now using the Code::Blocks IDE on a FreeBSD desktop.


Copyright ® Rhyous.com - Linking to this article is allowed without permission and as many as ten lines of this article can be used along with this link. Any other use of this article is allowed only by permission of Rhyous.com.


Book Review: TCP/IP Sockets in C – Practical Guide for Progammers Second Edition (Chapter 2)

Hello everyone,

I have just made my way through chapter 2. It had a few hiccups but was overall well done.

This chapters introduces you to a simple Client and Server communication process. The client program can send text to the server. The server sends the text back.

Client Code

The client code seems to work fine. I am a big fan of showing the absolute minimum the first time and not including anything else that may get in the way. However, they didn’t do the minimal, (though don’t worry, they were very close to the minimal). They also added two files, so to compile the following files are needed:

  • TCPEchoClient4.c
  • Practical.h
  • DieWithMessage.c

Personally, I have a hard time using code that I don’t understand, so this made me deviate from my purpose of learning sockets to see what is in these other files. Of course, the book give brief explanations too. These files were small and easy to understand.

Practical.h just declares a bunch of functions. However the implementation of these functions are if different .c files.

DieWithMessage.c provides the implementation of two of these functions, DieWithUserMessage and DieWithSystemMessage. These functions are little more than wrappers to output error messages to standard error.

To compile the client code on FreeBSD 8, I did this:

  1. Put the following files in the same directory: /home/jared/Devel/Echo/echoclient
    • TCPEchoClient4.c
    • Practical.h
    • DieWithMessage.c
  2. Change to that directory.
    cd /home/jared/Devel/Echo/echoclient

  3. Run gcc as follows:
    gcc TCPEchoClient4.c DieWithMessage.c -o echoclient

The book includes information about a web site where the code from the book can be downloaded. This web site is here:
http://cs.ecs.baylor.edu/~donahoo/practical/CSockets2/textcode.html
When I downloaded the code from there, the compiling of the client code worked first time and the echoclient works.

When I typed the code in myself (which I like to do because I think it helps me learn better to actually have to type all the code), I had some typos that the compiler errored on and I fixed them.

Server Code (IPv4)
My experience with this first example of server code was…well, lets just say it was confidence building.

The server code also had other files. Not only did it have the same extra files the client code had, but it required even more files:

  • TCPEchoServer4.c
  • Practical.h
  • DieWithMessage.c
  • TCPServerUtility.c
  • AddressUtility.c

We already know what Practical.h and DieWithMessage.c do.

TCPServerUtility.c is similar to DieWithMessage.c in that it provides implementation of functions declared in Practical.h, however, it is not the same in that it is not as short of a file with over 100 lines. It is not as complex as it looks because TCPServerUtility.c provides implementation for only three functions: SetupTCPServerSocket, AcceptTCPConnection, and HandleTCPConnection.

AddressUtility.c provides the implementation to functions declared in Practical.h as well. The following two functions are implemented: PrintSocketAddress, SockAddrsEqual.

I put these files in the same directory and tried to compile just like I did with the client code. However, there was a huge problem when I tried to compile. I got a long lists of errors.

[jared@FBSD8 ~/Devel/Echo/echoserver1]$ gcc TCPEchoServer4.c TCPServerUtility.c DieWithMessage.c AddressUtility.c
TCPServerUtility.c: In function ‘SetupTCPServerSocket’:
TCPServerUtility.c:17: error: ‘IPPROTO_TCP’ undeclared (first use in this function)
TCPServerUtility.c:17: error: (Each undeclared identifier is reported only once
TCPServerUtility.c:17: error: for each function it appears in.)
TCPServerUtility.c:25: error: ‘for’ loop initial declaration used outside C99 mode
AddressUtility.c:6: warning: ‘struct sockaddr’ declared inside parameter list
AddressUtility.c:6: warning: its scope is only this definition or declaration, which is probably not what you want
AddressUtility.c: In function ‘PrintSocketAddress’:
AddressUtility.c:16: error: dereferencing pointer to incomplete type
AddressUtility.c:17: error: ‘AF_INET’ undeclared (first use in this function)
AddressUtility.c:17: error: (Each undeclared identifier is reported only once
AddressUtility.c:17: error: for each function it appears in.)
AddressUtility.c:18: error: dereferencing pointer to incomplete type
AddressUtility.c:19: error: dereferencing pointer to incomplete type
AddressUtility.c:21: error: ‘AF_INET6’ undeclared (first use in this function)
AddressUtility.c:22: error: dereferencing pointer to incomplete type
AddressUtility.c:23: error: dereferencing pointer to incomplete type
AddressUtility.c:30: error: dereferencing pointer to incomplete type
AddressUtility.c: At top level:
AddressUtility.c:40: warning: ‘struct sockaddr’ declared inside parameter list
AddressUtility.c: In function ‘SockAddrsEqual’:
AddressUtility.c:43: error: dereferencing pointer to incomplete type
AddressUtility.c:45: error: dereferencing pointer to incomplete type
AddressUtility.c:45: error: ‘AF_INET’ undeclared (first use in this function)
AddressUtility.c:48: error: dereferencing pointer to incomplete type
AddressUtility.c:49: error: dereferencing pointer to incomplete type
AddressUtility.c:50: error: dereferencing pointer to incomplete type
AddressUtility.c:50: error: ‘AF_INET6’ undeclared (first use in this function)
AddressUtility.c:53: error: dereferencing pointer to incomplete type
AddressUtility.c:54: error: invalid application of ‘sizeof’ to incomplete type ‘struct in6_addr’
AddressUtility.c:54: error: dereferencing pointer to incomplete type
AddressUtility.c:55: error: dereferencing pointer to incomplete type
[jared@FBSD8 ~/Devel/Echo/echoserver1]$

This was not comforting. I really don’t like to debug sample code but here it goes. In the past, I probably would have stared at these errors and maybe I wouldn’t have had the skills to solve them. However, I was undaunted and resolved these. Let me explain how I resolved them.

  1. TCPServerUtility.c:17: error: ‘IPPROTO_TCP’ undeclared (first use in this function)
    This first error is a problem in TCPServerUtility.c with IPPROTO_TCP variable being undeclared. So I had to figure out where IPPROTO_TCP was declared. It is declared in netinet/in.h, which for some reason is not included. Maybe it only needs to be included on FreeBSD or maybe this is a bug in the Author’s code. Later, I will send the author a link to this post and let him comment on it. For now, I will add this line to the top of the TCPServerUtility.c.

    #include <netinet/in.h>
    
  2. TCPServerUtility.c:25: error: ‘for’ loop initial declaration used outside C99 mode
    This second error can easily be resolved by compiling with C99 mode enabled. This can be added to gcc as a paramter -std=c99.

  3. AddressUtility.c:16: error: dereferencing pointer to incomplete type
    This is not super clear to me at first. However, the line isn’t doing much. So why is the type incomplete? Maybe the struct is not declared yet because again, a file that should be included is not. The struct being called is sockaddr_in and it is defined in netinet/in.h but sure enough, netinet/in.h is not included in AddressUtility.c, so lets add it.

    #include <netinet/in.h>
    
  4. AddressUtility.c:17: error: ‘AF_INET’ undeclared (first use in this function)
    This error in AddressUtility.c is similar to the first error in TCPServerUtility.c. There is probably a header file missing. Again, this may be only a FreeBSD issue or it may be a bug in the author’s code. It is hard to know since I don’t see anywhere where the author specified the platform this was tested on. So I researched and found that AF_INET is declared in sys/socket.h however, again it is not included. Se we add this line to the file.

    #include <sys/socket.h>
    

Ok, now try to compile with this command line:

gcc -std=c99 TCPEchoServer4.c DieWithMessage.c TCPServerUtility.c AddressUtility.c -o echoserver4

Everybody cheer…this time it worked.

It tested the client and the server application together and sure enough, communication occurred. Any string I sent from the client, server sent back.

I was able to use the exact same command with the IPv6 version of the server code, only replacing the TCPEchoServer4.c with TCPEchoServer6.c.

gcc -std=c99 TCPEchoServer6.c DieWithMessage.c TCPServerUtility.c AddressUtility.c -o echoserver6

The rest of the chapter
The rest of the chapter is about what you would expect. The author gives a snippet of code and explains it well. Make sure to take time to read it. This is foundational material for understanding the rest of this book, so it may not hurt to read it twice.

Other notes on the C code
You need to be familar with some common C language features such as typedef and struct as they are used heavily.

typedef
Most the types used are just types that have been renamed with typedef. I am not 100% sure why one would declare a function as follows but I know at least one reason that I will mention:

in_port_t port;

To me this is much more confusing than what it is really saying. in_port_t is just an unsigned short. So it would seem that one should declare the function as follows:

unsigned short port;

However, what if your code is very popular and five years or ten years from now the RFC changes the implementation of a port so that an unsigned int is now required. it is really easy to change in_port_t to point be a typedef of an unsigned int and no other work needs to be done. However, if you declared your variable using unsigned short instead of in_port_t, then every where in your code that you did this, you have to find and manually change it or your code will probably fail.

You can even make a typedef of a typedef and in fact that is what in_port_t is. If you have an IDE (I am using Code::Blocks), then you can highlight the type, right click it and choose something similar to Find Declaration of: in_port_t and it will take you to where this value is defined using a typedef. However, in_port_t is a typedef of uinst16_t, which is a typedef itself of __uinst16_t, which is a typedef of unsigned short. So it is multiple typedefs deep. While sometimes confusing, this can be useful as mentioned above.

struct
C does not have objects or classes. Instead it has structs and one might say that they are the predecessor to objects or classes. However, they are not objects or classes and you should understand how they function. If you understand them, this book will be easier to understand. If you don’t, you will probably struggle. If you aren’t clear on structs, then take time to read about them.


Book Review: TCP/IP Sockets in C – Practical Guide for Progammers Second Edition (Chapter 1)

Hello everyone.

I want to learn sockets on FreeBSD so naturally I bought the following book about it.
TCP/IP Sockets in C, Second Edition: Practical Guide for Programmers (The Morgan Kaufmann Practical Guides Series)

Ok, so chapter one says it is an introduction but would be bettered titles as “Basic Computer Networking Concepts” as it really covers in a very, very broad sense the important points of the OSI model (without mentioning the OSI model). If you are excellent at networking, TCP/IP, etc, this chapter will be a quick read. It is so short that even if you are already an expert, just read it. Who knows, you may find that one line that will teach you something. By the way, I spent four years doing tech support for Nortel Networks Routers, Layer 3 switches, Load Balancers, Wireless APs, etc. I lived in the network world and spent a lot of time in Sniffer Pro or Wireshark (then Ethereal). After which I came to LANDesk (my current employer) where I spent a lot of time working with PXE booting over the network, which uses bootp, dhcp, TFTP and furthered my understanding of client/server communication. So you might think that I should have skipped this chapter entirely. No, I read it.

I found section 1.2.2 – Dealing with Two Versions interesting. This section mentions straight up that socket programmers will have to deal with IPv6. The whole chapter doesn’t just talk of IPv4 only, it includes little snippets of both. I believe the big move to IPv6 will not come quite yet. In 1999, a trainer in my MSCE class said that everyone will be using IPv6 within five years (2004) and if you don’t know, it has really been adopted yet in 2010. It is moving slowing and I think it will continue. Windows 7 and Windows 2008 will cause a lot of adoption, but people are still using Windows 98 in many places even today in 2010. Windows 2000 and Windows XP will take quite a long time to fade away. I predict that some companies (though not many) will still be running Windows XP in 2020. I think that a bigger adoption of IPv6 will occur once the next windows OS (the version after Windows 7) is on the majority of computers. So windows 7 will do what Windows Vista couldn’t and replace XP in the corporate world. The corporate world still must move all their domain environments to Server 2008 (or they may stay on Windows Server 2003 until the next server release after Windows Server 2008 ). The home world will take about five years (2015) to have everyone a majority moved to Windows 7. Anybody on Vista will upgrade to get off that poor unstable operating system and anybody running XP will probably have old hardware that will start dying off and will have to purchase new computers that already come with Windows 7. Moving the operating system is not enough. That aone won’t make everyone move to IPv6. Wireless routers are just starting to support IPv6 such as the DIR-655 Xtreme N Gigabit Router. However, there is a big difference between supporting IPv6 and making IPv6 the default. Most Internet Service Providers (ISPs) still give IPv4 addresses. The infrastructure using IPv4 is so huge it could take a few more decades to completely remove it. You can probably guess that the adoption is going to reach a craze when your ISP starts sending you notices that they are moving to IPv6 and you have to comply and you don’t have a choice, kind of like what just happened with the analog TV service this year. Funny, thing, for a lot of people, me included, their Cable TV service is also their ISP.

Ok, enough rambling about IPv6. It is enough to know that you are going to start to have to deal with it now and at some future time IPv4 will be replaced and you will only have to deal with IPv6.

As for the other topics in the chapter, it is actually amazing that they were able to mention as many topics as they did in such short pages. They mention NAT and DNS and URLs and other important topic (each of which have dozens of large books covering just the one topic). The networking world is a whole other field that have engineers who spend their entire lives becoming experts at just using the equipment, let alone developing software for it. Usually a software developer won’t need to reach such an expert level understanding of networking (unless they are developing the OS for a router/switch or a software such as a firewall).

This chapter was necessary and they added it and I would say they did a good job keeping it short and simple. They did a good job of providing the detail needed at just enough level that a freshman/sophmore in college who knows little about networking and programming would be able to understand the concept of networking enough to have a general idea why they need to code with sockets they way the book will describe.

Stay tuned for a review on Chapter 2.

Update: My review on Chapter 2 is here:
Book Review: TCP/IP Sockets in C – Practical Guide for Progammers Second Edition (Chapter 2)


How to debug a portion of FreeBSD code using gdb from a shell? (Using Sysinstall code as an example)

Well, in my last FreeBSD Friday post, I talked about How to compile a portion of FreeBSD code with debugging? (Sysinstall for this example). The next step is to learn to step through the code. There is a debugging tool included with FreeBSD called gdb.

A good start for gdb is to read this document from the FreeBSD Developers’ Handbook.
http://www.freebsd.org/doc/en/books/developers-handbook/debugging.html

To really get good at gdb though, you should read the gdb documenation here:
http://sourceware.org/gdb/current/onlinedocs/gdb/

Well, lets get started.

Step 1 – Compile a portion of FreeBSD code with debugging enabled
How to compile a portion of FreeBSD code with debugging? (Sysinstall for this example)

Step 2 – Start gdb
As a user (not root) launch gdb with the name of the executable as the only parameter.

$ gdb sysinstall
GNU gdb 6.1.1 [FreeBSD]
Copyright 2004 Free Software Foundation, Inc.
GDB is free software, covered by the GNU General Public License, and you are
welcome to change it and/or distribute copies of it under certain conditions.
Type “show copying” to see the conditions.
There is absolutely no warranty for GDB. Type “show warranty” for details.
This GDB was configured as “amd64-marcel-freebsd”…
(gdb)

Step 3 – Set a break point
At the gdb prompt, type break main.

(gdb) break main
Breakpoint 1 at 0x416b00: file main.c, line 55.
(gdb)

Step 4 – Start the program
To start the program type run and hit enter.

(gdb) run
Starting program: /usr/home/jared/Devel/FreeBSD/head/usr.sbin/sysinstall/sysinstall

Breakpoint 1, main (argc=1, argv=0x7fffffffe998) at main.c:55
55 {
(gdb)

Step 5 – Step through the code
Ok, to step through the code you simply type ‘s’.

(gdb) s
Breakpoint 1 at 0x416b00: file main.c, line 55.
(gdb)

Once you have typed ‘s’ once, you can just hit enter and it will keep stepping through. You could keep typing ‘s’ but you don’t need to.

Step through the code until it terminates because you are not root.

Here is the entire run through in one screen.

$ gdb sysinstall
GNU gdb 6.1.1 [FreeBSD]
Copyright 2004 Free Software Foundation, Inc.
GDB is free software, covered by the GNU General Public License, and you are
welcome to change it and/or distribute copies of it under certain conditions.
Type “show copying” to see the conditions.
There is absolutely no warranty for GDB. Type “show warranty” for details.
This GDB was configured as “amd64-marcel-freebsd”…
(gdb) break main
Breakpoint 1 at 0x416b00: file main.c, line 55.
(gdb) run
Starting program: /usr/home/jared/Devel/FreeBSD/head/usr.sbin/sysinstall/sysinstall

Breakpoint 1, main (argc=1, argv=0x7fffffffe998) at main.c:55
55 {
(gdb) s
61 StartName = argv[0];
(gdb)
64 if (getpid() == 1) {
(gdb)
68 signal(SIGPIPE, SIG_IGN);
(gdb)
71 if (geteuid() != 0) {
(gdb)
72 fprintf(stderr, “Error: This utility should only be run as root.\n”);
(gdb)
Error: This utility should only be run as root.
204 }
(gdb)
0x0000000000404d9e in _start ()
(gdb)
Single stepping until exit from function _start,
which has no line number information.

Program exited with code 01.
(gdb)

Ok, you now have done some basic debugging with gdb and you have learned that you cannot run sysinstall as root.

Step 6 – Debug as root
Ok, this shouldn’t be hard for you by now. Sudo to root and repeat the above steps only this time the program will continue past the check for whether it is running as root because it will be. Stop just after you pass the line that checks if you are root.

One you get so far, you will actually get to the sysinstall gui and you can choose to exit.

Step 7 – Set a break point based on line number
Type the following to set a break point based on line number.

(gdb) break main.c:103
Breakpoint 2 at 0x416bd6: file main.c, line 103.
(gdb)

Step 8 – Continuing to the next break point
So now instead of stepping to line 110, we will just continue the program with the command “continue”. By the way, the following three commands will continue and all are really the exact same command. You might ask, “Why are there three ways to do the same thing?” I have to answer, “I don’t know, I didn’t write gdb.” But hey, I am not complaining.

  • continue
  • c
  • fg

So yes to continue you can type any of the three commands at the gdb prompt and your program will continue until the next break point or until the program terminates.

(gdb) c
Continuing.

Breakpoint 2, main (argc=1, argv=0x7fffffffe8c8) at main.c:103
103 systemInitialize(argc, argv);
(gdb)

Note on finding development code or development features
Often while developing, a developer adds code to help them develop. This is development code, development features, debug code, or whatever you want to call it. This code is not really meant to be used in production, but it sure helps the developer write and test and debug the production code. Most large applications have such hidden development features. When stepping through code, you should look for these.

As I was looking through the sysinstall code, I noticed a section of code starting at line 110 (obviously this is subject to change but you should be able to find the line number in the same area) that checks for a parameter called -fake.

    if (argc > 1 && !strcmp(argv[1], "-fake")) {
        variable_set2(VAR_DEBUG, "YES", 0);
        Fake = TRUE;
        msgConfirm("I'll be just faking it from here on out, OK?");
    }

This hidden switch is never mentioned in the man page. It appears to be one of those development only features that we can take advantage of to help us code Sysinstall. It also suggests that you can step through Sysinstall without having anything actually happen, which might be useful in debugging.

Making our first code change
Ok, so if I am going to use the -fake switch, I would assume that I could do so without running as root. Since we are “faking it” anyway, we might as well not be running as root at all.

So here is a code change I have made that will allow me to run as a normal user if I pass the -fake parameter. I am going to change line 73 (again this may not be the exact line for you as this is subject to change) where sysinstall checks if it is running as root and add an additional check to see if a parameter was passed and if so see if the parameter was -fake and if so, continue even though it is not root.

Here is what the code was originally.

    if (geteuid() != 0) {
        fprintf(stderr, "Error: This utility should only be run as root.\n");
        return 1;
    }

Here is what I changed the code to. Notice that I didn’t delete or add to the existing line just yet. Instead, I commented it out and added a new line because that makes it easier to switch back and forth when testing this new code out.

//if (geteuid() != 0) {
if (geteuid() != 0 && (argc < 2 || strcmp(argv[1], "-fake"))) { fprintf(stderr, "Error: This utility should only be run as root.\n"); return 1; } [/sourcecode] Ok, so save and exit. No go ahead and exit your root shell so you are just logged in as your user again. Recompile to apply your changes. In case you forgot, you recompile with this command:

$ make DEBUG_FLAGS=-g

Go ahead and debug again. Repeat the steps above again, however, this time, in the gdb prompt, before you execute the command “run”, go ahead and set the arguments to pass to your application so that the -fake argument is passed.

(gdb) set args -fake
(gdb)

Just to make sure, lets show the arguments to make sure that we properly set them.

(gdb) show args
Argument list to give program being debugged when it is started is “-fake”.
(gdb)

Now you can run your program in gdb and continue debugging sysinstall as a regular user. I think I am going to send this change in because maybe it should be a permanent change. What do you think?


Copyright ® Rhyous.com – Linking to this article is allowed without permission and as many as ten lines of this article can be used along with this link. Any other use of this article is allowed only by permission of Rhyous.com.


How to add a new Project Type option in dotProject 2.x

Hey all,

So in dotProject 2.x, you can select a project type.

There are three values by default:

Unknown
Administrative
Operative

Of course, these are generic and more granular types that you may want to add. Such changes can be made by a dotProject Administrator by going to System Admin | System Lookup Type and clicking the edit icon next to Select List | Project Type.

The format is quite simple:

0|Unknown
1|Administrative
2|Operative

So if you want to change it you just add in text more values in the same format.

0|Unknown
1|Administrative
2|Operative
3|Salesforce
4|Reporting
5|Community
6|Internal Tool

And interestingly enough there is not an apply button. Instead there is an “Edit” button (which doesn’t make sense, because you are already in edit mode). An “Apply” button would make much more sense.


Why does the calendar date field and the date field of another table sometimes not match up in QlikView?

Why does the calendar date field and the date field of some other table some times not match up in QlikView?

Ok, so I have two tables, one a Calendar table and one a table of of support cases (pulled from Salesforce). They both have a column called CalendarDate and both have the same date values. The table for support cases looks something like this (obviously this is a minimal example).

CaseNumber, CalendarDate
123456, 1/1/2010
123457, 1/2/2010
123458, 1/2/2010
123459, 1/2/2010
123460, 1/2/2010
123461, 1/3/2010
123462, 1/3/2010
123463, 1/3/2010

The Date value is calculated from a field and converted using the Date() function: Date(sourcecolumn)

The Calendar table of course has days and months, etc…For more information about my calendar, go here:
http://rhyous.com/2009/11/30/my-new-and-improved-calendar-in-qlikview/

Anyway, I should be able to create a chart that has CalendarDate as the Dimension and Count(CaseNumber) as the Expression and get something like the following:

However, it wouldn’t work. This is too simple to possibly fail, right? Is it a QlikView bug? Or a bug with the Salesforce plugin?

What is interesting, is that if I do a select field, which only shows unique values, all the values show up:

1/1/2010
1/1/2010
1/2/2010
1/2/2010
1/2/2010
1/2/2010
1/2/2010
1/3/2010
1/3/2010
1/3/2010
1/3/2010

Now that is just not right. They are the same value right? Well, obviously not if only unique values show.

So how could they be different?

Well, QlikView doesn’t actually store the date, it stores a number. So obviously the number is different somehow. Maybe it is because my Calendar creates the CalendarDate using an integer but the Salesforce date values come in as doubles.

So here is why I think this is a Salesforce bug. I am calling Date() against the value and it is creating the 1/1/2010.

I have to say that I feel that QlikView needs to normalize this data, so that a Date created using Date(Integer) that returns 1/1/2010 and a Date created using Date(Double) that returns 1/1/2010 should match.

I did find a simple workaround. If I do this to round the double to an integer, it works.

Date(Round(DateAsDoubleValue - .5, 1)) as CalendarDate,

I am not sure if this is by QlikView design, but personally, I would prefer that If I call Date() on any data type, the return values should be normalized and match.


Researching the process for integrating FreeBSD with Active Directory

Hello everyone.

So I am not trying to be pro-Microsoft and Anit-open source with this comment. I like both and want that to be clear. However, Active Directory is the single most used authentication source for workstations in a corporation. It is hard to obtain new FreeBSD users if we cannot make it easier for corporate users who must have their machine joined to an Active Directory domain and they must authenticate to active directory. There is both too much effort and not enough effort in the Open Source world to integrate with Windows features such as Active Directory. I think that may be because often the open source community’s computers are probably rarely joined to a domain and just like there are too many Linux distros, there are two many ways to authenticate with Active Directory.

Active Directory is so common in the corporate world, it shouldn’t be so hard to join an Active Directory domain in FreeBSD. I mean, seriously, does it have to be such a pain? FreeBSD really needs a one command script to integrate with Active Directory, or a single port….imagine it. You run one command: joindomain or go to an “activedirectoryintegration” port and type make install. The script/install would prompt you for the domain and then it would look up a server and if it couldn’t find one it would prompt you for a domain controller name or IP, it would prompt your for credentials, etc…, when the script ended, the workstation would be a member of the domain and domain users would be able to login. Maybe also there should be a config file where you can add domain users/groups that can sudo to root.

Alas, it is not so easy. (Google summer of code project idea, anyone…)

You might be thinking to yourself that if I want a feature, I should write and contribute it myself. Which is in part true. However, I am already doing what I can to contribute and have other projects I am working on (for example, writing walk-thrus like the one you are about to read).

So, there are multiple documents and online resources and so here are my sources. However, I found none of them to be 100% correct and the writers words themselves drip with uncertainty about whether they are using the best way.

  • http://satish-linuxbug.blogspot.com/2008/08/freebsd-with-active-directory-single.html
  • http://www.nosam.com/2008/09/making-freebsd-7x-a-windows-server-20032008-active-directory-domain-member
  • http://www.ctdx.net/2008/07/11/freebsd-single-sign-on-with-active-directory-and-access-control/
  • http://web.irtnog.org/doc/how-to/freebsd-winbind
  • www.samba.org/samba/docs/man/Samba-HOWTO-Collection/domain-member.html
  • http://segment7.net/projects/FreeBSD/kerberos.html
  • http://joseph.randomnetworks.com/archives/2005/11/08/freebsd-users-and-groups-with-samba-winbind-and-active-directory/
  • http://technet.microsoft.com/en-au/magazine/2008.12.linux.aspx

It is good to have competition…among competitors in a market place…but not in a product itself. We need one difinitive method for authenticating to Active Directory. I don’t care if multiple methods exist as long as there is one method that the FreeBSD team can rally around, recommend, considers secure, and include in base, or as a single port.

I have never configured FreeBSD to authenticate its users to Active Directory before and I have hardly touched Kerberos 5, I consider myself a newbie in this area. However, the only way to move from being a newbie to being an expert is to learn it and configure it and troubleshoot it, so I can gain experience and then be an expert.

So I have been researching the past week and half (In the evenings outside of work). I had hoped to make it last Friday’s FreeBSD Friday post, but It probably won’t be finished by this Friday.

It will take me a while to research because:

  1. I don’t want to say something is needed when it is not.
  2. I don’t want to leave something out or forget to document a setting that is needed.
  3. I don’t like to change settings that I don’t understand.
  4. When writing a walk-thru, I don’t like telling some one what to do without explaining why when the why is not obvious.

So far it there are articles on integrating with Active Directory using the following:

  1. FreeBSD + Samba 3.x
  2. FreeBSD + Kerberos 5
  3. FreeBSD + Kerberos 5 (built-in) + Samba 3.x
  4. FreeBSD + Kerberos 5 (from ports) + Samba 3.x
  5. FreeBSD + LDAP + Samba 3.x

The ones I have tested so far have not been fully functional, but I have not tested all the articles yet. Maybe I doc on each method is warranted.

So which method is the best for the largest majority of FreeBSD users?

So if you are in a Windows environment, you may want samba anyway so number 1 in the list looks like a good choice. However, some articles say that samba alone won’t work with Active Directory 2003/2008. If that is true, then number 3 in the list may be better. I don’t like number 4 because why install something that is already installed (however, Heimdal is installed not MIT and if there is a reason you need MIT then number 4 makes sense). Number 5 I haven’t even researched but the guy who wrote the doc now says it is not as good of an option as method 1.

Ok, so Active Directory has multiple settings, and the first thing I want to test is a default clean Active Directory install. And then if I increase the security, do any of the above methods break?

No one really seems to have taken this to the next level of research, so anyway…you can see my confusion and frustration. This is definitely an area that needs to be cleaned up documented and probable coded into a long term manageable solution.


Keyboard Shortcuts – To all desktops everywhere, please standardize

Hello world,

I mostly use Windows 7 as a desktop but I often use FreeBSD with KDE, too.

I just submitted this wish to the KDE team.

Bug 221667 – Please make Keyboard shortcuts the same as those used by Microsoft Windows
https://bugs.kde.org/show_bug.cgi?id=221667

If you agree, please Login and vote for this bug. I so want to always use the same keyboard shortcuts no matter which platform I am installed on.

This probably is not just an enhancement request for KDE but for every GUI Operating System everywhere. In fact, let’s make a standard set of Keyboard Shortcuts and have every desktop-like software use the same exact keyboard shortcuts. Maybe someone who is a member could write and RFC and publish it, or does it need to be an IEEE standard?

Anyway…I try not to rant, but today it happened. Sorry.


How to get a full Control Panel/Administrative View in Windows 7 Windows 2008 or Vista? Or how to have a God Mode in Windows 7 Windows 2008 or Vista?

Ok, so the Control Panel is annoying to me in Windows 7 (or Windows 2008 or Windows Vista). I want the big long list like I used to have. Also, I would like the Administrative tools and other features to be part of it. Turns out there is a way to do this.

  1. Create a new folder. It doesn’t matter where.
  2. Rename the folder this:

    GodMode.{ED7BA470-8E54-465E-825C-99712043E01C}

You now have a nice Control Panel with everything in a big long list.

If you want you can drag it to your Start bar or ping it to your Taskbar.

Ok, so God Mode isn’t exactly some way to have all power over the box. It is really just a pretty, one-window-list of links to the interfaces of different management features


How to convert a number of seconds to a time format?

Ok, lets say you have a table with seconds in it.

TimeInSeconds
10
199
765
402
398
107
40

First use this function to convert it to a time based number:

Time#(TimeInSeconds,’ss’)

Second, wrap that

Time(Time#(TimeInSeconds,’ss’), ‘m:ss’)

Now your table will look like this:

TimeInSeconds
0:10
3:19
12:45
6:42
6:38
1:47
0:40

While there is more to this, as you will see with a wide range of data, this should get you started and you should be able to go from here.


How to compile a portion of FreeBSD code with debugging? (Sysinstall for this example)

Ok, so maybe you want to work on fixing something in a portion of FreeBSD code, but you lack the knowledge to get started. That is what this document is for, to get you started.

For this example, I am going to use Sysinstall, which is a pretty old installer but still in use and functional. Let’s be honest, when the developers write in the code that Sysinstall needs to be completely rewritten and those notes are almost a decade old, you can guess that the installer is living far past its days. However, I don’t mind Sysinstall and many others don’t mind it either, which is probably why it is not updated yet. So lets at least see if we can inspire some contributors to start working on it. Sysinstall is actually on the Project Ideas page for a couple reasons, though I am surprised that “complete rewrite” is not one of them.

So lets get started.

Step 1 – Install FreeBSD
You need a FreeBSD Environment, so install one. Following one of these documents:
How do I install FreeBSD?
or if you want a FreeBSD install with a desktop as well:
How to install and configure a FreeBSD 8 Desktop with Xorg and KDE?

Step 2 – Download the FreeBSD Source
Follow this guide to make sure you have the source you need.
How to download FreeBSD-Current or FreeBSD-Stable using svn?

Now that you have read that post and have the source, you should understand what I mean when I say for this example I checked out head.

Step 3 – Find the location of the portion of source you wish to compile (Sysinstall in this example)

  1. Change to the directory where your source is stored.
    $ cd /usr/home/jared/Devel/FreeBSD/head
  2. It is probably a good idea to browse the folders and get an understanding of what code is where. But this is a task you should perform over time. For now, lets search for exactly what we want: sysinstall.
    $ find ./ -name sysinstall

    You will see that sysinstall is here: ./usr.sbin/sysinstall

  3. Change to that directory.
    $ cd usr.sbin/sysinstall

Step 4 – Compile with debugging.
FreeBSD uses make to manage the compiling of the code, so it is really easy to compile it all.

  1. Run this command to compile Syinstall with debugging.
    $ make DEBUG_FLAGS=-g

You should now see all the .o libraries and the sysinstall libraries. You have just compiled a portion of FreeBSD.


Copyright ® Rhyous.com – Linking to this article is allowed without permission and as many as ten lines of this article can be used along with this link. Any other use of this article is allowed only by permission of Rhyous.com.