Authentication Token Service for WCF Services (Part 4 – Supporting Basic Authentication)

In Authentication Token Service for WCF Services (Part 3 – Token Validation in IDispatchMessageInspector) we showed how to verify our token against a database. The token is a great tool. The authentication service also provides the token based on a post of credentials.

In this article, we are going to add support for Basic Authentication. We aren’t going to do it the standard WCF way, using Transport security. We will keep our security at none, expect the deployment to be https and roll our own code to handle Basic Authentication.

Download this project here: WCF Basic Auth

There are two features we want in order claim support Basic Authentication.

  1. Allow AuthenticationTokenService.svc to create the token by optionally using Basic Authentication.
  2. Allow Basic Authentication as an option to providing a token.

To provide these two features, first we have to understand Basic Authentication. Basic Authentication is a well-known standard that is defined.

Basic Authentication is an html request header. The header is named “Authorization” and the value is as follows:

Basic amFyZWQ6dGVzdHB3

The first part of the Authorization header value is just the word “Basic” followed by a space.
The second part is the username and password concatenated together with a semicolon separator and then Base64 encoded.

jared:testpw
Basic amFyZWQ6dGVzdHB3

Let’s start with a simple class to manage the Basic authentication header, and encoding and decoding it.

using System;
using System.Text;
using WcfSimpleTokenExample.Model;

namespace WcfSimpleTokenExample.Business
{
    public class BasicAuth
    {
        private readonly string _User;
        private readonly string _Password;
        private const string Prefix = "Basic ";

        #region Constructors
        public BasicAuth(string encodedHeader)
            : this(encodedHeader, Encoding.UTF8)
        {
        }

        public BasicAuth(string encodedHeader, Encoding encoding)
        {
            HeaderValue = encodedHeader;
            var decodedHeader = encodedHeader.StartsWith(Prefix, StringComparison.OrdinalIgnoreCase)
                ? encoding.GetString(Convert.FromBase64String(encodedHeader.Substring(Prefix.Length)))
                : encoding.GetString(Convert.FromBase64String(encodedHeader));
            var credArray = decodedHeader.Split(':');
            if (credArray.Length > 0)
                _User = credArray[0];
            if (credArray.Length > 1)
                _Password = credArray[1];
        }

        public BasicAuth(string user, string password)
            : this(user, password, Encoding.UTF8)
        {
        }

        public BasicAuth(string user, string password, Encoding encoding)
        {
            _User = user;
            _Password = password;
            HeaderValue = Prefix + Convert.ToBase64String(encoding.GetBytes(string.Format("{0}:{1}", _User, _Password)));
        }
        #endregion

        public Credentials Creds
        {
            get { return _Creds ?? (_Creds = new Credentials { User = _User, Password = _Password }); }
        }
        private Credentials _Creds;

        public string HeaderValue { get; }
    }
}

BasicAuth.cs has constructors that allow for encoding by passing in a username and password and encoding it, as well as constructors that allow for passing in the header value and decoding it to get the username and password.

If we add BasicAuth.cs to our existing WcfSimpleTokenExample project, we can easily use it to support Basic Authentication.

Feature 1 – Basic Authentication for AuthenticationTokenService.svc/Authenticate

By using the BasicAuth.cs class, we can provide support for Basic Authentication in our token service using only 3 lines of code. Below is our new AuthenticationTokenService.svc.cs. Lines 18-20 our the new lines we add.

using System.ServiceModel;
using System.ServiceModel.Activation;
using System.ServiceModel.Web;
using WcfSimpleTokenExample.Business;
using WcfSimpleTokenExample.Database;
using WcfSimpleTokenExample.Model;

namespace WcfSimpleTokenExample.Services
{
    [ServiceContract]
    [AspNetCompatibilityRequirements(RequirementsMode = AspNetCompatibilityRequirementsMode.Allowed)]
    public class AuthenticationTokenService
    {
        [WebInvoke(Method = "POST", RequestFormat = WebMessageFormat.Json, ResponseFormat = WebMessageFormat.Json, BodyStyle = WebMessageBodyStyle.Bare)]
        [OperationContract]
        public string Authenticate(Credentials creds)
        {
            if (creds == null && WebOperationContext.Current != null)
            {
                creds = new BasicAuth(WebOperationContext.Current.IncomingRequest.Headers["Authorization"]).Creds;
            }
            using (var dbContext = new BasicTokenDbContext())
            {
                return new DatabaseTokenBuilder(dbContext).Build(creds);
            }
        }
    }
}

Feature 2 – Using Basic Authentication instead of a token

In our TokenValidationInspector.cs file, we are already validating the token using DatabaseTokenValidator, Now we need to validate the crendentials. We can validate credentials using the DatabaseCrendentialsValidator object that is already being used by AuthenticationTokenBuilder. However, we have to add some conditionaly code to test if a token is provided or if Basic Authorization is provided. If both are ignored, the token takes priority.

To do this, I wrapped the existing lines calling DatabaseTokenValidator into a method called ValidateToken. THen I created a new method called ValidateBasicAuthentication, which we only attempt to call a token isn’t provided.

using System.Net;
using System.Security.Authentication;
using System.ServiceModel;
using System.ServiceModel.Channels;
using System.ServiceModel.Dispatcher;
using System.ServiceModel.Web;
using WcfSimpleTokenExample.Business;
using WcfSimpleTokenExample.Database;
using WcfSimpleTokenExample.Interfaces;

namespace WcfSimpleTokenExample.Behaviors
{
    public class TokenValidationInspector : IDispatchMessageInspector
    {
        public object AfterReceiveRequest(ref Message request, IClientChannel channel, InstanceContext instanceContext)
        {
            // Return BadRequest if request is null
            if (WebOperationContext.Current == null) { throw new WebFaultException(HttpStatusCode.BadRequest); }

            // Get Token from header
            var token = WebOperationContext.Current.IncomingRequest.Headers["Token"];
            if (!string.IsNullOrWhiteSpace(token))
            {
                ValidateToken(token);
            }
            else
            {
                ValidateBasicAuthentication();
            }
            return null;
        }
        
        private static void ValidateToken(string token)
        {
            using (var dbContext = new BasicTokenDbContext())
            {
                ITokenValidator validator = new DatabaseTokenValidator(dbContext);
                if (!validator.IsValid(token))
                {
                    throw new WebFaultException(HttpStatusCode.Forbidden);
                }
                // Add User ids to the header so the service has them if needed
                WebOperationContext.Current.IncomingRequest.Headers.Add("User", validator.Token.User.Username);
                WebOperationContext.Current.IncomingRequest.Headers.Add("UserId", validator.Token.User.Id.ToString());
            }
        }


        private static void ValidateBasicAuthentication()
        {
            var authorization = WebOperationContext.Current.IncomingRequest.Headers["Authorization"];
            if (string.IsNullOrWhiteSpace(authorization))
            {
                using (var dbContext = new BasicTokenDbContext())
                {
                    var basicAuth = new BasicAuth(authorization);
                    if (!new DatabaseCredentialsValidator(dbContext).IsValid(basicAuth.Creds))
                    {
                        throw new AuthenticationException();
                    }
                }
            }
        }

        public void BeforeSendReply(ref Message reply, object correlationState)
        {
        }
    }
}

The web.config

There are not changes needed for the web.config. Here is a copy of it though, for reference.

<?xml version="1.0" encoding="utf-8"?>
<configuration>
  <configSections>
    <!-- For more information on Entity Framework configuration, visit http://go.microsoft.com/fwlink/?LinkID=237468 -->
    <section name="entityFramework" type="System.Data.Entity.Internal.ConfigFile.EntityFrameworkSection, EntityFramework, Version=6.0.0.0, Culture=neutral, PublicKeyToken=b77a5c561934e089" requirePermission="false" />
  </configSections>
  <appSettings>
    <add key="aspnet:UseTaskFriendlySynchronizationContext" value="true" />
  </appSettings>
  <system.web>
    <compilation debug="true" targetFramework="4.5" />
    <httpRuntime targetFramework="4.5" />
  </system.web>
  <system.serviceModel>
    <services>
      <service name="WcfSimpleTokenExample.Services.AuthenticationTokenService" behaviorConfiguration="ServiceBehaviorHttp">
        <endpoint address="" behaviorConfiguration="AjaxEnabledBehavior" binding="webHttpBinding" contract="WcfSimpleTokenExample.Services.AuthenticationTokenService" />
      </service>
      <service name="WcfSimpleTokenExample.Services.Test1Service" behaviorConfiguration="ServiceRequiresTokenBehaviorHttp">
        <endpoint address="" behaviorConfiguration="AjaxEnabledBehavior" binding="webHttpBinding" contract="WcfSimpleTokenExample.Services.Test1Service" />
      </service>
    </services>
    <behaviors>
      <endpointBehaviors>
        <behavior name="AjaxEnabledBehavior">
          <webHttp helpEnabled="true" />
        </behavior>
      </endpointBehaviors>
      <serviceBehaviors>
        <behavior name="ServiceBehaviorHttp">
          <serviceMetadata httpGetEnabled="true" httpsGetEnabled="true" />
          <serviceDebug includeExceptionDetailInFaults="true" />
        </behavior>
        <behavior name="ServiceRequiresTokenBehaviorHttp">
          <serviceMetadata httpGetEnabled="true" httpsGetEnabled="true" />
          <serviceDebug includeExceptionDetailInFaults="true" />
          <TokenValidationBehaviorExtension />
        </behavior>
      </serviceBehaviors>
    </behaviors>
    <extensions>
      <behaviorExtensions>
        <add name="TokenValidationBehaviorExtension"
          type="WcfSimpleTokenExample.Behaviors.TokenValidationBehaviorExtension, WcfSimpleTokenExample, Version=1.0.0.0, Culture=neutral"/>
      </behaviorExtensions>
    </extensions>
    <serviceHostingEnvironment aspNetCompatibilityEnabled="false" multipleSiteBindingsEnabled="true" />
  </system.serviceModel>
  <system.webServer>
    <modules runAllManagedModulesForAllRequests="true" />
    <directoryBrowse enabled="true" />
  </system.webServer>
  <entityFramework>
    <defaultConnectionFactory type="System.Data.Entity.Infrastructure.LocalDbConnectionFactory, EntityFramework">
      <parameters>
        <parameter value="v11.0" />
      </parameters>
    </defaultConnectionFactory>
    <providers>
      <provider invariantName="System.Data.SqlClient" type="System.Data.Entity.SqlServer.SqlProviderServices, EntityFramework.SqlServer" />
    </providers>
  </entityFramework>
  <connectionStrings>
    <add name="BasicTokenDbConnection" connectionString="data source=(LocalDB)\v11.0;attachdbfilename=|DataDirectory|\BasicTokenDatabase.mdf;integrated security=True;MultipleActiveResultSets=True;App=EntityFramework" providerName="System.Data.SqlClient" />
  </connectionStrings>
</configuration>

Testing Basic Authentication with PostMan

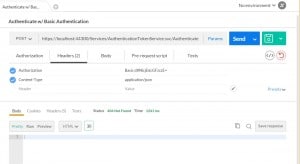
Now we an test that this is working using PostMan. Our PostMan call is similar to what we did in previous articles, but instead of passing a token header, we set Basic Authentication, which sets the Authorization header for us (yes, you could have set the Authorization header manually.)

You could create the Authorization header yourself, but PostMan will create it for you if you click the Authorization and select Basic Auth. Enter your username and password and click update.

PostManBasicAuth

All this does it create an Authorization header for you. You can see this by clicking on the Headers tab in PostMan.

PostManBasicAuthHeader

Go ahead and click Send and you will get your authentication.

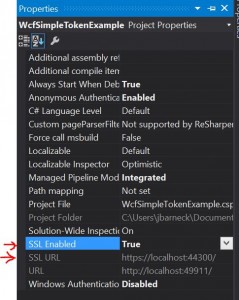
Notice the url is https in the image. I haven’t shown you how to do that yet. That is in part 5 here: Authentication Token Service for WCF Services (Part 5 – Adding SSL)


Handling input maxlength using knockout

I set out to handle maxlength with the following goals:

  • Set maxlength on an input field. That took about 10 seconds.

This wasn’t sufficient however. It had two problems:

  1. This prevents the UI from going over the maxlength, but not code. I preferred a solution that did both.
  2. Once the maxlength is reached, there is no indication of why the next character typed is ignored. I wanted the textbox to flash red.

So I decided to do the following:

  1. Have knockout handle the max length and not have maxlength in the html.
  2. Have knockout change the css style for 3 seconds.

Knockout allows for something called extenders. I quickly saw extenders as the way to solve my problem. I followed the documentation and modified the example for my needs. I used Plunker to develop this solution and have a working model here:

http://plnkr.co/edit/9SZzcIPUSwWjBttHDQ64

My extender is as follows:

ko.extenders.maxLength = function (target, maxLength) {
    var result = ko.computed({
        read: target,
        write: function (val) {
            if (maxLength > 0) {
                if (val.length > maxLength) {
                    var limitedVal = val.substring(0, maxLength);
                    if (target() === limitedVal) {
                        target.notifySubscribers();
                    }
                    else {
                        target(limitedVal);
                    }
                    result.css("errorborder");
                    setTimeout(function () { result.css(""); }, 500);
                }
                else { target(val); }
            }
            else { target(val); }
        }
    }).extend({ notify: 'always' });
    result.css = ko.observable();
    result(target());
    return result;
};

Now, as you see, I set the css to errorborder, then I remove it 500 milliseconds (1/2 second) later. In order to make this work, I need an errorborder css style. Here is my first quick stab at that.

.errorborder {
  outline: none;
  border: 2px solid red;
}

.errorborder:focus {
  outline: none;
  border: 2px solid red;
  border-color: red;
  box-shadow: 0 0 3px red;
}

The user will see the border of the text box go red for half a second as they try to type more. Having validation text pop-up saying that maxlength has been reached can be done with this as well, but is probably not necessary. This red border should be sufficient visual feedback.


10 signs you are a Senior Software Developer

Signs of a Senior Software Developer:

  1. Acquires a large foundation of knowledge and continues to learn.
    (Spends as much as 1 hour a day learning more about code. Which is why the Senior dev gets more done. Example: “That project was going to take two weeks. But while studying a came across this open source library that already does that. I solved this problem in an hour by referencing this project and using only a few lines of code.)
  2. Learns what the industry best practices are for a specific project before starting to code.
    (Humble, willing to learn, understands better developers exist.)
  3. Avoids code debt.
    (Frugal with time and code. Understands that debt piles up. Coding it correctly now will, sometime in the future, make a 2-week job take 1 day. Doing it wrong now will, sometime in the future, make a 1-day job take 2 weeks.)
  4. Follows the keep it super simple (KISS) rule.
    (Simplicity is so much more elegant than complexity.)
  5. Follows the 10/100 rule.
    (Code blocks are short. No classes over 100 lines, no methods over 10 lines. You code will natural turn into well-designed code just by following this one principle. You will likely end up using well-known design patterns. If you recognize those design patterns, that is even another sign that you are a senior.)
  6. Uses interface-based design.
    (IoC containers or not, the code is decoupled and uses interfaces, not concrete references that are hard to test.)
  7. Follows the don’t repeat yourself (DRY) principle and recognizes when they do repeat themselves.
    (Writing code takes time. Why would anyone want to write the same code twice?)
  8. Knows what SOLID stands for AND can show an example in actual code of each principle and why it makes sense.
  9. Writes unit tests to test code.
    (Are you still putting your tests in the Program.cs file of a Console Application? You’re not, right? Oh, you are? Seriously?)
  10. Doesn’t outshine coworkers, but instead, makes his coworkers shine, too.
    (When a quarterback wins the Super Bowl, even if named MVP, the rest of the team wins the Super Bowl too. Similarly, when a project is a huge success, you might be the MVP, but everyone in the project participated and contributed to its success, and everyone improved their skills in the process.)

Are you a Senior Software Developer?

My Thoughts

It baffles me that many developers don’t think that acquiring a foundation of knowledge is necessary. In 2010, I read the entire Pro C# 2010 and the .NET 4 Platform: http://www.amazon.com/2010-NET-Platform-Experts-Voice/dp/1430225491. I read it over time. One or two chapters a week and it took less than a year. I did the first 6 chapters really fast. However, I only did a handful of the coding examples. Still, I feel that it made me very knowledgeable in C#. Since then, I always read the “What is new” when a .NET version is released. I’m loving the new multiple level null check feature.

When I started working with WPF, I also watched every single WPF single video available on the now discontinued WindowsClient.net site as well as all the Videos on the Expression Blend site.

I think the key to being a Senior developer is always making the better decisions. Many developers accomplish a task and move on. Some developers design a solution and build upon it. The accomplished task usually is hard to maintain code and everyone wishes it had been done a different way or that it was part of a bigger solution. The designed solution is something that developers can work with, enhance, and improve easily.


Hidden Cyclomatic Complexity due to Parameter Value Coverage

Cyclomatic Complexity

Cyclomatic complexity is the number of branches found in code.

For example:

public int Add(int x, int y)
{
     return x + y;
}

This appears to have a cyclomatic complexity of 1 as there are no branches in your code. One test will give you 100% code coverage.

Detecting Hidden Cyclomatic Complexity

If you have read about Parameter Value Coverage (PVC) you would be aware that some code will do different things without branching in your code. Perhaps the branch occurs in the underlying code. This is still complexity that your code needs to be tested for.

Example 1

Look at the above Add(int x, int y) method. This appears to have a cyclomatic complexity of 1 as there are no branches in this code. One test will provide 100% code coverage if you count coverage by lines.

However, what if your coverage includes different possibilities for the different possible values of your method parameters? What are the possibilities for an int? Well, this example is in C#, so we will assume C# rules. In C#, an int can’t be null. It can be positive, negative or 0. It also has a max value and a minimum value. That is 5 different options that may be involved in Cyclomatic Complexity.

int result = Add(2147483647, 1);

The above code will not result in the answer being 2147483648.

However, the code doesn’t branch if the options are positive, negative, or 0. They code only behaves different if the combination of both values overflow the integer by going above int.MaxValue or below int.MinValue. So the Cyclomatic complexity is 3. It isn’t 1 as most people would assume at first glance.

Example 2

Also look at this simple divide method. This appears to have a cyclomatic complexity of 1 as there are no branches in this code. One test will provide 100% code coverage if you count coverage by lines. However, your code does react differently due to different possibilities for the different possible values of your method parameters.

public int divide(int x, int y)
{
     return x / y;
}

In the above method what happens when either parameter value is 0? Will your code behave the same as if two non-zero values are passed in? Or is there hidden cyclomatic complexity?

Taking into account the hidden cyclomatic complexity, do you still feel this code will never branch? Or do different parameter values cause it to branch? What is the Cylomatic complexity of this method?

If the second value is 0, the code is going to throw a DivideByZeroException. Really, that is the only difference. Since this is divide, it is impossible to overflow the integer, so int.MaxValue and int.MinValue don’t come into play. So the cyclomatic complexity is 2, not 1.

Conclusion

Cyclomatic Complexity is a great tool to measure the complexity of you code. However, failure to test and measure for different possible parameter values can give one a false sense of simplicity and an incorrect Cyclomatic Complexity score.

Branching can occur even in a single line of code. You have been warned!


Html and css for simple banner layout

As many of you know, html and css still hasn’t figured out how to make layout simple and easy. No wonder banners are images. Trying to do a banner that isn’t an image is like beating your head against the wall.

Here is a very basic and very common use case:

  • Banner should not be a full-width image.
  • There is html content on the left that is left justified, html content in the center that is center justified, html content on the right that is right justified.
  • If the screen shrinks, the content in the middle and the right should not wrap.

Failure 1 – The intuitive approach

<div id="frame-banner" style="min-width: 800px">
  <div style="float: left; min-width: 200px">Left Content</div>
  <div style="float: center; min-width: 400px">Middle content</div></div>
  <div style="float: right;min-width: 200px">right content</div>
</div>

Well, even though it seems intuitive to have something float in the center, float: center doesn’t exist, so that just doesn’t work. Would have been cool. I of course, knew float: center didn’t exist.

Left Content
Middle content
Right content


Failure 1 – Simple divs

So let’s actually spend some time trying to make this work. Here is what I actually thought should work. Unfortunately, it doesn’t. Some weird formatting happens.

<!DOCTYPE html>
<html>
<head>
<title>html fails at layout</title>
</head>
<body>
<div style="width: 100%;height: 100px;background: gray;margin: 0;padding: 0;">
    <div style="width: 800px;margin: 0 auto;height: 100%;">
        <div style="width: 25%;height: 90%;display: inline-block;background: lightblue;"><div style="background: blue;color: white;margin: 10px;height: 80%;">left<img alt="Image Alt" style="width: 32px; height: 32px;" /></div></div><!-- no space
     --><div style="width: 50%;height: 90%;display: inline-block;background: orange;text-align: center;"><div style="width: 25%;margin: 10px auto;background: blue;color: white;height: 80%;">middle</div></div><!-- no space
     --><div style="width: 25%;height: 90%;display: inline-block;background: lightblue;text-align: right;"><div style="background: blue;color: white;margin: 10px;height: 80%;text-align: right;">right</div></div>
    </div>
</div>
</body>
</html>

I added some hacks to eliminate spacing that shouldn’t exist, but does.

left
middle
right

That looks so good. You think that is going to work right?

Well, let’s add an image and see how that works.

<div style="width: 100%;height: 100px;background: gray;margin: 0;padding: 0;">
    <div style="width: 800px;margin: 0 auto;height: 100%;">
        <div style="width: 25%;height: 90%;display: inline-block;background: lightblue;"><div style="background: blue;color: white;margin: 10px;height: 80%;">left<img alt="Image Alt" style="width: 32px; height: 32px;" /></div></div><!-- no space
     --><div style="width: 50%;height: 90%;display: inline-block;background: orange;text-align: center;"><div style="width: 25%;margin: 10px auto;background: blue;color: white;height: 80%;">middle</div></div><!-- no space
     --><div style="width: 25%;height: 90%;display: inline-block;background: lightblue;text-align: right;"><div style="background: blue;color: white;margin: 10px;height: 80%;text-align: right;">right<img alt="rss" src="https://www.rhyous.com/wp-content/plugins/social-media-widget/images/default/32/rss.png" /></div></div>
    </div>
</div>
left
middle
rightrss

See, as soon as you try to use this layout by adding an image, the layout breaks. Do they do any layout testing in browsers? I’ve heard rumors that the W3C doesn’t believe in supporting layout.

Epic fail. Come on w3C people as well as HTML and CSS developers. There is no excuse for this after twenty years.

Failure 2 – All floats

<!DOCTYPE html>
<html>
<head>
<title>html fails at layout</title>
</head>
<body style="margin: 0; padding: 0;">
<div style="width: 100%;height: 100px;background: gray;margin: 0;padding: 0;">
    <div style="width: 800px;margin: 0 auto;height: 100%;">
        <div style="width: 25%;height: 90%;float: left;background: lightblue;"><div style="background: blue;color: white;margin: 10px;height: 80%;float: left;">left</div></div>
        <div style="width: 50%;height: 90%; background: orange;float:left;"><div style="margin: 10px;height: 80%;"><div style="width: 25%;background: blue;color: white;height: 100%;float: left; position: relative; right: -50%; margin: 0px auto;text-align: center;">middle</div></div></div>
        <div style="width: 25%;height: 90%;float: right;background: lightblue;text-align: right;"><div style="background: blue;color: white;margin: 10px;height: 80%;text-align: right;float:right;">right</div></div>
    </div>
</div>
</body>
</html>

This almost looks right, but wait. How do we actually get it centered? Notice it isn’t centered. It is right of center.

left

right

middle

I can make it left of center, but I have to put the middle after the right and that is a hack:

left
right
middle

But I can’t make it centered. This is not a solution.

Failure 3 – Middle doesn’t float

So what if just the middle element doesn’t float?

<!DOCTYPE html>
<html>
<head>
<title>html fails at layout</title>
</head>
<body style="margin: 0; padding: 0;">
<div style="width: 100%;height: 100px;background: gray;margin: 0;padding: 0;">
    <div style="width: 800px;margin: 0 auto;height: 100%;">
        <div style="width: 25%;height: 90%;float: left;background: lightblue;">
            <div style="background: blue;color: white;margin: 10px;height: 80%;float: left;">left</div>
        </div>
        <div style="width: 50%;height: 90%; background: orange;margin: 0 auto;">
            <div style="margin: 10px;height: 80%;">
                <div style="width: 25%;background: blue;color: white;height: 100%; margin: 0px auto;text-align: center;">middle</div>
            </div>
        </div>
        <div style="width: 25%;height: 90%;float: right;background: lightblue;text-align: right;">
            <div style="background: blue;color: white;margin: 10px;height: 80%;text-align: right;float: right;">right</div>
        </div>
    </div>
</div>
</body>
</html>

That looks horrible.

left

middle

right

Now I have two problems:

  1. The right side is down below my banner.
  2. The top margin of center is applying above the banner, not inside it.

Finally – Success with middle doesn’t float and extra div elements

Well, the final html looks horrible and the center ends up being wrapped in four divs.

To center, you use width: 99%; margin: 0 auto” where the width has to be less than 100%. How is that intuitive. It isn’t. It is horrible. Come on W3C, how hard would it be to add proper intuitive alignment to the html and css spec?

<!DOCTYPE html>
<html>
    <head>
        <title>html fails at layout</title>
    </head>
    <body style="margin: 0; padding: 0;">
        <div style="width: 100%;height: 100px;background: gray;margin: 0;padding: 0px;">
            <div style="width: 800px;margin: 0 auto;height: 100%;">
                <div style="width: 25%;height: 90%;float: left;background: lightblue;">
                    <div style="background: blue;color: white;margin: 10px;height: 80%;float: left;">left</div>
                </div>
                <div style="width: 25%;height: 90%;float: right;background: lightblue;text-align: right;">
                    <div style="background: blue;color: white;margin: 10px;height: 80%;text-align: right;float: right;">Right</div>
                </div>
                <div style="width: 50%;margin: 0 auto;height: 80%; background: orange;padding-top:10px">
                    <div style="text-align:center;width: 90%; margin: 0 auto; background: blue;color: white; height: 80%;">Center</div>
                </div>
            </div>
        </div>
    </body>
</html>

The result is finally acceptable.

left

Right

Center

Let’s add some content to make sure:

Rhyous
top

Follow Us on FacebookFollow Us on Google+Follow Us on TwitterFollow Us on LinkedInFollow Us on RSS
Your Awesome Page Title


cube

Rant on html, css, and W3C

I get that you are trying to do new things with HTML5, but until you actually draw the common layouts, such as two column fixed, three column fixed, and two column liquid, and three column liquid, and actually define the spec to layout properly, it will never work.

Also, without over-wrapping div in div in div, you can’t make html work. That is why all the html and css for the examples on the web look so horrible, because they have to be to work around the terrible job done with html and css layouts.

Layout failures starting with the W3C provided specs are the primary reason why HTML is not the answer for business. I could have written a separate UI for a banner in every platform Android, iOS, Windows, Windows Phone, and Linux, all in less than the time it took me to hack around and figure out what needed to be done in html.


Technology: What tech you use, you want to use for both home and work

I’ve been watching the tablet and smart phone products that have hit the world. They are big money makers. Apple and Google really profited, whereas BlackBerry has nearly died.

I want to discuss the near death of the BlackBerry. Why did the BlackBerry wither while Android and iOS thrived? What is next to wither and what is next to thrive? To answer these questions, let’s look at the PC market in the late 80s and early 90s from many years ago.

Microsoft Windows beat Apple PC

Note: Please forgive this massive short paragraph that is a gross oversimplification.

Apple PCs were all the rage in schools mostly. But Microsoft came out with a new operating system, Windows. It could run on a lot of hardware, and wasn’t stuck on expensive Apple hardware. Businesses started using it over Apple because the hardware was cheaper and the experience was as least as good as that of the Apple PC.

Microsoft and Apple both targeted the business and home users. But Microsoft hit the business faster because their operating could be sold on other manufacturers devices, whereas Apple’s could not. Really quickly, Microsoft Windows took over the business market, and then moved into peoples homes. Windows added solitaire for the home user, which was a very big hit and still is today. In the end, very few people ever brought an Apple PC for their home.

Apple tried to beat Windows and tried to add applications. They even had the market on artistic software for a while but they never have reached the Windows operating system market share.

So Microsoft won by winning both locations, home and work. And once they won, it was hard for Apple to catch up because all the software was written for Windows.

Apple and Google beat BlackBerry

BlackBerry’s main problem was that they didn’t have a device for both consumers and business users. Their phone was pretty much focused on business users. Some might argue that they had consumer models, but even if they did, they didn’t market them well. No one I knew had a personal cell that was a BlackBerry. BlackBerry failed to make the push from business to the home. But that didn’t cause them to wither right away. They needed a competitor.

When the iPhone released, it was a horrible business phone. The first iPhone couldn’t even hook up to Microsoft Exchange, the most popular enterprise and business email server. But the iPhone was a quality smart phone experience, and for non-business features, it had a better user experience than BlackBerry phones. However, many employees ended up having two phones, a personal iPhone and a BlackBerry for work. BlackBerry hadn’t lost yet. In the next two years after the first iPhone version was released, all BlackBerry had to do was up their game to meat the iPhone in features and experience. In essence, the BlackBerry phone needed consumer features and a great user experience. They failed to do that in time. Apple, on the other hand, upped their game and added business features to the iPhone. It could connect to Microsoft Exchange. Users only want one device. So the BlackBerry became obsolete because it didn’t move from the business to the home. The iPhone did move from the home to business.

The only difference from how Microsoft beat Apple in the operating system world and how Apple beat BlackBerry in the business phone world was the third competitor. Google entered the competition and provided an Android phone that gives and experience equal to (or slightly better or worse depending on mostly opinion).

All the apps were written for both iPhone or Android.

Google, however, was a little late to the game. Had they released their phone even a year earlier, I think Apple would have lost and history would have repeated itself. Remember, why Apple lost the PC market? It required expensive proprietary hardware. Well, so does the iPhone. Google took the place of Microsoft in providing an operating system that could install on any platform. And any vendor could sell their own operating system with Android. Google’s Android exploded into the world and is the most used operating system on phones by a large margin.

The big difference between the smart phone market and the PC market of the late 80s and 90s is that Apple already had the applications, now calls apps, already written for the iPhone. So when Google’s Android won the majority market share, Apple didn’t lose everyone. They maintain a very good market share of phones and each release is a hit.

Both phones are quite acceptable for business or work.

However, the Microsoft Phone was very late to the game. It would be great for business and home, but it doesn’t have the apps. They are already written for iPhone and Android phones. BlackBerry and Microsoft both lost.

What about the Tablet market?

So who is going to win it? Some might say the iPad has already won. Well, let’s look at what tablet today works for both home and business users? Is their one yet? Or is it in the same position that BlackBerry was in, only reversed?

The iPad is a great consumer device. But input is atrocious. Running a project in a meeting with requires a bunch of special connectors or wi-fi enabled connectors. It just doesn’t do it for the business user. Many people bought their iPads with hopes to use them at home and at work. But really, they are just home devices. Many employees that used to bring them to work are now leaving them home and have gone back to their laptops.

The Android tablets are pretty much the same experience. Input is just as terrible. I gave up on the keyboard I bought for it. Android tablets have all the same problems in a business environment that the iPad has. However, Android has one advantage over the iPad in that Android can be installed on other hardware, while iOS cannot.

Now, enter the Microsoft Surface and Surface Pro. Since version 3 released, it’s business usability is unquestionable. It is the same operating system that has been running businesses for a quarter of a century. The home experience is not quite as good as the iPad or Android, but it is acceptable and getting better. In fact, I just watched a few hours of Amazon prime on it instead of on my Kindle Fire HD and had a better experience.

The Surface Pro is here and is already at version 3 with Version 4 coming around the bend. It works for home and business. Also, Windows can install to other devices and other manufacturers such as Lenovo are releasing devices similar to the Surface Pro, also running Microsoft Windows.

Can Apple and Google catch up? Can they get the business market and the home market? I don’t see how.

I have already seen the Surface Pro 3 turn iPads into paper weights, well actually kid’s toys as parents stop using them and let their kids game on them. (That is what has happened to my Kindles.)

Conclusion

History shows that while there is money in an either consumer-only or business-only solution, if the solution is needed by both, the winner is whoever fills the needs of both.

If history repeats itself, and I think it will, Microsoft is going to win the Tablet operating system market simply by making the existing desktop and laptop operating system their tablet operating system. It makes the tablet usable for both home and work. The only question is, how much a market share will Apple and Android tablets keep?

There over a billion laptops in the world and most people want them to be thinner and lighter, though not necessarily smaller in screen size. I was quite surprised, however, that even though I was a 16″ or 17″ inch laptop screen guy, that I was willing to trade-off screen size for the light weight, slim Surface Pro 3.

So yes, the first tablet that is very usable for both home use and business use is the Windows Tablet. This is history repeating themselves. All the other tablets are like the early Apple PC, or the BlackBerry. There are once again differences to the current situation.  Apple and Android own the smart phone markets and those smartphone apps run on tablets too, so Apple will never really loose in the apps department. Microsoft’s tablet has already won in the application (full desktop application) market and so while it doesn’t have the apps, that doesn’t matter anymore, it has the applications. The apps will come because the Surface and similar devices are selling very well and will quickly take over the market share.

By the way, as developers write apps for the Surface (not applications), those apps will work on the Windows phone and Windows might just make a comeback in that arena thanks to winning the tablet market. Oh, and you may not think you will every run a windows phone, but what if your desktop/laptop/tablet is nothing more than a windows phone? What happens in a few years when your phone becomes your only device? Which operating system would you choose in a single device world? Most would say Windows (though there will always be Mac and BSD/Linux users). You get to work and dock your windows phone and it is as powerful as your most powerful desktop today and runs your dual monitors at your desk? It streams wirelessless to dumb screens, which were once tablets, but now just run off your phone.

Welcome back to the top Microsoft. Some might even say you never left.

And thank you for building the Surface Pro 3. I love mine. It is replacing my desktop and laptop.


Simpler inheritance in Javascript

I’ve been working more in JavaScript and decided I need some inheritance. I had a couple of classes that need to inherit the properties and methods of a base class. I’ve learned inheritance methods in javascript. The prototype inheritance just never really felt right.

Well, today it just dawned on me that I might not so much want inheritance as I want one place to implement my fields and methods. The prototypal inheritance method doesn’t exactly work for what I want. I don’t want to add methods to the prototype.

See this project fully unit tested with qunit here: Simpler Javascript Inheritance

The inheritance template

To make this method of JavaScript inheritance work, all you have to do is define an objects members using a method. I will use an init method.

// The template
var TemplateBaseClass = function(child) {
  var _self = this;
  _self.init = function(obj) {
    // define all members here using obj.member syntax.
  };
  _self.init(_self); // instantiates fields and method to itself
  if (child)
    _self.init(child); // instantiates fields and method to child
};

With this template we can now implement inheritance with far more simplicity than the prototypal method.

Example base class and inheritance

Let’s look at an example BaseClass that uses the Inheritance template

// Non-abstract base class
// You can use new BaseClass() or any child. 
var BaseClass = function(child) {
  var _self = this;
  _self.init = function(obj) {
    obj.field1 = null;
    obj.field2 = null;
    obj.action1 = function() {
      return true;
    };
    obj.action2 = function() {
      return true;
    };
  };
  _self.init(_self); // instantiates fields and method to itself
  if (child)
    _self.init(child); // instantiates fields and method to child
};

The above BaseClass creates a few fields and methods. It uses the template we’ve created. It allows inheritance. Let’s inherit from it. Check out this ChildClass below.

// A child of BaseClass
var ChildClass = function(child) {
  var _self = this;
  var _base = new BaseClass(_self);
  _self.init = function(obj) {

    // Overriding a base method
    obj.action1 = function() {
      return _base.action1() && _self.truefalse; // can call base.action1()
    };

    // Child class fields and methods
    obj.field5 = null;
    obj.truefalse = false;
    obj.action5 = function() {
      return true;
    };

    // expose base class
    obj.getBase = function() {
      return _base;
    }
  }
  _self.init(_self); // instantiates fields and method to itself
  if (child)
    _self.init(child); // instantiates fields and method to child
}

As you see, ChildClass inherits BaseClass(). They have all the same field and method signatures. Methods can be defined in the base class and don’t have to be redefined. Also notice that we didn’t have to mess with the clunky object.prototype or object.Create() syntax.

Note: Well, this is sort of inheritance. BaseClass and ChildClass actually have completely separate instances of the fields and methods. We can fix this for methods (I’ll show you later) but we can’t really fix this for members. Still, that limitation doesn’t really cause any immediate problems.

Example abstract base class and inheritance

Well since we don’t really need the base class to actually have the fields and methods, let’s implement it so it doesn’t. Notice that we don’t call _self.init(_self).

// Abstract base class (like an Interfaces but with the implementation)
// While you can call new AbstractBaseClass(), it doesn't have any
// of its members.
var AbstractBaseClass = function(child) {
  var _self = this;
  _self.init = function(obj) {
    obj.field3 = null;
    obj.field4 = null;
    obj.action3 = function() {
      return true;
    };
    obj.action4 = function() {
      return true;
    };
  };
  if (child)
    _self.init(child); // only instantiates fields and method to child
};

This is pretty identical to the code above, only the base class doesn’t implement any of the fields or methods it defines. I like to think of this as an Abstract class, or an interface that also includes implementation.

Let’s inherit from AbstractBaseClass.

// A child of the AbstractBaseClass
var ChildOfAbstractClass = function(child) {
  var _self = this;
  AbstractBaseClass(_self); // not saving AbstractBaseClass as it can't be used

  _self.init = function(obj) {
    // Overriding a base method
    obj.action1 = function() {
      // cannot call base.action1() because it doesn't exist
      return obj.truefalse;
    };

    // Child class fields and methods
    obj.field6 = null;
    obj.truefalse = false;
    obj.action6 = function() {
      return true;
    };
  }
  _self.init(_self); // instantiates fields and method to itself
  if (child)
    _self.init(child); // instantiates fields and method to child
}

As you see, inheriting from an abstract class is the same with the exception that you cannot call any base members or methods as the base object doesn’t have them.

Implementation where base class and child class share fields and methods

Well, to share a method, the syntax is simple. Here is our original BaseClass from above, changed so methods in a child are the same as the method in the base class.

// Non-abstract base class
// You can use new BaseClass() or any child. 
var BaseClass = function(child) {
  var _self = this;
  _self.init = function(obj) {
    obj.field1 = null;
    obj.field2 = null;
    obj.action1 = _self.action1 || function() {
      return true;
    };
    obj.action2 = _self.action1 || function() {
      return true;
    };
  };
  _self.init(_self); // instantiates fields and method to itself
  if (child)
    _self.init(child); // instantiates fields and method to child
};

How simple was that. We just assign the object _self.action1 if it exists, if not we assign it a new function. This works because both the base class and child class have a reference to the same method. However, with fields, this wont’ work because the calling _self.field1 would return a value of null, not a reference. They will have the same value initially, but changing the value in the child class won’t change the value in the base class.

One nice way to fix this is to implement the Property object. This is nice as it is basically a wrapper around the ubiquitous get/set methods familiar to all languages. Here is a simple implementation of a Property.

// A property class 
var Property = function() {
  var _self = this;
  var _backingField = null;
  _self.get = function() {
    return _backingField;
  }
  _self.set = function(value) {
    _backingField = value;
  }
}

Now let’s implement a base class using Properties instead of fields.

var BaseClassWithProperties = function(child) {
  var _self = this;
  _self.init = function(obj) {
    obj.prop1 = _self.prop1 || new Property();
    obj.prop2 = _self.prop1 || new Property();
  };
  _self.init(_self); // instantiates fields and method to itself
  if (child)
    _self.init(child); // instantiates fields and method to child
};

As you see, instead of assigning the fields a null value, we assign them a new object. Notice we can use our syntax, _self.prop1 || new Property();, to make sure that the base class and the child class share the same get/set Property.

Let’s implement a child class that also uses properties.

// A child of the BaseClassWithProperties 
var ChildProperties = function(child) {
  var _self = this;
  var _base = new BaseClassWithProperties(_self); // not saving AbstractBaseClass as it can't be used

  _self.init = function(obj) {
    // Child class properties
    obj.prop3 = new Property();

    // expose base class
    obj.getBase = function() {
      return _base;
    }
  }
  _self.init(_self); // instantiates fields and method to itself
  if (child)
    _self.init(child); // instantiates fields and method to child
}

Now if I create a new ChildProperties object and call it’s setter, the value is set for both the parent and the child object.

A sealed class

The idea of a sealed class is one that can’t be inherited from. Simply don’t implement the template and you have a sealed class.

// A child of the BaseClassWithProperties 
// since it doesn't implement the child parameter and the init function, it is sealed and not usable for inheritance.
var SealedClass = function() {
  var _self = this;
  var _base = new BaseClassWithProperties(_self); 
  
  // Child class properties
  _self.prop3 = new Property();

  // expose base class
  _self.getBase = function() {
    return _base;
  }
}

I want many child class that inherit the same


Why we need RFCs for database implementations!

We eschew reinventing the wheel in every aspect of development, yet when it comes to creating a customer database, or an order database, everyone creates their own. They roll out their own database model, usually to their regret, and have to roll their own create, read, update, delete (CRUD) services. We’ve been using databases for decades and somehow, we have failed to eliminate the constant repetition of the same work. Everyday someone is creating a Customer or Order database model from scratch. Why?

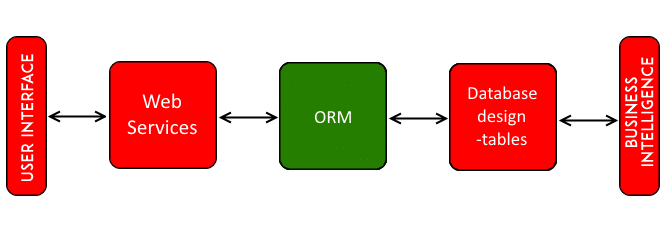
We have technologies like Entity Framework, NHibernate, Linq to Sql, etc… to help try to make sure we don’t reinvent the wheel for Object-relational mapping (ORM, a technique to talk to a relational database with object-oriented code), but we are constantly doing it just above the ORM layer because we are reinventing the database itself. Look at the design below. The blocks in red are the ones we are reinventing over and over again.

Reinventing the database wheel

Red = Layers in which we reinvent the wheel and duplicate a lot of code

Let’s look at how this causes a chain reaction of reinventing the wheel. No only do we reinvent the wheel for the services, we do so for the UI. You can break it down further from UI to MVC or MVVM, or your favorite UI partern, and you will see that we are duplicating a lot of code that we just don’t need to duplicate.

This also has an effect on Business Intelligence (BI). Because everyone is created a completely different database design, all the queries to get data from the database are different. These queries are used to build reports or to mine the data into a a data warehouse. The data often has to go through an Extract, Translate, Load (ETL) procedure to even make it reportable. Why?

Reinventing the database wheel chain reaction

Why are we all excepting the need to reinvent the wheel in so many layers? Is the open source world missing the vision of separation of concerns? We have entire projects that are tightly coupled end to end, some are far better and are loosely coupled end to end. But we don’t have a well-tuned engine of replaceable parts.

Why is it that we don’t have a place for a common database schema and ORM design. The closest thing I have found is this:
http://www.databaseanswers.org/data_models

This list of common schemas is really great, but it is just one box of the image above and that box isn’t even complete. We need not only common data models, but we need them in a source control repository so people can branch them, change them and contribute back. We need versions for MS Sql, Oracle, MySql, Postgresql, etc… We need tests to make sure the data models scale. We need a common services layer, and not just in one language. Perhaps Java, C#, and PHP to start out with, so companies don’t have to change the language they code in to use this.

Imagine it. Software startups could really get a jumpstart if they could download a schema in the database they want to use (perhaps Postgresql), a common service layer in their language (perhaps C#), and then build their proprietary idea on top of that. The startup can claim to implement the standard data model (SDM) and so enterprise companies can know their software will drop in.

UI designers could start building purchasable UIs for these database models and services.

BI companies could start selling prepackaged content reports along with their BI software.

This blows up even bigger when you start stacking these up. We could start using either inheritance or data model bundling. A shopping cart database model be combination of a person database model an order data model, and a Product data model. A software product data model might inherit from Product data model and add a few software specific tables, etc… When a full solution is released, each bundled model is independent of the rest. Each could be on their own databases instances on different servers if desired.

Now you can see how integration becomes so much easier. You start seeing how two completely separate applications could share the same data source. No more ETL from one system to the next for integration purposes. You wouldn’t need to do that. Imagine you have already implement your Customer Relationship Management (CRM) using Standard Data Models (SDMs), and then you want to implement an E-Commerce shopping cart. They choose an E-Commerce shopping cart that also uses the SDMs. Instead of having to migrate customers into the E-Commerce solution, they simply redirect the E-Commerce solution’s customer data model to point to their existing system. The rest of the E-Commerce data models can point to a separate database.

I feel like everyone is missing the big picture here. What do you think?


How to populate MailTo link with a form action using Javascript

Someday you might want to have a form where the submit button goes to a MailTo: link. You might want to populate the email’s To: Subject: and Body.

Here is a plunk to do it:
http://plnkr.co/edit/HWkMHhlaN5MO82wQfa0q

Here is the html and javascript:

<html>
<head>
<script>
function sendemail()
{
    var body = "First name: " + document.getElementById("fn").value + "\n";
    body +=  "Last name: " + document.getElementById("ln").value;
    var email = document.getElementById("email").value;
    var location = "mailto:" + email + "?subject=Hello world&body=" + encodeURIComponent(body);
    window.location.href = location;
}
</script>
</head>
<body>
<form action="javascript: sendemail()">
First name:<br>
<input id="fn" type="text" name="firstname">
<br>
Last name:<br>
<input id="ln" type="text" name="lastname">
<br>
Email:<br>
<input id="email" type="text" name="email">
<input type="submit" value="Submit">
</form>
</body>

How to get and set private fields or properties in C#

Sometimes you want to access a private member of an object. If you were the author of such object, you would simply change the encapsulation from private to public, or protected if you just want access from a child. However, what if you don’t have access to the object. What if it is one of the standard .NET library objects. You can’t change it. What are your options?

  1. Rewrite the entire class. (Not easy and I don’t recommend it)
  2. Recreate the value somehow (which might not even be possible)

Well, guess what. Microsoft left a nice workaround to encapsulation in its implementation of Reflection.

Here is a nice class you can use to get the value of any private member.

using System;
using System.Linq;
using System.Reflection;

namespace Rhyous.TextBlock.Business
{
    public class PrivateValueAccessor
    {
        public static BindingFlags Flags = BindingFlags.Instance
                                           | BindingFlags.GetProperty
                                           | BindingFlags.SetProperty
                                           | BindingFlags.GetField
                                           | BindingFlags.SetField
                                           | BindingFlags.NonPublic;

        /// <summary>
        /// A static method to get the PropertyInfo of a private property of any object.
        /// </summary>
        /// <param name="type">The Type that has the private property</param>
        /// <param name="propertyName">The name of the private property</param>
        /// <returns>PropertyInfo object. It has the property name and a useful GetValue() method.</returns>
        public static PropertyInfo GetPrivatePropertyInfo(Type type, string propertyName)
        {
            var props = type.GetProperties(Flags);
            return props.FirstOrDefault(propInfo => propInfo.Name == propertyName);
        }

        /// <summary>
        /// A static method to get the value of a private property of any object.
        /// </summary>
        /// <param name="type">The Type that has the private property</param>
        /// <param name="propertyName">The name of the private property</param>
        /// <param name="o">The instance from which to read the private value.</param>
        /// <returns>The value of the property boxed as an object.</returns>
        public static object GetPrivatePropertyValue(Type type, string propertyName, object o)
        {
            return GetPrivatePropertyInfo(type, propertyName).GetValue(o);
        }

        /// <summary>
        /// A static method to get the FieldInfo of a private field of any object.
        /// </summary>
        /// <param name="type">The Type that has the private field</param>
        /// <param name="fieldName">The name of the private field</param>
        /// <returns>FieldInfo object. It has the field name and a useful GetValue() method.</returns>
        public static FieldInfo GetPrivateFieldInfo(Type type, string fieldName)
        {
            var fields = type.GetFields(Flags);
            return fields.FirstOrDefault(feildInfo => feildInfo.Name == fieldName);
        }

        /// <summary>
        /// A static method to get the FieldInfo of a private field of any object.
        /// </summary>
        /// <param name="type">The Type that has the private field</param>
        /// <param name="fieldName">The name of the private field</param>
        /// <param name="o">The instance from which to read the private value.</param>
        /// <returns>The value of the property boxed as an object.</returns>
        public static object GetPrivateFieldValue(Type type, string fieldName, object o)
        {
            return GetPrivateFieldInfo(type, fieldName).GetValue(o);
        }
    }
}

And here is how to use it.

Imagine you have a class with a private Field and a private property.

public class A
{
    private int MyPrivateProperty
    {
        get { return _MyPrivateField; }
        set { _MyPrivateField = value; }
    } private int _MyPrivateField = 27;
}

You can access the value as follows:

    var a = new A();
    // Get values
    int privateFieldValue = (int)PrivateValueAccessor.GetPrivateFieldValue(typeof(A), "_MyPrivateField", a);
    int privatePropValue = (int)PrivateValueAccessor.GetPrivatePropertyValue(typeof(A), "MyPrivateProperty", a);

    // Set Values
    PrivateValueAccessor.GetPrivateFieldInfo(typeof(A), "_MyPrivateField").SetValue(a, 11);
    PrivateValueAccessor.GetPrivatePropertyInfo(typeof(A), "MyPrivateProperty").SetValue(a, 7);

Access private fields or properties from a base class

OK, so now that we have this class, you can imagine that you can now use it in a child, if you have no other choice, in order to expose A.MyPrivateProp.

public class B : A
{
    public int ExposedProperty
    {
        get { return (int)PrivateValueAccessor.GetPrivateFieldValue(typeof(A), "_MyPrivateField", this); }
        set { PrivateValueAccessor.GetPrivateFieldInfo(typeof(A), "_MyPrivateField").SetValue(this, value); }
    }
}

Now you have exposed the private value in your child class. You can call it as normal.

            var b = new B();
            b.ExposedProperty = 20;

Here is what it looks like in the debugger before you set it.

b    {B}    B
    base    {B}    A {B}
        _MyPrivateField      27    int
        MyPrivateProperty    27    int
        ExposedProperty      27    int
        b.ExposedProperty    27    int

And after setting B.ExposedProperty to 20, it looks like this.

b    {B}    B
    base    {B}    A {B}
        _MyPrivateField      20    int
        MyPrivateProperty    20    int
        ExposedProperty      20    int
        b.ExposedProperty    20    int

Conclusion

You now have a serviceable workaround for a getting and setting a private field or property.

It really isn’t going to perform well, since it uses Reflection, but if it is a single value that you only set once, you won’t have a performance problem.

Since it is so easy to break encapsulation with Reflection, it makes me wonder what the point of encapsulation is in C#? But it still has it’s purposes, I know.


Tips for using the Google Calendar API with C#

See my previous post: Interfacing with the Google Calendar API using C#

Tip #1 – Google Calendar API is set to ReadOnly in the example

I needed to edit, not just read.
Change line 23 in the code above:

//static string[] Scopes = { CalendarService.Scope.CalendarReadonly }; // I needed more than read only
static string[] Scopes = { CalendarService.Scope.Calendar };

Tip #2 – Your App’s Security Permission to use the Google Calendar API

My application stopped working. I had to revoke my projects permission and then run the code again so I was prompted to accept permission. Sometimes I had to re-run the code twice to get the prompt.

Go here to revoke your permissions: https://security.google.com/settings/security/permissions

Tip #3 – How to find a Calendar by name

You can get a list of Calendars. The Summary property is where the Calendar title is stored.

    // . . . Authentication here

    // Create Calendar Service.
    var service = new CalendarService(new BaseClientService.Initializer()
    {
        HttpClientInitializer = credential,
        ApplicationName = ApplicationName,
    });


    var list = service.CalendarList.List().Execute();
    var myCalendar = list.Items.SingleOrDefault(c => c.Summary == "My Calendar Name");
            
    // . . . do stuff with your calendar

Tip #4 – How to add an event

I thought it was weird that the example didn’t actually have you add an event. To add an event:

  1. First read Tip #1.
  2. Use this code:
    var list = service.CalendarList.List().Execute();
    var myCalendar = list.Items.SingleOrDefault(c => c.Summary == "My Calendar");
            
    if (myCalendar != null)
    {
        Event calEvent = new Event
        {
            Summary = "Awesome Party",
            Location = "My House",
            Start = new EventDateTime
            {
                DateTime = new DateTime(2015, 5, 20, 19, 00, 0)
            },
            End = new EventDateTime
            {
                DateTime = new DateTime(2015, 5, 20, 23, 59, 0)
            },
            Recurrence = new List<string>()
        };
        var newEventRequest = service.Events.Insert(calEvent, myCalendar.Id);
        var eventResult = newEventRequest.Execute();
    }

Interfacing with the Google Calendar API using C#

I needed to script something with Google Calendar, so naturally I headed over to their API page. I found a quick start document and it is a creative commons license, so I can re-post it here:

See my tips after you read this document! See my previous post: Tips for using the Google Calendar API with C#

—————-
Complete the steps described in the rest of this page, and in about five minutes you’ll have a simple .NET console application that makes requests to the Google Calendar API.

Prerequisites

To run this quickstart you’ll need:

  • Visual Studio 2013 or later.
  • Access to the internet and a web browser.
  • A Google account with Google Calendar enabled.

Step 1: Enable the Calendar API

  1. Use this wizard
    to create or select a project in the Google Developers Console and
    automatically enable the API.
  2. In the sidebar on the left, select Consent screen. Select an
    EMAIL ADDRESS and enter a PRODUCT NAME if not already set and click
    the Save button.
  3. In the sidebar on the left, select Credentials and click Create new
    Client ID
    .
  4. Select the application type Installed application, the installed
    application type Other, and click the Create Client ID button.
  5. Click the Download JSON button under your new client ID. Rename it
    to client_secret.json.

Step 2: Install the Google Client Library

  1. Create a new Visual C# Console Application project in Visual Studio.
  2. From the Package Manager Console, with package source set to “nuget.org”
    run the following command:
PM> Install-Package Google.Apis.Calendar.v3

Step 3: Set up the sample

  1. Copy client_secret.json (downloaded in Step 1) into your project directory.
  2. Refresh the Solution Explorer to show the client_secret.json that was
    copied in.
  3. From Solution Explorer right click on client_secret.json and select
    the Include In Project option.
  4. With client_secret.json still selected go to the Properties window and set
    the Copy to Output Directory field to Copy always.
  5. Replace the contents of Program.cs with the following code.
using Google.Apis.Auth.OAuth2;
using Google.Apis.Calendar.v3;
using Google.Apis.Calendar.v3.Data;
using Google.Apis.Services;
using Google.Apis.Util.Store;
using System;
using System.Collections.Generic;
using System.IO;
using System.Linq;
using System.Text;
using System.Threading;
using System.Threading.Tasks;

namespace CalendarQuickstart
{
  /// <summary>
  /// Google Calendar API quickstart application that retrieves the next ten
  /// events of the authenticated user's primary calendar and prints the
  /// summary and start datetime/date of each.
  /// </summary>
  class Program
  {
    static string[] Scopes = { CalendarService.Scope.CalendarReadonly };
    static string ApplicationName = "Calendar API Quickstart";


    static void Main(string[] args)
    {
      UserCredential credential;

      using (var stream = new FileStream("client_secret.json", FileMode.Open,
          FileAccess.Read))
      {
        string credPath = System.Environment.GetFolderPath(System.Environment
          .SpecialFolder.Personal);
        credPath = Path.Combine(credPath, ".credentials");

        credential = GoogleWebAuthorizationBroker.AuthorizeAsync(
           GoogleClientSecrets.Load(stream).Secrets,
          Scopes,
          "user",
          CancellationToken.None,
          new FileDataStore(credPath, true)).Result;

        Console.WriteLine("Credential file saved to: " + credPath);
      }

      // Create Calendar Service.
      var service = new CalendarService(new BaseClientService.Initializer()
      {
        HttpClientInitializer = credential,
        ApplicationName = ApplicationName,
      });

      // Define parameters of request.
      EventsResource.ListRequest request = service.Events.List("primary");
      request.TimeMin = DateTime.Now;
      request.ShowDeleted = false;
      request.SingleEvents = true;
      request.MaxResults = 10;
      request.OrderBy = EventsResource.ListRequest.OrderByEnum.StartTime;

      Console.WriteLine("Upcoming events:");
      Events events = request.Execute();
      if (events.Items.Count > 0)
      {
        foreach (var eventItem in events.Items)
        {
          string when = eventItem.Start.DateTime.ToString();
          if (String.IsNullOrEmpty(when))
          {
            when = eventItem.Start.Date;
          }
          Console.WriteLine("{0} ({1})", eventItem.Summary, when);
        }
      }
      else
      {
        Console.WriteLine("No upcoming events found.");
      }
      Console.Read();
    }
  }
}

Step 4: Run the sample

Run the sample by clicking Start in the Visual Studio toolbar.

The first time you run the sample it will prompt you to authorize access.

  1. A browser window will open prompting you to login if you are not already
    logged into your Google account. If you are logged into multiple Google
    accounts, you will be asked to select one account to use for the authorization.
  2. Click the Accept button.

Authorization information is stored on the file system, so subsequent
executions will not prompt for authorization.

Further reading

Except as otherwise noted, the content of this page is licensed under the Creative Commons Attribution 3.0 License, and code samples are licensed under the Apache 2.0 License. For details, see our Site Policies.


The Three-Minute Standup

We should all strive for the three-minute standup. If you stand up is different than this, you are doing it wrong:

Manager: Hey, all, let's start standup.

Manager: (looks at Dev 1) Kanban board says you moved Blah task to done yesterday and pulled in foo task today.
Dev 1: Yes.
Manager: Good work. Need anything from me or the team.
Dev 1: No

Manager: (looks at Dev 2) Kanban board says you moved Oober1 task to done yesterday and pulled in Gobblygook task today.
Dev 2: Yes.
Manager: Need anything from me or the team.
Dev 2: Yes, I need help from Dev 1 to do Gobblygook.
Manager: (looks at Dev 1) Dev 1, can you talk to Dev 2 about gobblygook after standup.
Dev 1: Yes

Manager: (looks at Dev 3) Kanban board says you moved Whatsit task to done yesterday and pulled in WrongWork task today.
Dev 3: Oops. Yes, I finished Whatsit yesteday, but I pulled in the wrong story. I am working on RightWork.
Manager: Fix the Kanban board mistake. Need anything from me or the team on RightWork.
Dev 3: Nope

Manager: (Looks at Tester) Kanban board says you finished tests for oober1 and you are working on testing Blah.
Tester: Yes, there was one bug, I verbally told Dev 2, he fixed it. I retested and all tests pass. I am testing Blah now.
Manager: Good work. Need anything from me or the team.
Tester: I'll maybe need to speek to Dev 1 about Blah sometime after lunch.

Manager: Great job team. Keep up the good work.

Stand up ends.

Notice the key to a successful standup is the Kanban board (or Scrum task board). You shouldn’t ever have to explain what you are working on, it is on the board.

If you don’t have a Kanban board or task board, get one immediately.


Setting File Properties in a NuGet Package: Build Action, Copy to Output Directory, Custom Tool

So I have a bunch of files in a NuGet package that need the File Properties set as follows:

Build Action Content
Copy to Output Directory Copy if newer
Custom Tool
Custom Tool Namespace

I am using the NuGet package Project that you can find in the Online projects.

I was able to set these values in a NuGet package as follows using the Install.ps1 PowerShell script. I found this out thanks to Workabyte’s answer on StackOverflow

$item = $project.ProjectItems.Item("MyContentFile.xml")
$item.Properties.Item("BuildAction").Value = 2
$item.Properties.Item("CopyToOutputDirectory").Value = 2
$item.Properties.Item("CustomTool").Value = ""

I would just set something to what I wanted it to be, then I would look at its value.

Here is my full Install.ps1

# Runs every time a package is installed in a project

param($installPath, $toolsPath, $package, $project)

# $installPath is the path to the folder where the package is installed.
# $toolsPath is the path to the tools directory in the folder where the package is installed.
# $package is a reference to the package object.
# $project is a reference to the project the package was installed to.

function SetFilePropertiesRecursively
{
	$folderKind = "{6BB5F8EF-4483-11D3-8BCF-00C04F8EC28C}";
	foreach ($subItem in $args[0].ProjectItems)
	{
		$path = $args[1]
	    if ($subItem.Kind -eq $folderKind)
		{
			SetFilePropertiesRecursively $subItem ("{0}{1}{2}" -f $path, $args[0].Name, "\")
		}
		else
		{
			Write-Host -NoNewLine ("{0}{1}{2}" -f $path, $args[0].Name, "\")
			SetFileProperties $subItem 2 2 ""
		}
	}
}

function SetFileProperties
{
	param([__ComObject]$item, [int]$buildAction, [int]$copyTo, [string]$customTool)
	Write-Host $item.Name
	Write-Host "  Setting Build Action to Content"
	$item.Properties.Item("BuildAction").Value = $buildAction
	Write-Host "  Setting Copy To Output Directory to Copy if newer"
	$item.Properties.Item("CopyToOutputDirectory").Value = $copyTo
	Write-Host "  Setting Custom Tool to blank"
	$item.Properties.Item("CustomTool").Value = $customTool
}

SetFilePropertiesRecursively $project.ProjectItems.Item("Globalization")
SetFilePropertiesRecursively $project.ProjectItems.Item("Styles")
SetFileProperties $project.ProjectItems.Item("App.xaml") 4 0 "MSBuild:Compile"

Life is good.


Putting Code in Blog Comments

To put code in comments, you can use the Syntax Highlighter tags common to WordPress.

your code here

Or for shorthand, you can do this:

your code here
[csharp]
</code>

Here is an example:
<code>
[csharp]
using System;</code>

namespace FnoSharp.DataMigrator
{
class Program
{
static void Main(string[] args)
{
Console.WriteLine("Hello, World!");
}
}
}
[csharp]

And it looks like this:
<pre>[csharp]
using System;

namespace FnoSharp.DataMigrator
{
    class Program
    {
        static void Main(string[] args)
        {
            Console.WriteLine("Hello, World!");
        }
    }
}

The language (or lang) parameter controls how the code is syntax highlighted. The following languages are supported:

  • actionscript3
  • bash
  • clojure
  • coldfusion
  • cpp
  • csharp
  • css
  • delphi
  • erlang
  • fsharp
  • diff
  • groovy
  • html
  • javascript
  • java
  • javafx
  • matlab (keywords only)
  • objc
  • perl
  • php
  • text
  • powershell
  • python
  • r
  • ruby
  • scala
  • sql
  • vb
  • xml

If the language parameter is not set, it will default to “text” (no syntax highlighting).

Code in between the source code tags will automatically be encoded for display, you don’t need to worry about HTML entities or anything.