Archive for the ‘C++’ Category.

MSVCR100.dll Download or MSVCP100.dll Download

In a previous post, Avoiding the MSVCR100.dll, MSVCP100D.dll, or MSVCR100D.dll is missing error, I explain what the MSVCR100.dll is and how to solve problems with it.

Many have asked for an MSVCR100.dll download. Turns out that Visual Studio has a redistributable folder that contains these dlls. So I zipped it up and I am redistributing it.

Here it is:

Download MSVCR100.dll and MSVCP100.dll

How to compile WinNFSd with Visual Studio?

Recently I needed an NFS server on Windows, preferably written in C++. A long time ago I had used WinNFSd and sure enough the project still exists on Sourceforge, though unfortunately it hasn’t been updated since 2005.

However, I found that someone had updated it here: https://github.com/noodle1983/winnfsd-nd

So the big question, how do you compile this on windows with Visual Studio?

Step 1 – Download and extract the WinNFSd source

  1. Go to https://sourceforge.net/projects/winnfsd and download the source.
    Note: You can alternately download the git hub source as it has an update you might like:
    https://github.com/noodle1983/winnfsd-nd
  2. Click the Zip button at the top of the page to download the source as a zip.
    Note: Alternately if you have git working already you can clone this repo.
  3. Extract the zip file to a directory.  Remember where you extracted it as we will copy the source files later.

Step 2 – Create a new Visual Studio solution

  1. In Visual Studio, go to File | New | Project.
  2. Select Other Languages | Visual C++ | Empty Project.
    Note: Depending on your Visual Studio configuration you may Visual C++ in a different place.
  3. Name the solution WinNFSd.
  4. Click Ok.

Step 3 – Add the WinNFSd files to your solution

  1. In Visual Studio, right-click on your Project and click Open Folder in Windows Explorer.
  2. Create a new folder to hold your source code.
    Note: I simply named my folder src.
  3. Copy the source you extracted in Step 1 into the src directory.
  4. Highlight all the files in the src directory.
  5. Drag the files into Visual Studio and drop them on your project.
Note: If you try to build now, you will get 22 errors in debug mode and maybe 17 in release mode.

Step 4 – Configure the project properties

  1. In Visual Studio, right-click on your project and choose Properties.
    Note: The Configuration should say Active(Debug) currently.
  2. Go to Configuration Properties | Linker | Input.
  3. Add ws2_32.lib to the Additional Dependencies.
  4. Change the Configuration to Release and add ws2_32.lib for release as well.

Step 5 – Handle the Visual Studio C++ Runtime

If you were to compile now, and try to run your project on a different machine (not the one running Visual Studio) you would likely get an error due to a missing dll.  Here is the error you will likely receive.

The program can’t start because MSVCR100.dll is missing from your computer. Try reinstalling the program to fix this problem.

I am not going to explain the solution again here, because it is all documented here:
Avoiding the MSVCR100.dll or MSVCR100D.dll is missing error

Choose the best of the three solutions for you from the link above.

Note: For this single file exe, I prefer the statically linked option.

Step 6 – Build WinNFSd

  1. You should now be able to click Build | Build Solution and it should build.

You should be able to test both debug and release.

Note: I received 37 warnings, which would be nice to resolve, but I wouldn’t worry too much about them.


Unwrapping a packet with Pcap and tcpdump (Part 1 – Ethernet Header)

If you are familiar with the OSI model, you are aware that network packets are wrapped in layers called headers.
Note: Don’t confuse these with C++ headers, these are network packet headers and I will try to always clarify by saying “packet headers” or “C++ headers”.
The goal of this article to demonstrate how to unwrap these packet headers using C++ and the Pcap and tcpdump libraries.

Prerequisites

  • You have read the previous Pcap posts.
  • Basic understanding of the OSI model
  • Basic knowledge of networking

Packet Headers

The first layer of a valid packet will contain an ethernet layer and it will be the first 14 octets. Each octet is a pair of hex numbers.  If you look at a standard TCP Syn packet in Wireshark, it will be displayed in Hex view as follows:

00 18 e7 dc e7 29 00 1f 3b 69 4f 29 08 00 45 00
00 34 0c 93 40 00 80 06 aa 86 c0 a8 00 0f 41 30
41 c3 39 22 00 50 c9 bc 46 2b 00 00 00 00 80 02
20 00 c2 11 00 00 02 04 05 b4 01 03 03 02 01 01
04 02

But you could display the octets in bits using the Bits View to see the binary representation of the packet:

00000000 00011000 11100111 11011100 11100111 00101001 00000000 00011111
00111011 01101001 01001111 00101001 00001000 00000000 01000101 00000000
00000000 00110100 00001100 10010011 01000000 00000000 10000000 00000110
10101010 10000110 11000000 10101000 00000000 00001111 01000001 00110000
01000001 11000011 00111001 00100010 00000000 01010000 11001001 10111100
01000110 00101011 00000000 00000000 00000000 00000000 10000000 00000010
00100000 00000000 11000010 00010001 00000000 00000000 00000010 00000100
00000101 10110100 00000001 00000011 00000011 00000010 00000001 00000001
00000100 00000010

I will use Hex unless demonstrating something that is easier to explain in binary.

Because this is a TCP Syn packet, there actually is no data or payload, just packet headers really, because it is just the first packet of a TCP handshake, but we can still demonstrate the idea of packet headers (and it is easier since the packet is smaller).

The first 14 octets comprises the first packet header and it has three items of data:

00 18 e7 dc e7 29 - (6 octets) Destination Mac Address
00 1f 3b 69 4f 29 - (6 octets) Source Mac Address<
08 00             - (2 octets) Ethertype

So our first job in C++ is to get this packet header data into a struct. Structs are already created in the tcpdump library if you want to use them, but if you want, you can create your own.

We will continue the project we started here: How to read a PCap file from Wireshark with C++

Step 1 – Download tcpdump

  1. Go to the tcpdump developer page:
    http://www.tcpdump.org/#latest-release
  2. Download the latest stable version of WinPcap.
  3. Extract to your solution directory.

Step 2 – Add tcpdump to Additional Include Directories

  1. In Visual Studio, right-click on your project and go to Properties.
  2. Go to Configuration Properties | C/C++ | General.
  3. Note: If you don’t see the C/C++ option, did you forget to do Step 2 above?
  4. For Additional Include Directories add the relative path to the tcpdump-4.2.0 directory you just extracted:
    ..\tcpdump-4.2.0

Step 3 – Add #include statements for packet headers and enums

The ether.h file that comes with tcpdump code has a small amount of code that include three #define and one struct (BSD license and comments omitted for brevity).

#define	ETHERMTU	1500
#define	ETHER_ADDR_LEN		6
struct	ether_header {
	u_int8_t	ether_dhost[ETHER_ADDR_LEN];
	u_int8_t	ether_shost[ETHER_ADDR_LEN];
	u_int16_t	ether_type;
};
#define ETHER_HDRLEN		14

However, there are other C++ headers that provide struct for packet headers as well as useful #define statements and enumerations. Here is a list of some of the tcpdump c++ headers you should become familiar with.

// These provide Packet Headers and Enums
#include <ether.h>
#include <ip.h>
#include <ipproto.h>
#include <tcp.h>
#include <udp.h>
#include <ethertype.h>

Add these to the main.cpp.

We are now ready to start unwrapping the packet headers with c++ code.

Step 4 – Create some helper functions

Let’s move the printing of the packet into its own function, this will get it out of our way.

Lets also create a function to only print parts of the packet.

Also, add a function to convert ethertype values to strings.

First declare them…

// Declare helper functions
void PrintPacket(pcap_pkthdr * header, const u_char *data);
void PrintData(u_int startOctet, u_int endOctet, const u_char *data);
char * get_ethertype(const u_int16_t ethertype);

Then define them….

void PrintPacket(pcap_pkthdr * header, const u_char *data)
{
	// Print using printf. See printf reference:
	// http://www.cplusplus.com/reference/clibrary/cstdio/printf/

	// Show the packet number
	printf("Packet # %i\n", ++packetCount);

	// Show the size in bytes of the packet
	printf("Packet size: %ld bytes\n", header->len);

	// Show a warning if the length captured is different
	if (header->len != header->caplen)
		printf("Warning! Capture size different than packet size: %ld bytes\n", header->len);

	// Show Epoch Time
	printf("Epoch Time: %ld:%ld seconds\n", header->ts.tv_sec, header->ts.tv_usec);

	// loop through the packet and print it as hexidecimal representations of octets
	// We also have a function that does this similarly below: PrintData()
	for (u_int i=0; (i < header->caplen ) ; i++)
	{
		// Start printing on the next after every 16 octets
		if ( (i % 16) == 0) printf("\n");

		// Print each octet as hex (x), make sure there is always two characters (.2).
		printf("%.2x ", data[i]);
	}
	printf("\n\n");
}

void PrintData(u_int startOctet, u_int endOctet, const u_char *data)
{
	for (u_int i = startOctet; i <= endOctet; i++)
	{
		// Print each octet as hex (x), make sure there is always two characters (.2).
		printf("%.2x ", data[i]);
	}
	printf("\n");
}

// Returns a string representation of the common Ethertype
char * get_ethertype(const u_int16_t ethertype)
{
	switch(ethertype)
	{
	case ETHERTYPE_IP:
		return "IPv4";
	case ETHERTYPE_IPV6:
		return "IPv6";
	case ETHERTYPE_ARP:
		return "ARP";
	default:
		return "Unknown";
	}
}

Step 5 – Unwrapping the first packet header with the ether_header struct

Once we have printed the packet out, we are now going to print details of the packet.

  1. Create a pointer to an ether_header struct.
  2. Assign it the same memory address as the data pointer.
const struct ether_header *ethernet;
ethernet = (struct ether_header*)(data);

Now print out the three items in the struct: Destination Mac, Source Mac, and Ethertype.

// Print Destination Mac Address
printf("Dst MAC: ");
PrintData(0,5,ethernet->ether_dhost);

// Print Source Mac Address
printf("Src MAC: ", ethernet->ether_shost);
PrintData(0,5,ethernet->ether_shost);

// Print EtherType
printf("Ethertype: %s (%#.4x)\n", get_ethertype(ethernet->ether_type), ethernet->ether_type);

Everything should print fine except the ethertype. It is 0x0080 instead of 0x8000. In the next step we will fix this.

Step 6 – Fix the bit order of the ether_type

We are going to use the ntohs() function to fix the bits. This is defined on windows in the Ws2_32.lib library, which is not included, so we must include it.

  1. In Visual Studio, right-click on your project and go to Properties.
  2. Go to Configuration Properties | Linker | Input.
  3. For Additional Dependencies, add the following:
    Ws2_32.lib;

Now we can go ahead and use the ntohs() function in our code.

// Print EtherType
u_short ethertype = ntohs(ethernet->ether_type);
printf("Ethertype: %s (%#.4x)\n", get_ethertype(ethertype), ethertype);

Lets end here for now. We have successfully unwrapped the first packet header.

Here is the full main.cpp file.

/*
	Copyright 2011 Rhyous. All rights reserved.

	Redistribution and use in source and binary forms, with or without modification, are
	permitted provided that the following conditions are met:

	   1. Redistributions of source code must retain the above copyright notice, this list of
		  conditions and the following disclaimer.

	   2. Redistributions in binary form must reproduce the above copyright notice, this list
		  of conditions and the following disclaimer in the documentation and/or other materials
		  provided with the distribution.

	THIS SOFTWARE IS PROVIDED BY Rhyous ''AS IS'' AND ANY EXPRESS OR IMPLIED
	WARRANTIES, INCLUDING, BUT NOT LIMITED TO, THE IMPLIED WARRANTIES OF MERCHANTABILITY AND
	FITNESS FOR A PARTICULAR PURPOSE ARE DISCLAIMED. IN NO EVENT SHALL Rhyous OR
	CONTRIBUTORS BE LIABLE FOR ANY DIRECT, INDIRECT, INCIDENTAL, SPECIAL, EXEMPLARY, OR
	CONSEQUENTIAL DAMAGES (INCLUDING, BUT NOT LIMITED TO, PROCUREMENT OF SUBSTITUTE GOODS OR
	SERVICES; LOSS OF USE, DATA, OR PROFITS; OR BUSINESS INTERRUPTION) HOWEVER CAUSED AND ON
	ANY THEORY OF LIABILITY, WHETHER IN CONTRACT, STRICT LIABILITY, OR TORT (INCLUDING
	NEGLIGENCE OR OTHERWISE) ARISING IN ANY WAY OUT OF THE USE OF THIS SOFTWARE, EVEN IF
	ADVISED OF THE POSSIBILITY OF SUCH DAMAGE.

	The views and conclusions contained in the software and documentation are those of the
	authors and should not be interpreted as representing official policies, either expressed
	or implied, of Rhyous.
/*

/*
* How to read a packet capture file.
*/

/*
* Step 1 - Add includes and namespace
*/
#include <string>
#include <iostream>
#include <pcap.h>

// These provide headers and enums
#include <ether.h>
#include <ip.h>
#include <ipproto.h>
#include <tcp.h>
#include <udp.h>
#include <ethertype.h>

using namespace std;

// Declare helper functions
void PrintPacket(pcap_pkthdr * header, const u_char *data);
void PrintData(u_int startOctet, u_int endOctet, const u_char *data);
u_short get_ethertype_value(const u_char *data);
char * get_ethertype(const u_int16_t ethertype);

// static values
static u_int packetCount = 0;

// Defines
#define SIZE_ETHERNET 14

int main(int argc, char *argv[])
{
	/*
	* Step 2 - Get a file name
	*/

	string file = "C:\\users\\jared\\testfiles\\smallcapture.pcap";

	/*
	* Step 3 - Create an char array to hold the error.
	*/

	// Note: errbuf in pcap_open functions is assumed to be able to hold at least PCAP_ERRBUF_SIZE chars
	//       PCAP_ERRBUF_SIZE is defined as 256.
	// http://www.winpcap.org/docs/docs_40_2/html/group__wpcap__def.html
	char errbuff[PCAP_ERRBUF_SIZE];

	/*
	* Step 4 - Open the file and store result in pointer to pcap_t
	*/

	// Use pcap_open_offline
	// http://www.winpcap.org/docs/docs_41b5/html/group__wpcapfunc.html#g91078168a13de8848df2b7b83d1f5b69
	pcap_t * pcap = pcap_open_offline(file.c_str(), errbuff);

	/*
	* Step 5 - Create a header and a data object
	*/

	// Create a header object:
	// http://www.winpcap.org/docs/docs_40_2/html/structpcap__pkthdr.html
	struct pcap_pkthdr *header;

	// Create a character array using a u_char
	// u_char is defined here:
	// C:\Program Files (x86)\Microsoft SDKs\Windows\v7.0A\Include\WinSock2.h
	// typedef unsigned char   u_char;
	const u_char *data;

	/*
	* Step 6 - Loop through packets and print them to screen
	*/
	while (int returnValue = pcap_next_ex(pcap, &header, &data) >= 0)
	{
		// I moved the code for printing the packet as hex values
		// to a function
		PrintPacket(header, data);

		// Print the packet in details
		printf("Packet Details\n");

		// Unwrap ether_header (first 14 bytes)
		const struct ether_header *ethernet;
		ethernet = (struct ether_header*)(data);

		// Print Destination Mac Address
		printf("Dst MAC: ");
		PrintData(0,5,ethernet->ether_dhost);

		// Print Source Mac Address
		printf("Src MAC: ", ethernet->ether_shost);
		PrintData(0,5,ethernet->ether_shost);

		// Print EtherType
		u_short ethertype = ntohs(ethernet->ether_type);
		printf("Ethertype: %s (%#.4x)\n", get_ethertype(ethertype), ethertype);

		// Add two lines between packets
		printf("\n\n");
	}
}

void PrintPacket(pcap_pkthdr * header, const u_char *data)
{
	// Print using printf. See printf reference:
	// http://www.cplusplus.com/reference/clibrary/cstdio/printf/

	// Show the packet number
	printf("Packet # %i\n", ++packetCount);

	// Show the size in bytes of the packet
	printf("Packet size: %ld bytes\n", header->len);

	// Show a warning if the length captured is different
	if (header->len != header->caplen)
		printf("Warning! Capture size different than packet size: %ld bytes\n", header->len);

	// Show Epoch Time
	printf("Epoch Time: %ld:%ld seconds\n", header->ts.tv_sec, header->ts.tv_usec);

	// loop through the packet and print it as hexidecimal representations of octets
	// We also have a function that does this similarly below: PrintData()
	for (u_int i=0; (i < header->caplen ) ; i++)
	{
		// Start printing on the next after every 16 octets
		if ( (i % 16) == 0) printf("\n");

		// Print each octet as hex (x), make sure there is always two characters (.2).
		printf("%.2x ", data[i]);
	}
	printf("\n\n");
}

void PrintData(u_int startOctet, u_int endOctet, const u_char *data)
{
	for (u_int i = startOctet; i <= endOctet; i++)
 	{
		// Print each octet as hex (x), make sure there is always two characters (.2).
		printf("%.2x ", data[i]);
	}
	printf("\n");
}

u_short get_ethertype_value(const u_char *data)
{
	u_short ethertype = data[12] << 8;
	ethertype += data[13];
	return ethertype;
}

// Returns a string representation of the common Ethertype
char * get_ethertype(const u_int16_t ethertype)
{
	switch(ethertype)
	{
	case ETHERTYPE_IP:
		return "IPv4";
	case ETHERTYPE_IPV6:
		return "IPv6";
	case ETHERTYPE_ARP:
		return "ARP";
	default:
		return "Unknown";
	}
}

Stay tuned for Unwrapping a packet with Pcap and tcpdump (Part 2 – IP Header)

How to read a PCap file from Wireshark with C++

In my Computer Security class I am taking as part of my Masters of Computer Science course, we need to parse a Pcap dump file.

Prerequisites

It is expected you have Visual Studio 2010 already. It may work the same with Visual C++ 2010.

Step 1 – Install Wireshark

We are going to use Wireshark to get a packet capture. Wireshark is a nice easy tool to get a packet capture.

http://www.wireshark.org

Make sure to install Wireshark and let Wireshark install WinPcap when it prompts you.

Step 2 – Create a new project in Visual Studio

I already have post on creating a WinPcap project in Visual Studio and getting it to compile, so follow it.

How to compile WinPcap with Visual Studio 2010?

Step 3 – Get a packet capture.

  1. Open Wireshark and start capturing file.
  2. Open your browser or go to a few sites.
  3. Stop the packet capture.
  4. Save the packet capture to a file.
    I named my file smallcapture.pcap.

Step 4 – Add C++ code to read the packet capture

I am going to paste the code for you and put the comments and steps in the code.

/*
* How to read a packet capture file.
*/

/*
* Step 1 - Add includes
*/
#include <string>
#include <iostream>
#include <pcap.h>

using namespace std;

int main(int argc, char *argv[])
{
	/*
	* Step 2 - Get a file name
	*/

	string file = "C:\\users\\jared\\testfiles\\smallcapture.pcap";

	/*
	* Step 3 - Create an char array to hold the error.
	*/

	// Note: errbuf in pcap_open functions is assumed to be able to hold at least PCAP_ERRBUF_SIZE chars
	//       PCAP_ERRBUF_SIZE is defined as 256.
	// http://www.winpcap.org/docs/docs_40_2/html/group__wpcap__def.html
	char errbuff[PCAP_ERRBUF_SIZE];

	/*
	* Step 4 - Open the file and store result in pointer to pcap_t
	*/

	// Use pcap_open_offline
	// http://www.winpcap.org/docs/docs_41b5/html/group__wpcapfunc.html#g91078168a13de8848df2b7b83d1f5b69
	pcap_t * pcap = pcap_open_offline(file.c_str(), errbuff);

	/*
	* Step 5 - Create a header and a data object
	*/

	// Create a header object:
	// http://www.winpcap.org/docs/docs_40_2/html/structpcap__pkthdr.html
	struct pcap_pkthdr *header;

	// Create a character array using a u_char
	// u_char is defined here:
	// C:\Program Files (x86)\Microsoft SDKs\Windows\v7.0A\Include\WinSock2.h
	// typedef unsigned char   u_char;
	const u_char *data;

	/*
	* Step 6 - Loop through packets and print them to screen
	*/
	u_int packetCount = 0;
	while (int returnValue = pcap_next_ex(pcap, &header, &data) >= 0)
	{
		// Print using printf. See printf reference:
		// http://www.cplusplus.com/reference/clibrary/cstdio/printf/

		// Show the packet number
		printf("Packet # %i\n", ++packetCount);

		// Show the size in bytes of the packet
		printf("Packet size: %d bytes\n", header->len);

		// Show a warning if the length captured is different
		if (header->len != header->caplen)
			printf("Warning! Capture size different than packet size: %ld bytes\n", header->len);

		// Show Epoch Time
		printf("Epoch Time: %d:%d seconds\n", header->ts.tv_sec, header->ts.tv_usec);

		// loop through the packet and print it as hexidecimal representations of octets
		// We also have a function that does this similarly below: PrintData()
		for (u_int i=0; (i < header->caplen ) ; i++)
		{
			// Start printing on the next after every 16 octets
			if ( (i % 16) == 0) printf("\n");

			// Print each octet as hex (x), make sure there is always two characters (.2).
			printf("%.2x ", data[i]);
		}

		// Add two lines between packets
		printf("\n\n");
	}
}

You are now reading packets in C++. Now you can start working on differentiating the packet types.

Resources

  • http://www.tcpdump.org/pcap.html
  • http://www.tcpdump.org/pcap3_man.html

How to compile WinPcap with Visual Studio 2010?

The documentation for WinPcap was pretty poor. The last update for Visual Studio was for 2005, so this hasn’t been updated for Visual Studio 2008 or Visual Studio 2010.

Also, the steps don’t say what type of C++ project was created. This is probably why it missing information, such as the fact that WIN32 must be defined.

So I thought I would get it working and provide a post someone could actually find. I had to read the pcap.h file myself to figure out what was missing in the documentation.

Prerequisites

It is expected you have Visual Studio 2010 already. It may work the same with Visual C++ 2010.

Step 1 – Create a new empty project

  1. In Visual Studio go to File | New | Project.
  2. Select Other Languages | Visual C++ | General | Empty Project
  3. Enter a Project name, Location, and Solution Name.
  4. Take note of the solution directory.
  5. Click OK.

This creates the following directory structure:

.\WinPcapExample\WinPcapExample.sdf
.\WinPcapExample\WinPcapExample.sln
.\WinPcapExample\WinPcapExample\
.\WinPcapExample\WinPcapExample\WinPcapExample.vcxproj
.\WinPcapExample\WinPcapExample\WinPcapExample.vcxproj.filters
.\WinPcapExample\WinPcapExample\WinPcapExample.vcxproj.user

Step 2 – Create a main.cpp file

  1. Right-click on the project and choose Add | New Item.
  2. Select C++ File (.cpp)
  3. Enter the name as Main.cpp.
  4. Click Ok.
  5. Add the standard main function to the file:
    int main(int argc, char *argv[])
    {
    }
    
  6. Save the file.

Step 3 – Download and extract WinPCap

  1. Go to the WinPcap developer page:
    http://www.winpcap.org/devel.htm
  2. Download the latest stable version of WinPcap.
  3. Extract to your solution directory.

Step 4 – Configure the Project properties

Now that the needed resources are in your solution directory, you can configure your project to access them.

  1. In Visual Studio, right-click on your project and choose Properties.
  2. Make the following configuration changes to your project:

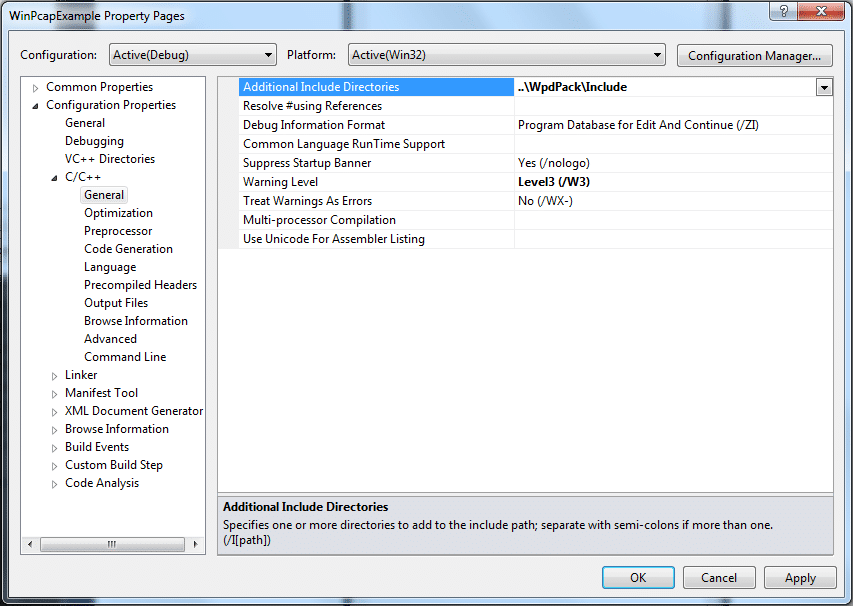
Configuration 1 – Add Additional Include Directories

  1. Go to Configuration Properties | C/C++ | General.
    Note: If you don’t see the C/C++ option, did you forget to do Step 2 above?
  2. For Additional Include Directories add the relative path:
    ..\WpdPack\Include

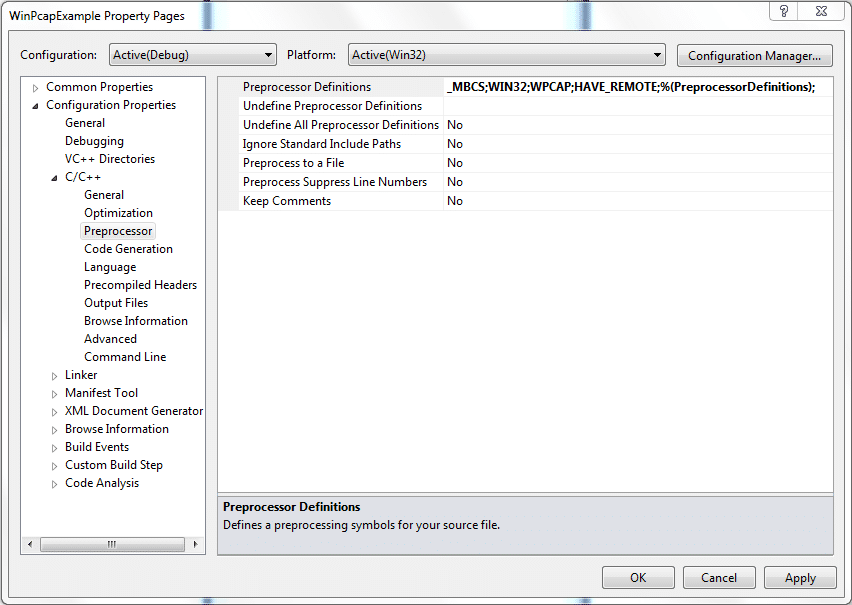
Configuration 2 – Add Preprocessor Definitions

  1. Go to Configuration Properties | C/C++ | Preprocessor.
  2. For Preprocessor Definitions, add these three:
    WIN32;WPCAP;HAVE_REMOTE.

Preprocessor Definintions

Important: If you fail to add WIN32, your compile will fail as follows:

Error	1	error C1083: Cannot open include file: 'sys/time.h': No such file or directory	c:\users\jared\documents\visual studio 2010\projects\c++\readpcapexample\libs\winpcap-4.1.2\include\pcap\pcap.h	47	1	ReadPCapExample

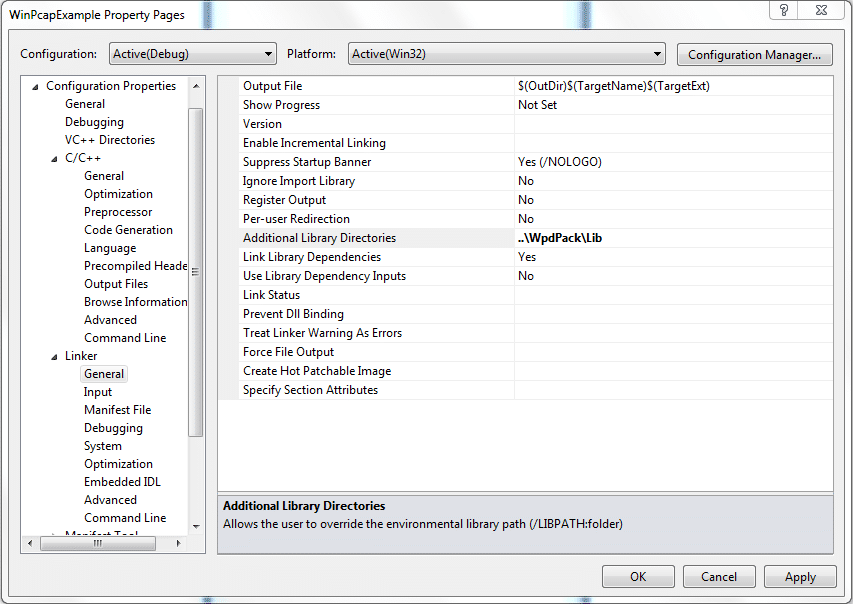
Configuration 3 – Add Additional Library Directories

  1. Go to Configuration Properties | Linker | General.
  2. For Additional Library Directories enter the following:
    ..\WpdPack\Lib
AdditionalLibraryDirectories

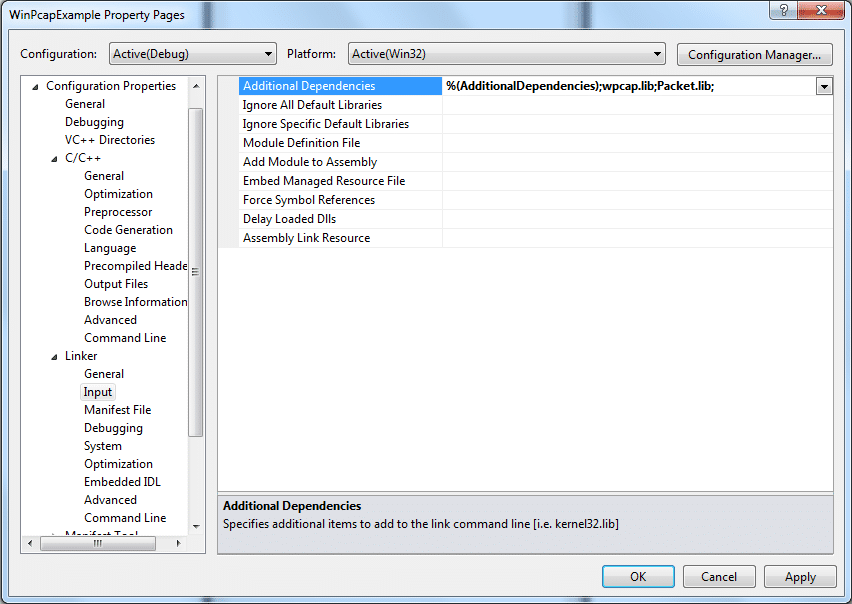
Configuration 4 – Add Additional Dependencies

  1. Go to Configuration Properties | Linker | Input.
  2. For Additional Dependencies, add the following:
    winpcap.lib;Packet.lib;

Additional Dependencies

Note: I removed the default libraries. You may need some of them:
kernel32.lib;user32.lib;gdi32.lib;winspool.lib;comdlg32.lib;advapi32.lib;shell32.lib;ole32.lib;oleaut32.lib;uuid.lib;odbc32.lib;odbccp32.lib;

Step 5 – Include pcap.h

  1. Open the Main.cpp file.
  2. Include pcap.h.
    #include
    
    int main(int argc, char *argv[])
    {
    }
    
  3. Try to compile and it should work.
You are now ready to develop using WinPcap.

Avoiding the MSVCR110.dll or MSVCR110D.dll is missing error

MSVCR110.dll

This MSVCR110.dll is the Microsoft Visual C++ Redistributable dll that is needed for projects built with Visual Studio 2011. The dll letters spell this out.

MS = Microsoft
V = Visual
C = C++
R = Redistributable

If you create a C++ project in Visual Studio 2011, this file is probably needed.

MSVCR110D.dll

The MSVCR110D.dll is almost the same file only the D at the end stands for Debug. This file has debugging enabled.

Why the error?

Ok, so recently I switched to Visual Studio 2011.  I had a C++ application that worked perfectly in Visual Studio 2008.  Once I compiled it with Visual Studio 2011 and ran it on a clean 2008 server (fully patched but otherwise clean), it failed to run with the following error.

TestWin32.exe – System Error

The program can’t start because MSVCR110.dll is missing from your computer. Try reinstalling the program to fix this problem.

Here is the screen shot:

MSVCR110.dll

The same things happens with the debug version of the file, only it is a the debug version of the same DLL as noted by the fact that the DLL name ends with D.

Autorun – System Error

The program can’t start because MSVCR110.dll is missing from your computer. Try reinstalling the program to fix this problem.

The screen shot is identical except for the D in the dll name.

MSVCR110d.dll

I create a new project in Visual Studio 2011 using the project type of C++ Win32 Project and without making a single change to the default project, I built the file and tested it on my clean machine and the same issue occurred.

So obviously that is not acceptable.  It seems like this should just not happen by default, but unfortunately it does.

Solution

It was actually really easy to resolve for my one project.

Here is what I did.

You can solve this any of the following ways:

  1. Statically link to the dll files so they are compiled into my executable instead of referenced as separate dll files.
  2. Included the dll in the same directory as the exe (I actually didn’t try this but I assume it would work).
  3. Forced everyone to install the VC++ Runtime Redistributable before running the app.

The first option seems the most stable and robust and easiest for a single executable. So that is the one I am going to use.

The second option doesn’t really make sense to me and I would probably never do it.  Maybe if I had dozens of executable files that all required the same DLL and I didn’t have an installer, and I wanted to conserve size, which probably wouldn’t happen for me since I am pretty good at creating a quick installer. Though you might be in this a situation.

The third option would make sense if I was planning on running my executable after an install.  During the install I could include the VC++ Runtime Redistributable and all would be fine.

Statically Linking the DLLs

Make sure you resolve it for both Release and Debug.  The steps are slightly different.

Release

  1. In Visual Studio, I went to the project Properties.
  2. I changed my Configuration to Release.
  3. I went under Configuration Properties | C/C++ | Code Generation
  4. Look at the Runtime Library setting.  It is set to this: Multi-threaded DLL (/MD)
    Change it to this: Multi-threaded (/MT)
  5. Rebuild.

Debug

Almost exactly the same as release.

  1. In Visual Studio, I went to the project Properties.
  2. I changed my Configuration to Debug.
  3. I went under Configuration Properties | C/C++ | Code Generation
  4. Look at the Runtime Library setting.  It is set to this: Multi-threaded Debug DLL (/MDd)
    Change it to this: Multi-threaded Debug (/MTd)
  5. Rebuild the debug

It might be a good idea for me to figure out how to change the project so when I create a new project of this type, those settings are the default.

Prime Factors calculator in C++

Hey all, I wrote a C++ object that gets the prime factors of any number and thought I would share it.

The comments should help you and the variables have very clear names, so it should be self-documenting.

PrimeFactorsOfCalculator.h

#pragma once

#include <vector>

using namespace std;

class PrimeFactorsOfCalculator
{
public:
	PrimeFactorsOfCalculator(void);
	~PrimeFactorsOfCalculator(void);

	long GetNumber();
	void SetNumber(long inNumber);
	vector<int> GetPrimeFactors(bool inAllowDuplicates = false, bool inForceRecalculate = false);


private:
	long Number;
	vector<int> PrimeFactors;
	bool IsPrime(long inNumber);

	long MultiplyPrimes();

};

PrimeFactorsOfCalculator.cpp

#include "PrimeFactorsOfCalculator.h"
#include <math.h>
#include <algorithm>

using namespace std;

PrimeFactorsOfCalculator::PrimeFactorsOfCalculator(void)
{
}


PrimeFactorsOfCalculator::~PrimeFactorsOfCalculator(void)
{
}

long PrimeFactorsOfCalculator::GetNumber()
{
	return Number;
}

void PrimeFactorsOfCalculator::SetNumber(long inNumber)
{
	Number = inNumber;
	PrimeFactors.clear();
}

//
// Gets the prime factors of Number. 100 return 2,5.
//	
// inAllowDuplicates - Allow duplicates, for example, 100 has prime 
// factors of 2 and 5,but in order to get 100, you need 2*2*5*5. So 
// instead of returning 2,5 the return array will be 2,2,5,5.
//
// inForceRecalculate - By default the values are stored at first
// calculation and only recalcuated when needed. this is for efficiency.
vector<int> PrimeFactorsOfCalculator::GetPrimeFactors(bool inAllowDuplicates, bool inForceRecalculate)
{
	// Don't recalculate if already calculated.
	if (PrimeFactors.size() > 0 && !inForceRecalculate)
		return PrimeFactors;

	PrimeFactors.clear();
	// Calculate
	if (Number % 2 == 0 && Number >= 2)
	{
		PrimeFactors.push_back(2);
	} 

	for (int i = 3; i < Number/3; i++)
	{
		if (Number % i == 0 && IsPrime(i))
			PrimeFactors.push_back(i);
	}

	// Allow duplicates, for example, 100 has prime factors of 2 and 5,
	// but in order to get 100, you need 2*2*5*5. So instead of returning
	// 2,5 the return array will be 2,2,5,5.
	if (inAllowDuplicates)
	{
		while (MultiplyPrimes() != Number)
		{
			long multipliedVal = MultiplyPrimes();
			long val = 0;

			if (multipliedVal != 0)
				val = Number / multipliedVal;

			if (IsPrime(val))
			{
				PrimeFactors.push_back(val);
				continue;
			}
			else
			{
				// recursion
				PrimeFactorsOfCalculator calc = PrimeFactorsOfCalculator();
				calc.SetNumber(val);
				vector<int> duplicateFactors = calc.GetPrimeFactors();
				for (size_t i = 0; i < duplicateFactors.size(); i++)
				{
					PrimeFactors.push_back(duplicateFactors.at(i));
				}
			}
		}
	}

	sort(PrimeFactors.begin(), PrimeFactors.end());
	return PrimeFactors;
}

bool PrimeFactorsOfCalculator::IsPrime(long inNumber)
{
	// Get square root as that is the highest possible factor
	// and add one in case precision is screwy.
	long highestPossibleFactor = (long)(sqrt((double)inNumber) + 1);

	// Handle 2 separatly then no other even has to be checked
	if (inNumber % 2 == 0) 
		return false;

	// See if the value is divisible by any odd number
	// if so it is not prime
	for (int i = 3; i < highestPossibleFactor; i+=2)
	{
		if (inNumber % i == 0) 
			return false;
	}
	return true;
}

long PrimeFactorsOfCalculator::MultiplyPrimes()
{
	if (PrimeFactors.size() == 1)
		return PrimeFactors.at(0);
	else if (PrimeFactors.size() > 1)
	{
		int minVal = PrimeFactors.at(0);
		for (size_t i = 1; i < PrimeFactors.size(); i++)
		{
			minVal *= PrimeFactors.at(i);
		}
		return minVal;
	}
	else return 1; // 1 is always a prime
}

And last here is a sample main function that uses this.

Main.cpp

#include <vector>
#include "PrimeFactorsOfCalculator.h"

using namespace std;

int main()
{
	PrimeFactorsOfCalculator calc = PrimeFactorsOfCalculator();
	calc.SetNumber(100);
	vector<int> primeFactors = calc.GetPrimeFactors();
	vector<int> primeFactorsWithDuplicates = calc.GetPrimeFactors(true, true);


	calc.SetNumber(200);
	primeFactors = calc.GetPrimeFactors();
	primeFactorsWithDuplicates = calc.GetPrimeFactors(true, true);


	calc.SetNumber(1000);
	primeFactors = calc.GetPrimeFactors();
	primeFactorsWithDuplicates = calc.GetPrimeFactors(true, true);

	calc.SetNumber(14593);
	primeFactors = calc.GetPrimeFactors();
	primeFactorsWithDuplicates = calc.GetPrimeFactors(true, true);

	calc.SetNumber(12345678);
	primeFactors = calc.GetPrimeFactors();
	primeFactorsWithDuplicates = calc.GetPrimeFactors(true, true);
}

Avoiding the MSVCR100.dll, MSVCP100D.dll, or MSVCR100D.dll is missing error (Also MSVCR110.dll, MSVCR120.dll, MSVCR140.dll)

Note: This also applies to newer MSVCR110.dll, MSVCR120.dll and MSVCR140.dll.

MSVCR100.dll

This msvcr100.dll is the Microsoft Visual C++ Redistributable dll that is needed for projects built with Visual Studio 2010. The dll letters spell this out.

MS = Microsoft
V = Visual
C = C program language
R = Run-time
100 = Version

If you create a C++ project in Visual Studio 2010, this file is probably needed.

MSVCP100.dll

This msvcp100.dll is the Microsoft Visual C++ Redistributable dll that is needed for projects built with Visual Studio 2010. The dll letters spell this out.

MS = Microsoft
V = Visual
CP = C++
100 = version

If you create a C++ project in Visual Studio 2010, this file is probably needed.

MSVCR100D.dll

The MSVCR100D.dll is almost the exact same file only the D at the end stands for Debug. This file has debugging enabled and is not considered redistributable.

Why the error?

Ok, so recently I switched to Visual Studio 2010.  I had a C++ application that worked perfectly in Visual Studio 2008.  Once I compiled it with Visual Studio 2010 and ran it on a clean 2008 server (fully patched but otherwise clean), it failed to run with the following error.

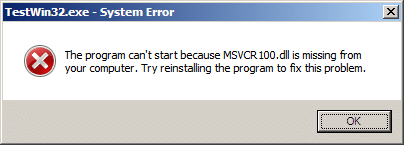
TestWin32.exe – System Error

The program can’t start because MSVCR100.dll is missing from your computer. Try reinstalling the program to fix this problem.

Here is the screen shot:

msvcr100.dll

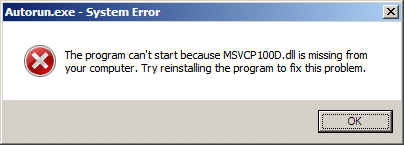
The same things happens with the debug version of the file, only it is a the debug version of the same DLL as noted by the fact that the DLL name ends with D.

Autorun – System Error

The program can’t start because MSVCR100.dll is missing from your computer. Try reinstalling the program to fix this problem.

The screen shot is identical except for the D in the dll name.

msvcr100d.dll

I create a new project in Visual Studio 2010 using the project type of C++ Win32 Project and without making a single change to the default project, I built the file and tested it on my clean machine and the same issue occurred.

So obviously that is not acceptable.  It seems like this should just not happen by default, but unfortunately it does.

Solution

It was actually really easy to resolve for my one project.

Here is what I did.

You can solve this any of the following ways:

  1. Statically link to the dll files so they are compiled into my executable instead of referenced as separate dll files.
  2. Included the dll in the same directory as the exe (I actually didn’t try this but I assume it would work).
  3. Forced everyone to install the VC++ Runtime Redistributable before running the app.

The first option seems the most stable and robust and easiest for a single executable. So that is the one I am going to use.

The second option doesn’t really make sense to me and I would probably never do it. Maybe if I had dozens of executable files that all required the same DLL and I didn’t have an installer, and I wanted to conserve size, which probably wouldn’t happen for me since I am pretty good at creating a quick installer. Though you might be in this a situation.

The third option would make sense if I was planning on running my executable after an install. During the install I could include the VC++ Runtime Redistributable and all would be fine.

Statically Linking the DLLs

Make sure you resolve it for both Release and Debug. The steps are slightly different.

Release

  1. In Visual Studio, I went to the project Properties.
  2. I changed my Configuration to Release.
  3. I went under Configuration Properties | C/C++ | Code Generation
  4. Look at the Runtime Library setting.  It is set to this: Multi-threaded DLL (/MD)
    Change it to this: Multi-threaded (/MT)
  5. Rebuild.

Debug

Almost exactly the same as release.

  1. In Visual Studio, I went to the project Properties.
  2. I changed my Configuration to Debug.
  3. I went under Configuration Properties | C/C++ | Code Generation
  4. Look at the Runtime Library setting. It is set to this: Multi-threaded Debug DLL (/MDd)
    Change it to this: Multi-threaded Debug (/MTd)
  5. Rebuild the debug

It might be a good idea for me to figure out how to change the project so when I create a new project of this type, those settings are the default.

Install the VC++ Runtime Redistributable

Release

Download the appropriate version of VC++ Runtime Redistributable:

File Version VC++ Runtime Version
MSVCR100.dll Microsoft Visual C++ 2010 Redistributable Package (x86)
MSVCR110.dll Microsoft Visual C++ 2012 Redistributable Package (x86)
MSVCR120.dll Microsoft Visual C++ 2013 Redistributable Package (x86)
MSVCR140.dll Microsoft Visual C++ 2015 Redistributable Package (x86)

Just google these and you will find the download links. Install the correct version and you are good to go.

Debug

If you are missing MSVCR100D.dll, then that is a debug dll and is not part of the free to download Visual C++ Redistributable package. So you pretty much are stuck with copying it from your dev box. Copy it to the C:\Windows\System32 directory. You need admin privileges to do this.

Note: You would never want to redistribute the debug dll anyway.

How to convert a string to an int in C++? (Or to a float, double, etc)

Ok, so I already have a post on How to convert an int to a string in C++? (Also doubles, floats, etc…) and so I need a post on doing this in reverse.

So lets say you wanted to convert a string to an int. The code for a function would be simple: (Note updated to one that didn’t give errors on either windows or Linux)

int stringToInt( string inString )
{
	int retVal;
	stringstream ss;
	ss << inString;
	ss >> retVal;
	return retVal;
}

Now, you are going to want a function that handles more than just int types. You want it to handle int, float, doubles, etc… So lets use a template for this as well. However, since the return type is never going to be known, we will not have a return type. Instead, we will pass in a reference to a variable and that will be a generic.

template <class T>
void stringToAnyType(T& t, std::string inString)
{
	std::stringstream ss(inString);
	ss >> t;
}

At first it will appear that this code is all that is needed, and sure the code will work for int, float doubles, but not for 100% for char types because when converting to a char it only gets the first word. Here is a quick example of using the template code. Copy it over and run it with a debugger and look at the variable values.

Note: I am on Windows 7 64 bit (app compiled as 32 bit) using a Visual Studio 2008 C++ empty project. I wonder if the output is different on other platforms.

//#include <iostream>
#include <string>
#include <sstream>

template <class T>
void stringToAnyType(T& t, std::string inString)
{
	std::stringstream ss(inString);
	ss >> t;
}

using namespace std;

int main()
{
	string intAsString = "12345";
	int i;
	stringToAnyType(i, intAsString);

	string floatAsString1 = "12345.678";
	float f1;
	stringToAnyType(f1, floatAsString1);
	// Looks like this works

	string floatAsString2 = "99.99";
	float f2;
	stringToAnyType(f2, floatAsString2);
	// Hmmm...a little loss of precision: 99.989998

	string doubleAsString1 = "123456789.12345678";
	double d1;
	stringToAnyType(d1, doubleAsString1);
	// Perfect conversion

	string doubleAsString2 = "99.99";
	double d2;
	stringToAnyType(d2, doubleAsString2);
	// Hmmm...a little loss of precision: 99.989999999999995


	string charArrayAsString1 = "Hello";
	char c1[100];
	stringToAnyType(c1, charArrayAsString1);

	string charArrayAsString2 = "Hello world";
	char c2[100];
	stringToAnyType(c2, charArrayAsString2);
	// Ahhh! This didn't work.  Only the first word "Hello" is copied into c2

	string trueBoolAsString = "True";
	bool bTrue;
	stringToAnyType(bTrue, trueBoolAsString);
	// Did this really work?

	string falseBoolAsString = "false";
	bool bFalse;
	stringToAnyType(bFalse, falseBoolAsString);
	// Ahhh! This didn't work.  It is still true not false;

	string yesBoolAsString = "Yes";
	bool bYes;
	stringToAnyType(bTrue, yesBoolAsString);
	// Ahhh! This didn't work.  It is still true not false;

	string noBoolAsString = "NO";
	bool bNo;
	stringToAnyType(bFalse, noBoolAsString);
	// Ahhh! This didn't work.  It is still true not false;
}

So obviously there must be a better way that will also get bool conversions and to get the full string when converting a string to a char array, but for now this gets your basic number types and any string without characters such as a space. When I have a solution that works for char types as well, I will let you know.

Also, as you can see that there is a chance of a loss of precision with floats and doubles so be careful.