Archive for the ‘CodeProject’ Category.

The Oft Forgotten Middle Trim

Two Most Popular Ways to Trim

It has become ubiquitous to trim whitespace from data. Data should almost never have whitespace at the front or at the end. This fact is nearly ubiquitous throughout the industry.

  • Front Trim (also called left trim) = Remove leading whitespace, whitespace (space, tab, new line, carriage return) at the front of text.
  • Back Trim (also called left trim) = Remove trailing whitespace, whitespace (space, tab, new line, carriage return) from the back of data. Trailing whitespace.

What does this mean? Look at the following data example:

"  White space at front"      <-- space
"	White space at front" <-- tab
"
White space at front"         <-- new line or carriage return
"White space at back   "      <-- space
"White space at back	"     <-- tab
"White space at back
"                             <-- new line or carriage return

When extra white space is added to the front or back of data, it should almost always be trimmed.

The Third Way to Trim – Middle Trim

There is a third type of trimming that should be done for many fields. It is not as popular and many developers forget about it. (Marked in green below.)

  • Front Trim (also called left trim) = Remove whitespace (space, tab, new line, carriage return) from the front of data.
  • Back Trim (also called right trim) = Remove whitespace (space, tab, new line, carriage return) from the back of data.
  • Middle Trim (also called center trim) = Remove extra whitespace (space, tab, new line, carriage return) from between words of data.

Note: Extra whitespace could mean different things depending on the field. In this post, it means more than one space. However, if we were dealing with names of objects in code that should not have any middle spaces at all, then even one middle space could be considered an extra space.

Perhaps “Middle Trim” is not something you have heard of before. Front and back trim involves only removing characters if they exist. Middle Trim involves either removing or replacing characters if they exist. Because of this, some might argue that Middle Trim is an incorrect phrase. From a certain point of view, I would agree. However, to properly link the task to front trim and back trim, the phrase Middle Trim makes a lot of sense.

"Extra     white space in middle"      <-- space
"Extra 	white space in middle"          <-- tab
"Extra
white space in middle"         <-- new line or carriage return

This one actually takes some thought. Because it doesn’t apply to every field as often as front trim and back trim do. However, for many fields, middle trim is just as valid.

  • Address Lines (When there is one field per line)
  • City
  • Country
  • Name (Pretty much any type of name)
    • Account
    • Business
    • Contact
    • Company
    • Course
    • Customer
    • First
    • Last
    • Middle
    • Part
    • Partner
    • Product
    • School
    • Spouse
    • Street
    • User
  • Order Identifiers
  • State
  • etc…

Names should not have extra whitespace at the front, end, or middle. State or Country names should never have extra whitespace at the front, middle, or end. Many types of input should be cleaned of extra whitespace in the front, middle, or end.

"Awesome     Company LLC"  <-- space
"Washtington	D.C."      <-- tab
"United States of
America"                   <-- new line or carriage return

All of the above are wrong. I could quote First Normal Form to you, but really common sense should be enough. These spaces make the data wrong.

Now, each field may be different. You may not want middle trim if your field is a blob of text, that has paragraphs. In that case, you certainly want to leave carriage returns.

Implementing Middle Trim in C#

Middle trim isn’t exactly easy to implement. Some languages have features, such as Regex, which make it easy. Others do not.

Why isn’t Middle Trim extremely common and more easily implemented? Perhaps middle trim is forgotten because there isn’t a clear method for it like there is with String.Trim() and so it is often left out?

Many languages, like C#, make front and back trimming easy. In C#, you can simply call String.Trim() and it will trim whitespace from the front and back. However, it doesn’t clean up extra whitespace in the middle.

Doing all three trims in C# is most easily done with Regex and an extension method.

Note: Get the Rhyous.StringLibrary from NuGet or check out the Rhyous.StringLibrary project on GitHub.

public static class StringExtensions
{
    public static string TrimAll(this string value)
    {
        var newstring = value;
        newstring = myString.Trim(); // This removes extra whitespace from the front and the back.
        newstring = Regex.Replace(LastName, @"\s+", " "); // Replaces all whitespace with a single space
    }
}

If you want to avoid regex, you could roll your own like this:

public static class StringExtensions
{
    public static string TrimAll(this string value)
    {
        var trimmedValue = new StringBuilder();
        char previousChar = (char)0;
        foreach (char c in value)
        {
            if (char.IsWhiteSpace(c))
            {
                previousChar = c;
                continue;
            }
            if (char.IsWhiteSpace(previousChar) && trimmedValue.Length > 0)
            {
                trimmedValue.Append(' ');
            }
            trimmedValue.Append(c);
            previousChar = c;
        }
        return trimmedValue.ToString();
    }
}

You would use either method the same way.

  var newstring = " This string     has extra whitespace in the      front, middle and the end.   "
  newstring = nestring.TrimAll();

Implementing Middle Trim in MSSQL

MSSQL also has LTRIM (left trim) and RTRIM (right trim), but middle trim doesn’t exist. Middle Trim is even harder to write in MSSQL because there is no Regex. So you have to replace whitespaces characters with spaces, then remove multiple spaces.

Here is what it looks like to add a name to a person and to do all three trims: front, back, middle. Wow! It is ugly.

INSERT INTO PERSON  (NAME) VALUES (
	REPLACE(
		REPLACE (
			REPLACE(
				REPLACE(
					REPLACE(
						REPLACE(
							LTRIM(RTRIM(@str))
							, char(9), ' '
						),  char(10), ' '
					),  char(13), ' '
				),'  ',' '+CHAR(7)
			), CHAR(7)+' ',''
		), CHAR(7),''
	)
)

This does right trim, left trim. Then it replaces tabs, new line, and carriage returns with spaces. Then it uses the bell character (because bell is basically never used) to replace any double spaces, char(32)+Char(32), with space bell, char(32)+char(7). Then it replaces any instance of char(7)+char(32) with ”, an empty string. Then that might leave a few space bell sequences, so we only need one more replace of bell, char(7), with ”, an empty string.

How to know which type of trimming you need?

This is very simple. Just ask questions:

  • Front trim – Will extra whitespace at the front ever be valid?
  • Back trim – Will extra whitespace at the back ever be valid?
  • Middle trim – Will extra whitespace in the middle ever be valid? Are middle spaces allowed? If so, should they always be a single space?

If the answer to any of those questions is “no,” then you need to do that type of trim. However, it is clear that Middle Trim has more questions as it is more complex.

NuGet for Source Using Add As Link (Part 1)

Update: Projects using NuGet for Source with Add as Link. If you have a project using this please comment and let me know.

  1. https://github.com/rhyous/SimpleArgs
  2. https://github.com/rhyous/EasyXml
  3. https://github.com/rhyous/EasyCsv
  4. https://github.com/rhyous/SimplePluginLoader
  5. https://github.com/rhyous/StringLibrary

So I have a project on GitHub called SimpleArgs. This project makes command line arguments easy in a C# project. However, one of the requirements is to have an option to use the SimpleArgs dll or to have a single file executable. Yes, everything in one single exe, so referencing a dll is not an option.

So I created two separate NuGet packages from this project:

  1. SimpleArgs – This NuGet package uses a dll
  2. SimpleArgs.Sources – This NuGet package adds source

I use SimpleArgs.Sources the most. I quickly realized that NuGet for source does not scale. I have a Solution with four different projects where each project is a single file executable. The result was many copies of the SimpleArgs code.

MySolution
    /Packages    &amp;lt;-- Copy of SimpleArgs source
    /SingleExe1  &amp;lt;-- Copy of SimpleArgs source
    /SingleExe2  &amp;lt;-- Copy of SimpleArgs source
    /SingleExe3  &amp;lt;-- Copy of SimpleArgs source
    /SingleExe4  &amp;lt;-- Copy of SimpleArgs source

That is 5 copies of the SimpleArgs source. Now at first, this doesn’t seem to be a big problem, in fact, it seems little more than an annoyance. One of the first changes I made, was to exclude the duplicate copies of source from Git. This helped but not enough. There are still problems that occur with multiple copies of source. For example, I ran into a bug with SimpleArgs. I fixed it, and then some time later I ran into the same bug with another project in the same solution. Oh, yeah. I only fixed the bug in one copy of the SimpleArgs source.

I decided the best solution was to reference the source using Add as link. Add as link is the ability to include a file into your Visual Studio project but without making a copy of the file in your project.

See: How to Add As Link in Visual Studio

I quickly changed the projects so the source was included not as copies but using the Add As Link capability. I manually did this. Then I finally pushed my changes to SimpleArgs Git repository and released a new version of the SimpleArgs.Sources NuGet package. That basically wiped out my manual work to Add As Link.

I needed the NuGet packages include the source using Add As Link for me.

How to create NuGet package using Add As Source

Well, to my dismay, NuGet didn’t have this feature built in. At first I was exciting about the possibility that this feature would be added as part of NuGet 3.3 and the contentFiles feature, but unfortunately, this feature is for Universal Windows projects, and not for Console Application, Windows Forms, or WPF projects.

However, NuGet does run a PowerShell script on install and another on uninstall, called install.psi and uninstall.ps1. It took some work, I even gave up once, but eventually I found the right library and the documentation for it to help me solve this.

Step 1 – Create a NuGet Packager Project in Visual Studio

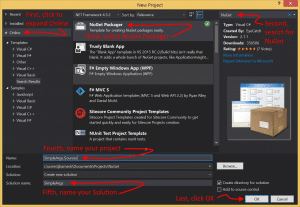
  1. Open Visual Studio and go to File | New Project.
    Note: Steps 2 thru 7 installs the NuGet Packager project from online. If you have already done this, then you probably can create your project without these steps. 🙂
  2. At the bottom of the list on the right, click Online to expand it.
    Note: For some reason, Visual Studio hung for about ten to twenty seconds when I clicked this.
  3. In the search bar on the top right, enter NuGet.
  4. Select NuGet Packager.
  5. Give your project a Name.
    Note: Mine is named SimpleArgs.Sources.
  6. Give your solution a Name.
  7. Click Ok.
    See steps 2 – 7 in this image:
    NuGet Package Visual Studio Project Template
    When you click OK, the template will install. It will prompt you a few times but once installed, your project will be created.Note: From now on, you can find the NuGet Packager project in Installed | Templates | Visual C# | NuGet.

Step 2 – Fill out the Package.nuspec file metadata

The package.nusepc is an Xml file. It is created as follows:

 
&amp;lt;?xml version=&amp;quot;1.0&amp;quot;?&amp;gt;
&amp;lt;package &amp;gt;
  &amp;lt;metadata&amp;gt;
    &amp;lt;id&amp;gt;SimpleArgs.Sources&amp;lt;/id&amp;gt;
    &amp;lt;version&amp;gt;1.0.0&amp;lt;/version&amp;gt;
    &amp;lt;title&amp;gt;SimpleArgs.Sources&amp;lt;/title&amp;gt;
    &amp;lt;authors&amp;gt;Jjbarneck&amp;lt;/authors&amp;gt;
    &amp;lt;owners&amp;gt;&amp;lt;/owners&amp;gt;
    &amp;lt;description&amp;gt;A long description of the package. This shows up in the right pane of the Add Package Dialog as well as in the Package Manager Console when listing packages using the Get-Package command.&amp;lt;/description&amp;gt;
    &amp;lt;releaseNotes&amp;gt;&amp;lt;/releaseNotes&amp;gt;
    &amp;lt;summary&amp;gt;A short description of the package. If specified, this shows up in the middle pane of the Add Package Dialog. If not specified, a truncated version of the description is used instead.&amp;lt;/summary&amp;gt;
    &amp;lt;language&amp;gt;en-US&amp;lt;/language&amp;gt;
    &amp;lt;projectUrl&amp;gt;https://nuget.org/packages/SimpleArgs.Sources&amp;lt;/projectUrl&amp;gt;
    &amp;lt;iconUrl&amp;gt;https://nuget.org/Content/Images/packageDefaultIcon-50x50.png&amp;lt;/iconUrl&amp;gt;
    &amp;lt;requireLicenseAcceptance&amp;gt;false&amp;lt;/requireLicenseAcceptance&amp;gt;
    &amp;lt;licenseUrl&amp;gt;http://opensource.org/licenses/Apache-2.0&amp;lt;/licenseUrl&amp;gt;
    &amp;lt;copyright&amp;gt;Copyright  2016&amp;lt;/copyright&amp;gt;
    &amp;lt;dependencies&amp;gt;
        &amp;lt;group targetFramework=&amp;quot;net40&amp;quot;&amp;gt;
          &amp;lt;dependency id=&amp;quot;log4net&amp;quot; version=&amp;quot;1.2.10&amp;quot; /&amp;gt;
        &amp;lt;/group&amp;gt;
    &amp;lt;/dependencies&amp;gt;
    &amp;lt;references&amp;gt;&amp;lt;/references&amp;gt;
    &amp;lt;tags&amp;gt;&amp;lt;/tags&amp;gt;
  &amp;lt;/metadata&amp;gt;
  &amp;lt;files&amp;gt;
    &amp;lt;file src=&amp;quot;lib\&amp;quot; target=&amp;quot;lib&amp;quot; /&amp;gt;
    &amp;lt;file src=&amp;quot;tools\&amp;quot; target=&amp;quot;tools&amp;quot; /&amp;gt;
    &amp;lt;file src=&amp;quot;content\&amp;quot; target=&amp;quot;content&amp;quot; /&amp;gt;
  &amp;lt;/files&amp;gt;
&amp;lt;/package&amp;gt;
Package.nuspec Changes

I can’t go over every possible nuspec setting. That is in the Nuspec Reference. However, I’ll give you the basics of what I changed.

  1. id – Set this to your package name. If you named your project correctly, this is already named correctly. I’ll leave the above unchanged.
  2. version – This is your version. If this is your first release, 1.0.0 is perfect. I am changing mine to 1.1.0 as my last version was 1.0.9.
  3. title – Often the same as the id, but not always. I’ll leave mine as is.
  4. authors – This is me. I want something other than the Visual Studio username. I changed this to Jared Barneck (Rhyous)
  5. owners – This is me or my business. I’ll change this to Rhyous Publishing LLC
  6. description – Long description. This is defined in the Xml. Change it to describe your NuGet package.
  7. releaseNotes – I just put a link to the release notes in my GitHub repo: https://github.com/rhyous/SimpleArgs/blob/master/ReleaseNotes.txt
  8. summary – Short description. This is also defined in the xml. This is usually shorter than the description.
  9. language – This is the 5 digit language IETF language tag. I left mine at en-US.
  10. projectUrl – I changed this to my GitHub location: https://github.com/rhyous/SimpleArgs
  11. iconUrl – I changed this to the icon file in my GitHub source. Unlike the release notes and the license file, I used the raw GitHub link for the image: https://raw.githubusercontent.com/rhyous/SimpleArgs/master/Docs/Images/SimpleArgs.Logo.png
  12. requireLicenseAcceptance – I left this as false. Only set this to true if your license requires an agreement.
  13. licenseUrl – I set this to the license file in my GitHub repository:
    https://github.com/rhyous/SimpleArgs/blob/master/Fork%20and%20Contribute%20License.txt
  14. copyright – I set this to Copyright Rhyous Publishing LLC
  15. dependencies – This project has no dependencies, so I deleted this entire section.
  16. references – I deleted this tag. Source NuGet packages probably won’t have any references.
  17. tags – Since my project is for command line arguments, I set my tags to: args, arguments
  18. files – This was preconfigured, however, I replaced the libs\ with src\ because I didn’t have any libs but I have source.

You can see my final nuspec file in the GitHub repo: SimpleArgs.Sources Package.nuspec

Step 3 – Add Shared Source Files

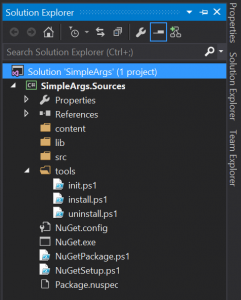
Default Items in Solution Explorer for a NuGet Packager ProjectIn Visual Studio, in Solution Explorer, you should see that there are already four folders provided for you. See the image to your right. ———–>

  • content – This is what is going to be copied to your project. Since we don’t want all our source copied, we aren’t going to put our source here.
    Note: I would delete this folder, but it turns out, I have one source file that isn’t shared. ArgsHandler.cs will be customized in each project, which makes sense because each project will have different args and handle args differently. ArgsHandler.cs will go here.
  • libs – I have no libs. I can delete this folder and the associated xml for it in the nuspec.
  • src – Stuff I put here isn’t copied to my projects. I am going to put all my shared source in this folder.
  • tools – this has the PowerShell scripts: init.ps1, install.ps1, and uninstall.ps1

Now that we understand our folder structure, let’s get to work.

  1. In Visual Studio’s Solution Explorer, create a folder called App_Packages under the src directory.
    Note: I was going to use App_Sources but NuGet recommends that we follow what other community members follow and others have already started putting source files under App_Packages, so I am following that community convention. Also, this is important for the PowerShell scripts, as this convention plays a part in them. If you don’t follow this convention, you will have to edit the and uninstall.psi PowerShell scripts, which I’ll be providing later.
  2. In Visual Studio’s Solution Explorer, create a Folder with the project name and version. In my case, the folder name is this: SimpleArgs.Sources.1.1.0.
    Note: Again, this was by community convention. Others were doing this. You don’t have to follow this exactly, again, If you don’t follow this convention, you will have to edit the install.ps1 and uninstall.psi PowerShell scripts, which I’ll be providing later.
  3. In Windows Explorer, not in Visual Studio, put your source under the project name and version directory.
    Note: In Visual Studio’s Solution Explorer, I only have these two directories: App_Packages/SimpleArgs.Sources.1.1.0.
    Note: In Windows Explorer, My directory structure ended up as follows:

    \App_Packages
    \App_Packages\SimpleArgs.Sources.1.1.0\
    \App_Packages\SimpleArgs.Sources.1.1.0\Business
    \App_Packages\SimpleArgs.Sources.1.1.0\Business\Args.cs
    \App_Packages\SimpleArgs.Sources.1.1.0\Business\ArgsHandlerCollection.cs
    \App_Packages\SimpleArgs.Sources.1.1.0\Business\ArgsManager.cs
    \App_Packages\SimpleArgs.Sources.1.1.0\Business\ArgsReader.cs
    \App_Packages\SimpleArgs.Sources.1.1.0\Business\ArgumentMessageBuilder.cs
    \App_Packages\SimpleArgs.Sources.1.1.0\Business\CommonAllowedValues.cs
    \App_Packages\SimpleArgs.Sources.1.1.0\Extensions
    \App_Packages\SimpleArgs.Sources.1.1.0\Extensions\ArgumentExtensions.cs
    \App_Packages\SimpleArgs.Sources.1.1.0\Extensions\StringExtensions.cs
    \App_Packages\SimpleArgs.Sources.1.1.0\Interfaces
    \App_Packages\SimpleArgs.Sources.1.1.0\Interfaces\IArgumentMessageBuilder.cs
    \App_Packages\SimpleArgs.Sources.1.1.0\Interfaces\IArgumentsHandler.cs
    \App_Packages\SimpleArgs.Sources.1.1.0\Interfaces\IReadArgs.cs
    \App_Packages\SimpleArgs.Sources.1.1.0\Model
    \App_Packages\SimpleArgs.Sources.1.1.0\Model\Argument.cs
    \App_Packages\SimpleArgs.Sources.1.1.0\Model\ArgumentAddedEventArgs.cs
    \App_Packages\SimpleArgs.Sources.1.1.0\Model\ArgumentDictionary.cs
    \App_Packages\SimpleArgs.Sources.1.1.0\Model\ArgumentList.cs
    \App_Packages\SimpleArgs.Sources.1.1.0\Model\ArgumentsHandlerBase.cs
    

    Note: There is a good reason that I don’t include these in the NuGet Packager Visual Studio project, which I will explain later.

Step 4 – Add Source Files

As mentioned earlier, the ArgsHandler.cs file isn’t shared. Each project does need its own copy of this file. So we need to add it so that it supports Source Code Transformations.

  1. In Visual Studio’s Solution Explorer, copy any source files into the Content directory. You may put them in sub directories if you wish. I created an Arguments folder.
  2. Add .pp to the end of any source files.
  3. Change the namespace to $rootnamespace$ in any source files. You may also add a sub namespace to the end of $rootnamespace$ as I did.
using SimpleArgs;
using System;
using System.Collections.Generic;

namespace $rootnamespace$.Arguments
{
    // Add this line of code to Main() in Program.cs
    //
    //   ArgsManager.Instance.Start(new ArgsHandler(), args);
    //

    /// &amp;lt;summary&amp;gt;
    /// A class that implements IArgumentsHandler where command line
    /// arguments are defined.
    /// &amp;lt;/summary&amp;gt;
    public sealed class ArgsHandler : ArgsHandlerBase
    {
         // content snipped see full file here: https://github.com/rhyous/SimpleArgs/blob/master/NuGet/SimpleArgs.NuGet/content/Arguments/ArgsHandler.cs.pp
    }
}

Step 5 – Add As Link in NuGet using PowerShell scripts

There are three PowerShell scripts.

  • init.ps1
  • install.ps1
  • uninstall.ps1

We are only going to modify install.ps1 and uninstall.ps1.

Note: The following are written to be very generic and have been tested in various Visual Studio projects, which means some common bugs are already fixed, such as not failing on creation of App_Packages just because it is already there.

  1. Update install.ps1.

    Note: For the latest versions of install1.ps1 and uninstall.ps1, go to the tools directory on my GitHub repo.

    # Runs every time a package is uninstalled
    
    param($installPath, $toolsPath, $package, $project)
    
    # $installPath is the path to the folder where the package is installed.
    # $toolsPath is the path to the tools directory in the folder where the package is installed.
    # $package is a reference to the package object.
    # $project is a reference to the project the package was installed to.
    
    # Variables
    $src = &amp;quot;src&amp;quot;
    $packageName = [System.IO.Path]::GetFileName($installPath)
    
    #logging
    write-host &amp;quot;project: &amp;quot; $project.FullName
    write-host &amp;quot;installPath: &amp;quot; $installPath
    write-host &amp;quot;toolsPath: &amp;quot; $toolsPath
    write-host &amp;quot;package: &amp;quot; $package
    write-host &amp;quot;project: &amp;quot; $project
    
    $srcPath = [System.IO.Path]::Combine($installPath, $src)
    write-host &amp;quot;srcPath: &amp;quot; $srcPath
    
    $solutionDir = [System.IO.Path]::GetDirectoryName($dte.Solution.FullName)
    $projectDir = [System.IO.Path]::GetDirectoryName($project.FullName)
    write-host &amp;quot;solutionDir: &amp;quot; $solutionDir
    write-host &amp;quot;projectDir: &amp;quot; $projectDir
    
    $areSameDir = $solutionDir -eq $projectDir
    write-host &amp;quot;areSameDir: &amp;quot; $areSameDir
    
    function AddLinkedFiles($path, $addLocation, $canLink) 
    { 
        write-host &amp;quot;path: &amp;quot; $path
        write-host &amp;quot;addLocation: &amp;quot; $addLocation.FullName
        write-host &amp;quot;canLink: &amp;quot; $canLink
        foreach ($item in Get-ChildItem $path)
        {
            write-host &amp;quot;item: &amp;quot; $item $item.FullName
            if (Test-Path $item.FullName -PathType Container) 
            {
                if ( $canLink) {
                    $addFolder = $project.ProjectItems|Where-Object {$_.FullName -eq $item.FullName}
                    if (!$addFolder) {
                        $addFolder = $addLocation.ProjectItems.AddFolder($item)
                    }
                    write-host &amp;quot;addFolder: &amp;quot; $addFolder.FullName
                    AddLinkedFiles $item.FullName $addFolder $canLink
                } else
                {
                    AddLinkedFiles $item.FullName $addLocation $canLink
                }            
            } 
            else 
            {             
                write-host &amp;quot;Adding &amp;quot; $item.FullName &amp;quot; to &amp;quot; $addLocation.FullName
                $addLocation.ProjectItems.AddFromFile($item.FullName)
            }
        } 
    }
    
    write-host &amp;quot;Calling AddLinkedFiles&amp;quot;
    AddLinkedFiles $srcPath $project (!$areSameDir)
    
  2. Update uninstall.ps1.
    # Runs every time a package is uninstalled
    
    param($installPath, $toolsPath, $package, $project)
    
    # $installPath is the path to the folder where the package is installed.
    # $toolsPath is the path to the tools directory in the folder where the package is installed.
    # $package is a reference to the package object.
    # $project is a reference to the project the package was installed to.
    
    # Variables
    $packages = &amp;quot;Packages&amp;quot;
    $app_packages = &amp;quot;App_Packages&amp;quot;
    $src = &amp;quot;src&amp;quot;
    $packageName = [System.IO.Path]::GetFileName($installPath)
    
    #logging
    write-host &amp;quot;project: &amp;quot; $project.FullName
    write-host &amp;quot;installPath: &amp;quot; $installPath
    write-host &amp;quot;toolsPath: &amp;quot; $toolsPath
    write-host &amp;quot;package: &amp;quot; $package
    write-host &amp;quot;project: &amp;quot; $project
    
    
    $srcPath = [System.IO.Path]::Combine($installPath, $src)
    write-host &amp;quot;srcPath: &amp;quot; $srcPath
    
    $solutionDir = [System.IO.Path]::GetDirectoryName($dte.Solution.FullName)
    $projectDir = [System.IO.Path]::GetDirectoryName($project.FullName)
    write-host &amp;quot;solutionDir: &amp;quot; $solutionDir
    write-host &amp;quot;projectDir: &amp;quot; $projectDir
    
    $areSameDir = $solutionDir -eq $projectDir
    write-host &amp;quot;areSameDir: &amp;quot; $areSameDir
    
    
    if ($areSameDir) {
        $packagesItem = $project.ProjectItems|Where-Object {$_.Name -eq $packages}    
        write-host &amp;quot;packageFolder: &amp;quot; $packagesItem.Name
        $item = $packagesItem.ProjectItems|Where-Object {$_.Name -eq [System.IO.Path]::GetFileName($installPath)}
        write-host &amp;quot;item: &amp;quot; $item.Name
        $item.Remove()
        if ($packagesItem.ProjectItems.Count -eq 0) {
            $packagesItem.Remove()
        }            
    } else {
        $app_packagesItem = $project.ProjectItems|Where-Object {$_.Name -eq $app_packages}
        write-host &amp;quot;app_packagesItem: &amp;quot; $app_packagesItem.Name
        $app_packagesFolder = [System.IO.Path]::Combine($srcPath,$app_packages)
        foreach ($subDir in (Get-ChildItem $app_packagesFolder)) {
            $item = $app_packagesItem.ProjectItems|Where-Object {$_.Name -eq $subDir.Name}
            write-host &amp;quot;item: &amp;quot; $item.Name
            if ($item) {
                $item.Delete()
            }
        }
        if ($app_packagesItem.ProjectItems.Count -eq 0 -and (Get-ChildItem ([System.IO.Path]::Combine($projectDir, $app_packages))).Count -eq 0) {
            $app_packagesItem.Delete()
        }
    }
    

    Step 6 – Build the solution and NuGet package

    The NuGet Packager project template is pretty awesome. When you use it, it builds the NuGet package for you on build. Also, if you build in release mode, it will try to upload the NuGet package to the public NuGet Package Gallary.

    1. In Visual Studio, make sure the Solution Configuration is set to Debug.
    2. Choose to Build | Build Solution.
    3. In your project directory, you should have a NuGet package built. Mine is called SimpleArgs.Sources.1.1.1.nupkg.

    Stay Tuned

    Stay tuned for NuGet for Source Using Add As Link (Part 2 – Testing & Deploying)

    If you subscribe, you will never miss a post.

Authentication Token Service for WCF Services (Part 1)

I am setting out to create a thin web UI that consists of only HTML, CSS, and Javascript (HCJ) for the front end. For the back end, I have Ajax-enabled WCF services.

I have a couple of options for authentication.

Options:

  1. Authenticate with username and password every time a service is called.
  2. Store the username and password once, then store the credentials in the session or a cookie or a javascript variable and pass them every time I call a subsequent service.
  3. Authentication to one WCF service, then store a token.

Option 1 – Authenticate every time

This is not acceptable to the users. It would be a pain to type in credentials over and over again when clicking around a website.

Option 2 – Authenticate once and store credentials

This option is not acceptable because we really don’t want to be storing credentials in cookies and headers. You could alleviate the concern by hashing the password and only storing the hash, but that is still questionable. It seems this might cause the username and password to be passed around too often and eventually, your credentials will be leaked.

Option 3 – Authenticate once and store a token

This option seems the most secure. After authenticating, a token is returned to the user. The other web services can be accessed by using the token. Now the credentials are not stored. They are only passed over the network at authentication time.

Secure Token Service

This third idea is the idea around the Secure Token Service (STS). However, the STS is designed around the idea of having a 3rd party provide authentication, for example, when you login to a website using Facebook even though it isn’t a Facebook website.

STS service implementation is complex. There are entire projects built around this idea. What if you want something simpler?

Basic Token Service (BTS)

I decided that for simple authentication, there needs to be an example on the web of a Basic Token Service.

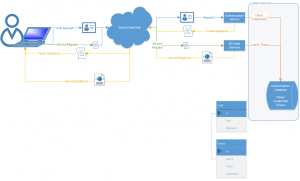
In the basic token service, there is a the idea of a single service that provides authentication. That service returns a token if authenticated, a failure otherwise. If authenticated, the front end is responsible for passing the token to any subsequent web services. This could be a header value, a cookie or a url parameter. I am going to use a header value in my project.

Here is the design.

Basic Token Service

Since this is “Basic” it should use basic code, right? It does.

The BTS Code

Download here: WCF BTS

In Visual Studio, I chose New | Project | Installed > Templates > Visual C# > WCF | WCF Service Application.

OK, so lets do some simple code. In this example, we will put everything in code. (In part 2, I will enhance the code to look to the database.)

Ajax-enabled WCF Services

Add the Authentication WCF Service first. In Visual Studio, I right-clicked on the project and chose Add | New Item … | Installed > Visual C# > Web | WCF Service (Ajax-enabled)

<%@ ServiceHost Language="C#" Debug="true" Service="WcfSimpleTokenExample.Services.AuthenticationTokenService" CodeBehind="AuthenticationTokenService.svc.cs" %>
using System.Security.Authentication;
using System.ServiceModel;
using System.ServiceModel.Activation;
using System.ServiceModel.Web;
using WcfSimpleTokenExample.Business;
using WcfSimpleTokenExample.Interfaces;
using WcfSimpleTokenExample.Model;

namespace WcfSimpleTokenExample.Services
{
    [ServiceContract]
    [AspNetCompatibilityRequirements(RequirementsMode = AspNetCompatibilityRequirementsMode.Allowed)]
    public class AuthenticationTokenService
    {
        [WebInvoke(Method = "POST", RequestFormat = WebMessageFormat.Json, ResponseFormat = WebMessageFormat.Json, BodyStyle = WebMessageBodyStyle.Bare)]
        [OperationContract]
        public string Authenticate(Credentials creds)
        {
            ICredentialsValidator validator = new CodeExampleCredentialsValidator();
            if (validator.IsValid(creds))
                return new CodeExampleTokenBuilder().Build(creds);
            throw new InvalidCredentialException("Invalid credentials");
        }
    }
}

A second example service:

<%@ ServiceHost Language="C#" Debug="true" Service="WcfSimpleTokenExample.Services.Test1Service" CodeBehind="Test1Service.svc.cs" %>
using System.ServiceModel;
using System.ServiceModel.Activation;
using System.ServiceModel.Web;
using System.Web;
using WcfSimpleTokenExample.Business;
using WcfSimpleTokenExample.Interfaces;

namespace WcfSimpleTokenExample.Services
{
    [ServiceContract]
    [AspNetCompatibilityRequirements(RequirementsMode = AspNetCompatibilityRequirementsMode.Allowed)]
    public class Test1Service
    {
        [OperationContract]
        [WebInvoke(Method = "POST", RequestFormat = WebMessageFormat.Json, ResponseFormat = WebMessageFormat.Json, BodyStyle = WebMessageBodyStyle.Bare)]
        public string Test()
        {
            var token = HttpContext.Current.Request.Headers["Token"];
            ITokenValidator validator = new CodeExampleTokenValidator();
            if (validator.IsValid(token))
            {
                return "Your token worked!";
            }
            else
            {
                return "Your token failed!";
            }
        }
    }
}
<?xml version="1.0"?>
<configuration>
  <appSettings>
    <add key="aspnet:UseTaskFriendlySynchronizationContext" value="true" />
  </appSettings>
  <system.web>
    <compilation debug="true" targetFramework="4.5" />
    <httpRuntime targetFramework="4.5"/>
  </system.web>
  <system.serviceModel>
    <services>
      <service name="WcfSimpleTokenExample.Services.AuthenticationTokenService" behaviorConfiguration="ServiceBehaviorHttp" >
        <endpoint address="" behaviorConfiguration="AjaxEnabledBehavior" binding="webHttpBinding" contract="WcfSimpleTokenExample.Services.AuthenticationTokenService" />
      </service>
      <service name="WcfSimpleTokenExample.Services.Test1Service" behaviorConfiguration="ServiceBehaviorHttp" >
        <endpoint address="" behaviorConfiguration="AjaxEnabledBehavior" binding="webHttpBinding" contract="WcfSimpleTokenExample.Services.Test1Service" />
      </service>
    </services>
    <behaviors>
      <endpointBehaviors>
        <behavior name="AjaxEnabledBehavior">
          <webHttp helpEnabled="true" />
        </behavior>
      </endpointBehaviors>
      <serviceBehaviors>
        <behavior name="ServiceBehaviorHttp">
          <serviceMetadata httpGetEnabled="true" httpsGetEnabled="true" />
          <serviceDebug includeExceptionDetailInFaults="true" />
        </behavior>
      </serviceBehaviors>
    </behaviors>
    <serviceHostingEnvironment aspNetCompatibilityEnabled="true" multipleSiteBindingsEnabled="true" />
  </system.serviceModel>
  <system.webServer>
    <modules runAllManagedModulesForAllRequests="true"/>
    <directoryBrowse enabled="true"/>
  </system.webServer>
</configuration>

Note: In the project, there is an xdt:Transform for the web.config.debug and the web.config.release if you use web deploy. These enforce that the web services that make them only use HTTPS. Check them out.

Models

Now we are going to have a single class in the Model for this basic example, a Credentials class.

namespace WcfSimpleTokenExample.Model
{
    public class Credentials
    {
        public string User { get; set; }
        public string Password { get; set; }
    }
}

Interfaces

using WcfSimpleTokenExample.Model;

namespace WcfSimpleTokenExample.Interfaces
{
    public interface ICredentialsValidator
    {
        bool IsValid(Credentials creds);
    }
}
using WcfSimpleTokenExample.Model;

namespace WcfSimpleTokenExample.Interfaces
{
    interface ITokenBuilder
    {
        string Build(Credentials creds);
    }
}
namespace WcfSimpleTokenExample.Interfaces
{
    public interface ITokenValidator
    {
        bool IsValid(string token);
    }
}

Business Implementations

using WcfSimpleTokenExample.Interfaces;
using WcfSimpleTokenExample.Model;

namespace WcfSimpleTokenExample.Business
{
    public class CodeExampleCredentialsValidator : ICredentialsValidator
    {
        public bool IsValid(Credentials creds)
        {
            // Check for valid creds here
            // I compare using hashes only for example purposes
            if (creds.User == "user1" && Hash.Get(creds.Password, Hash.HashType.SHA256) == Hash.Get("pass1", Hash.HashType.SHA256))
                return true;
            return false;
        }
    }
}
using System.Security.Authentication;
using WcfSimpleTokenExample.Interfaces;
using WcfSimpleTokenExample.Model;

namespace WcfSimpleTokenExample.Business
{
    public class CodeExampleTokenBuilder : ITokenBuilder
    {
        internal static string StaticToken = "{B709CE08-D2DE-4201-962B-3BBAC74C5952}";

        public string Build(Credentials creds)
        {
            if (new CodeExampleCredentialsValidator().IsValid(creds))
                return StaticToken;
            throw new AuthenticationException();
        }
    }
}
using WcfSimpleTokenExample.Interfaces;

namespace WcfSimpleTokenExample.Business
{
    public class CodeExampleTokenValidator : ITokenValidator
    {
        public bool IsValid(string token)
        {
            return CodeExampleTokenBuilder.StaticToken == token;
        }
    }
}

I also use the Hash.cs file from this post: A C# class to easily create an md5, sha1, sha256, or sha512 hash.

Demo

I use the Postman plugin for Chrome.
Postman

Step 1 – Authenticate and acquire token

  1. Set the url. In this example, it is a local debug url:
    http://localhost:49911/Services/AuthenticationTokenService.svc/Authenticate.
  2. Set a header value: Content-Type: application/json.
  3. Add the body: {“User”:”user1″,”Password”:”pass1″}
  4. Click Send.
  5. Copy the GUID returned for the next step.

PostmanAuthReceive

Step 2 – Call subsequent service

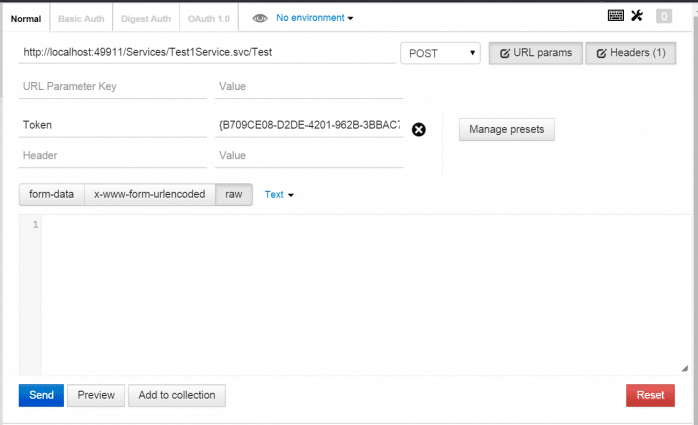
  1. Set the url. In this example, it is a local debug url:
    http://localhost:49911/Services/Test1Service.svc/Test
  2. Add a header called “Token” and paste in the value received from the authentication step

PostmanTestReceive

Part 1 uses examples that are in subbed in statically in the code. In Authentication Token Service for WCF Services (Part 2 – Database Authentication), we will enhance this to use a database for credentials validation and token storage and token validation.