Archive for the ‘csharp’ Category.

AOP – Implementing try catch in C# with PostSharp

I’ll be honest, I always cringe whenever I have to use try/catch. I do everything I can to avoid it. Besides being a resource hog, try/catch statements clutter code making it harder to read. So naturally I was excited when learning about Aspect-oriented programming (AOP) and PostSharp (the AOP library for C#) that try/catch statements are cross-cutting concerns and can be implemented as aspects.

It is assumed you have the following already installed and licensed:

  1. Visual Studio
  2. PostSharp

Step 1 – Create your Visual Studio Project

So to show you how this works, lets get started.

  1. Create a sample Console Application project in Visual Studio.
  2. Add a reference to PostSharp.
  3. Populate the Program.cs with an example exception as shown.
using System;
using Common.Aspects;

namespace AspectExamples
{
    class Program
    {
        static void Main(string[] args)
        {
            ThrowSampleExecption();
        }

        private static void ThrowSampleExecption()
        {
            throw new ApplicationException("Sample Exception");
        }
    }
}

Ok, now we have an example exception, lets show how we can catch this exception, log it, and continue.

Step 2 – Creating an exception aspect

  1. Right-click on your project and choose Add | Class.
  2. Give the class a name.
    I named my class ExceptionAspect.
  3. Click OK.
  4. Make the class inherit from OnExceptionAspect.
    Note: If you haven’t added a reference to PostSharp, you’ll need to do that now.
  5. Add a string property called Message.
  6. Add a Type property called ExceptionType.
  7. Add a FlowBehavior property called Behavior.
    The default value is FlowBehavior.Default.
  8. Override the OnException method.
  9. In the OnException method, create a message and log it.
    For this example, I will just log to the Visual Studio  Output window.
  10. In the OnException method, set the FlowBehavior to the Behavior property.
  11. Override the GetExceptionType method and configure it to return the ExceptionType property.
using System;
using System.Diagnostics;
using PostSharp.Aspects;

namespace Common.Aspects
{
    [Serializable]
    public class ExceptionAspect : OnExceptionAspect
    {
        public String Message { get; set; }

        public Type ExceptionType { get; set; }

        public FlowBehavior Behavior { get; set; }

        public override void OnException(MethodExecutionArgs args)
        {
            string msg = DateTime.Now + ": " + Message + Environment.NewLine;
            msg += string.Format("{0}: Error running {1}. {2}{3}{4}", DateTime.Now, args.Method.Name, args.Exception.Message, Environment.NewLine, args.Exception.StackTrace);
            Debug.WriteLine(msg);
            args.FlowBehavior = FlowBehavior.Continue;
        }

        public override Type GetExceptionType(System.Reflection.MethodBase targetMethod)
        {
            return ExceptionType;
        }
    }
}

Your ExceptionAspect class is complete and ready to use.

Step 3 – Apply the ExceptionAspect

  1. Add ExceptionAspect as an attribute to the ThrowSampleException method.
  2. Set the ExceptionType property to type of exception being thrown, which is an ApplicationException in this example.
  3. Set the Message property to hold a message.
  4. Set the Behavior property to FlowBehavior.Continue.
using System;
using Common.Aspects;
using PostSharp.Aspects;

namespace AspectExamples
{
    class Program
    {
        static void Main(string[] args)
        {
            ThrowSampleExecption();
        }

        [ExceptionAspect(ExceptionType = typeof(ApplicationException), Message = "An example exception.", Behavior = FlowBehavior.Continue)]
        private static void ThrowSampleExecption()
        {
            throw new ApplicationException("Sample Exception");
        }
    }
}

This is now complete. You have now implemented try/catch as an aspect.
You should take the time to look at your code with .NET Reflector or ILSpy to see what is really being done.
So here is the resulting code for the method accord to ILSpy.

  • Notice that our one line of code in the original method is in the try block.
  • Notice that in the catch block, the OnException method is called.
  • Notice that the catch block also has a switch statement based on the FlowBehavior to determine whether to continue or rethrow, etc.
// AspectExamples.Program
private static void ThrowSampleExecption()
{
	try
	{
		throw new ApplicationException("Sample Exception");
	}
	catch (ApplicationException exception)
	{
		MethodExecutionArgs methodExecutionArgs = new MethodExecutionArgs(null, null);
		MethodExecutionArgs arg_1F_0 = methodExecutionArgs;
		MethodBase m = Program.<>z__Aspects.m2;
		arg_1F_0.Method = m;
		methodExecutionArgs.Exception = exception;
		Program.<>z__Aspects.a0.OnException(methodExecutionArgs);
		switch (methodExecutionArgs.FlowBehavior)
		{
		case FlowBehavior.Default:
		case FlowBehavior.RethrowException:
			IL_55:
			throw;
		case FlowBehavior.Continue:
			methodExecutionArgs.Exception = null;
			return;
		case FlowBehavior.Return:
			methodExecutionArgs.Exception = null;
			return;
		case FlowBehavior.ThrowException:
			throw methodExecutionArgs.Exception;
		}
		goto IL_55;
	}
}

You now can implement pretty much any try/catch block as an Aspect using the ExceptionAspect.

Reusability

One of the main benefits of Aspects is that they take cross-cutting concerns and make them modular. That means that like class files, they are now reusable. Now it is easy to use, link to, or copy and paste your ExceptionAspect class into any other project.

Return to Aspected Oriented Programming – Examples

Why I used the ‘goto’ statement in C# today

Today I did something I have only ever done once before. I used the goto statement in C#.

In batch files I used goto all the time. For those who don’t know, LANDesk Management Suite supports batch file distribution packages and I became an expert at scripting with batch files. Of course, as a batch file scripting expert, I am very good at using the goto statement, but honestly using it in C# is generally frowned upon. I am sure there are other poeple like me that have used a language where goto is popular and can recognize uses for it when they crop up.

Anyway, I needed to start, stop, or restart a windows service and I need to perform the actions asynchronously in the background. Everytime I tried to create three methods, a Start, Stop, and Restart, the code grew in size and there was lots of duplication. So I kept going back to a single method that takes an action of start, stop, restart.

Since I wanted to run the action in the background, I created a ServiceWorker that inherits from BackgroundWorker and has an Action property (for Stop, Start, Restart) and here is the method I used.

private void StartOrStopService(object sender, DoWorkEventArgs doWorkEventArgs)
{
    ServiceWorker worker = sender as ServiceWorker;
    if (worker != null)
    {
    restart:
        switch (worker.Action)
        {
            case "Start":
                Log.WriteLine("Attempting to start service: " + worker.ServiceController.DisplayName);
                worker.ServiceController.Start();
                worker.ServiceController.WaitForStatus(ServiceControllerStatus.Running, TimeSpan.FromMilliseconds(30000));
                break;
            case "Restart":
            case "Stop":
                worker.ServiceController.Stop();
                worker.ServiceController.WaitForStatus(ServiceControllerStatus.Stopped, TimeSpan.FromMilliseconds(30000));
                if (worker.Action == "Restart")
                {
                    worker.Action = "Start";
                    goto restart;
                }
                break;
            default:
                return;
        }
    }
}

I of course have other options, but if I break this method out into more methods, it is actually more code. For example, if I make Start and Stop methods,

private void StartOrStopService(object sender, DoWorkEventArgs doWorkEventArgs)
{
    ServiceWorker worker = sender as ServiceWorker;
    if (worker != null)
    {
        switch (worker.Action)
        {
            case "Start":
                StartService(worker);
                break;
            case "Stop":
                StopService(worker);
                break;
            case "Restart":
                StopService(worker);
                StartService(worker);
                break;
            default:
                return;
        }
    }
}

private void StartService(ServiceWorker worker)
{
    Log.WriteLine("Attempting to start service: " + worker.ServiceController.DisplayName);
    worker.ServiceController.Start();
    worker.ServiceController.WaitForStatus(ServiceControllerStatus.Running, TimeSpan.FromMilliseconds(30000));
}

private void StopService(ServiceWorker worker)
{
    Log.WriteLine("Attempting to stop service: " + worker.ServiceController.DisplayName);
    worker.ServiceController.Stop();
    worker.ServiceController.WaitForStatus(ServiceControllerStatus.Stopped, TimeSpan.FromMilliseconds(30000));
}

What’s your opinion?

Do you like 1 method with 28 lines including a goto statement?

Do you like 3 methods totaling 36 lines without the goto statement?

Leave a comment and let me know.

AOP – Tracing methods in C# with PostSharp

Suppose you are tasked with adding logging to trace when a method starts and when it ends. Now suppose that you are tasked to do this for every method in a project, lets say you have to do this for 1,000 methods scattered throughout all your objects. Every method included would have two lines of logging code, one at the start, one at the end. That means you have to add two lines of code per method or 2,000 lines of code.  Sure, you could extract the logging methods into a static or singleton making it “easier”, but in the end, you still end up with 2,000 lines of code, two per method.

Is adding 2,000 lines of code the right solution? No it is not. These lines of code can be distracting and can make a method less readable. A single line method becomes three lines. Your class files get bigger, especially if they are method heavy. Also, these lines of code break the SOLID principles in that 1) you are repeating yourself, and 2) your method no longer has a single responsibility as it is doing what it was design for and it is doing tracing, etc. It doesn’t have to be this way.

AOP can allow you to do the same task but have the code in a single place. Including spaces and brackets, the C# MethodTracingAspect file is only 36 lines of code and to implement this into all methods in a namespace an AspectInfo.cs file is used with only three lines of code.

Which would you rather deal with: 39 lines of code in two class files, or 2,000 lines of code spread throughout ever class file?

This document assumes you have the done the following already:

  1. Installed Visual Studio
  2. Installed PostSharp
  3. Licensed PostSharp

Note: While PostSharp has a free version, my examples will likely require the licensed version.

Step 1 – Create a new C# project for Aspects

  1. In Visual Studio, choose File | New | Project.
  2. Choose a Visual C# Console Application.
  3. Give the project a Name.
    Note: I named my project AspectExamples
  4. Click Ok.

Your project is now created.

Step 2 – Add a reference to PostSharp

  1. In Solution Explorer, right-click on your new project and choose Add Reference.
  2. In the Add Reference window, click to select the .NET tab.
  3. Locate PostSharp and click to highlight it.
  4. Click Ok.

You have now added PostSharp as a reference to your project.

Step 3 – Create an Aspect for method tracing

  1. Right-click on your project and choose Add | Class.
  2. Give the class a Name.
    Note: I named my version of this class MethodTraceAspect.
  3. Add a using reference to the PostSharp.Aspects namespace.
  4. Make the object inherit from OnMethodBoundaryAspect.
  5. Override the OnEntry method.
  6. Override the OnExit method.
  7. Add code to each method for logging to the Output window using Debug.WriteLine().
    Note: Obviously, you can use any logging library you software may use.
  8. Add code to make sure that methods inside methods are properly tabbed.

Here is my final class file.

using System;
using System.Collections.Generic;
using System.Diagnostics;
using PostSharp.Aspects;

namespace AspectsExamples
{
    [Serializable]
    public class MethodTraceAspect : OnMethodBoundaryAspect
    {
        private static int _TabCount = 0;
        private static Stack<long> _StartTimeStack = new Stack<long>();

        public override void OnEntry(MethodExecutionArgs args)
        {
            Debug.WriteLine(GetTabs() + "Method started: " + args.Method.Name);
            _TabCount++;
        }

        public override void OnExit(MethodExecutionArgs args)
        {
            _TabCount--;
            Debug.WriteLine(GetTabs() + "Method completed:" + args.Method.Name);
        }

        private static String GetTabs()
        {
            string tabs = string.Empty;
            for (int i = 0; i < _TabCount; i++)
            {
                tabs += "\t";
            }
            return tabs;
        }
    }
}

You now have a modular Aspect that you can use to add method start, method end logging to any method in any C# project.

Step 4 – Implement the Aspect for method tracing

Implementing the Aspect for method tracing is accomplished by using an Attribute. The attribute can be added to a single method, a class, or a namespace.

We will use the following Program.cs file will demonstrate this.

using System;

namespace AspectExamples
{
    class Program
    {
        static void Main(string[] args)
        {
            HelloWordMethod();
        }

        private static void HelloWordMethod()
        {
            Console.WriteLine("Hello, World!");
        }
    }
}

Option 1 – Adding the Aspect to methods

When adding this to method, you have to add it for each method.

  1. Add the MethodTraceAspect to the Main method.
  2. Add the MethodTraceAspect to the HelloWordMethod.
using System;

namespace AspectExamples
{
    class Program
    {
        [MethodTraceAspect]
        static void Main(string[] args)
        {
            HelloWordMethod();
        }

        [MethodTraceAspect]
        private static void HelloWordMethod()
        {
            Console.WriteLine("Hello, World!");
        }
    }
}

Ok, lets test this.

  1. Click Debug | Start Debugging to run the application in debug mode.
  2. Look at the Output and you should see the following lines.
Method started: Main
	Method started: HelloWordMethod
	Method completed:HelloWordMethod
Method completed:Main

Option 2 – Adding the Aspect to classes

When adding this to a class, you don’t have to add it for each method in the class.

  1. Add the MethodTraceAspect to the Program class.
using System;

namespace AspectExamples
{
    [MethodTraceAspect]
    class Program
    {
        static void Main(string[] args)
        {
            HelloWordMethod();
        }

        private static void HelloWordMethod()
        {
            Console.WriteLine("Hello, World!");
        }
    }
}

Ok, lets test this.

  1. Click Debug | Start Debugging to run the application in debug mode.
  2. Look at the Output and you should see the following lines.
Method started: Main
	Method started: HelloWordMethod
	Method completed:HelloWordMethod
Method completed:Main

Option 3 – Adding the Aspect to a namespace

When adding this to a namepsace, you don’t have to add it for each class or every method in each class. Instead it is automatically added to every method in every class in the namespace.

  1. Add the MethodTraceAspect to the namespace.
    Note: Notice the syntax is slight different for adding to a namespace than for a class or method.
using System;

[assembly: MethodTraceAspect]
namespace AspectExamples
{
    class Program
    {
        static void Main(string[] args)
        {
            HelloWordMethod();
        }

        private static void HelloWordMethod()
        {
            Console.WriteLine("Hello, World!");
        }
    }
}

Ok, lets test this.

  1. Click Debug | Start Debugging to run the application in debug mode.
  2. Look at the Output and you should see the following lines.
Method started: Main
	Method started: HelloWordMethod
	Method completed:HelloWordMethod
Method completed:Main

Note: For real projects that aren’t just examples, it is a good idea to implement Aspects to a namespace in a separate file, such as an AspectInfo.cs file.

using Common.Aspects;
[assembly: MethodTraceAspect]
namespace AspectExamples {}

Congratulations, you have implemented an Aspect in C# using PostSharp.

Return to Aspected Oriented Programming – Examples
How to insert table rows using a DataTable in C#

You may have already read How to query a SQL database in C#? and How to insert a row into a Microsoft SQL database using C#? but you are looking for more information on how to insert rows using a DataTable.  Well, here is how.

The example code below assumes you have a simple database called ExampleDB, with one table called Person that has an Id (Primary Key and auto increments), a FirstName, and a LastName column.

Further information is in the comments in the sample code below.

using System.Data;
using System.Data.SqlClient;

namespace SQLExamples
{
    public class Program
    {
        static void Main(string[] args)
        {
            // Step 1 - Create the connection with a Connection string

            // Create a connection builder
            var connectionBuilder = new SqlConnectionStringBuilder();
            connectionBuilder.IntegratedSecurity = true;
            connectionBuilder.DataSource = "localhost";
            connectionBuilder.InitialCatalog = "ExampleDB";

            // Create a connection that uses the connection string
            SqlConnection connection = new SqlConnection(connectionBuilder.ConnectionString);

            // Step 2 - Open the Connection
            connection.Open();

            // Step 3 - Perform database tasks with the open connection (Examples provided...)

            //
            // Example 1 - Insert data with a query
            //

            // Create an insert query
            string insertQuery = "Insert into Person (FirstName, LastName) Values ('Jared', 'Barneck')";

            // Create an SqlCommand using the connection and the insert query
            SqlCommand insertCommand = new SqlCommand() { Connection = connection, CommandText = insertQuery };

            // Run the ExecuteNonQuery() method
            int rowsAffected = insertCommand.ExecuteNonQuery();

            //
            // Example 2 - Select * from a table
            //

            // Create a String to hold the query.
            string selectQuery = "SELECT * FROM Person";

            // Create an SqlCommand using the connection and the insert query
            SqlCommand selectCommand = new SqlCommand() { Connection = connection, CommandText = selectQuery };

            // Use the above SqlCommand object to create a SqlDataReader object.
            SqlDataReader queryCommandReader = selectCommand.ExecuteReader();

            // Create a DataTable object to hold all the data returned by the query.
            DataTable dataTable = new DataTable();

            // Use the DataTable.Load(SqlDataReader) function to put the results of the query into a DataTable.
            dataTable.Load(queryCommandReader);

            //
            // Example 3 - Insert many rows DataTable insert
            //

            // Add to the DataTable from example 2
            DataRow row1 = dataTable.NewRow();
            row1["FirstName"] = "John";
            row1["LastName"] = "Johnson";
            dataTable.Rows.Add(row1);

            DataRow row2 = dataTable.NewRow();
            row2["FirstName"] = "Jenni";
            row2["LastName"] = "Jenson";
            dataTable.Rows.Add(row2);

            string adapterInsertQuery = "Insert into Person (FirstName, LastName) Values (@FirstName, @LastName)";
            SqlCommand adapterInsertCommand = new SqlCommand() { Connection = connection, CommandText = adapterInsertQuery };
            adapterInsertCommand.Parameters.Add("@FirstName", SqlDbType.NVarChar, 255, "FirstName");
            adapterInsertCommand.Parameters.Add("@LastName", SqlDbType.NVarChar, 255, "LastName");

            SqlDataAdapter adapter = new SqlDataAdapter(selectCommand);
            adapter.InsertCommand = adapterInsertCommand;
            adapter.Update(dataTable);

            // Step 4 - Close the connection
            connection.Close();
        }
    }
}

You show now have a good starting point for using ADO.NET to manipulate a Database.


Return to ADO.NET and Database with C#

Running Pinta on FreeBSD – A C# (Mono) Image Editor

I wanted to continue with the C# (Mono) on FreeBSD theme this week. The next C# (Mono) post for FreeBSD is simply running a .C# (Mono) app on FreeBSD. My first thought was this, “I wonder if there is a mono version of Paint.NET?”. Paint.NET is my favorite image editor for Windows. After a quick search, I found the Pintaproject, which is a Mono clone of Paint.NET.

Installing Pinta on FreeBSD

So anyway, the steps for running on FreeBSD are quite simple.  This is a preview of my next FreeBSD Friday post, as I will continue the mono them to promote you app.

  1. Follow this post to get mono on FreeBSD.
    http://rhyous.com/2010/12/10/c-mono-on-freebsd/
  2. Download the Pinta tarball.
    Note: Get the latest link from here: http://pinta-project.com/download

    $ fetch http://cloud.github.com/downloads/PintaProject/Pinta/pinta-1.3.tar.gz
  3. Extract it:
    $ tar -xzf pinta-0.5.tar.gz
  4. Change to the directory:
    $ cd pinta-0.5
  5. Run configure.
    $ ./configure
  6. Note: I am not entirely sure this is needed, but I did it because it was there.

    $ mkdir ~/.tmp
  7. Compile the solution as follows:
    $ mdtool build Pinta.sln

    Note: I am not sure why, but “make” didn’t work, though I expected it to.

  8. Then as root or with sudo, run make install.
    # make install
  9. Make the shell rehash the commands in PATH.
    $ rehash[shell]
    Or depending on your shell...
    [shell]$ hash -r
  10. Now just run pinta.
     $ pinta


Pinta is now installed and usable on FreeBSD or PC-BSD.

More information

Pinta installs the following files

/usr/local/bin/pinta
/usr/local/lib/pinta/
/usr/local/lib/pinta/Pinta.Core.dll
/usr/local/lib/pinta/Pinta.Effects.dll
/usr/local/lib/pinta/Pinta.Gui.Widgets.dll
/usr/local/lib/pinta/Pinta.Resources.dll
/usr/local/lib/pinta/Pinta.Tools.dll
/usr/local/lib/pinta/Pinta.exe

The first file, /usr/local/bin/pinta, is a shell script that runs this:

#!/bin/sh
exec /usr/local/bin/mono /usr/local/lib/pinta/Pinta.exe "$@"

The other files are the application. It is a little weird to see .exe and .dll files on FreeBSD, but I’ll get over it.

Adding Pinta to the KDE Menu

I use KDE so I was able to add a menu item for pinta easily. I used the same command that the shell script used:

/usr/local/bin/mono /usr/local/lib/pinta/Pinta.exe "$@"

I found a nice installed logo and used it for the menu icon:
/usr/local/share/icons/hicolor/96×96/apps/pinta.png

Pinta in Ports

According to this Problem Report (PR), Pinta will be a port soon, if it isn’t already. http://www.freebsd.org/cgi/query-pr.cgi?pr=164309

My Coding Guidelines

Everyone has their own style guide and mine has just grown naturally. I didn’t used to do all of these so many of my early posts don’t follow these formats exactly, but I now very much prefer these coding styles.

Also, it annoys me to no end when someone calls there style good and another style bad. I will do no such thing. I will mark the styles as “My style” and “Not my style”. Just because it is “No my style” doesn’t mean it isn’t a good style for you.

Some basic guidelines

  • Follow the rules of grammar whenever possible.
  • Make code as self-documenting as possible.
  • Make code easy to copy and paste.

Indentation

Use four spaces tabs when tabbing. Remember this, scrolling up and down is easier than scrolling side to side.

Do not tab brackets but tab code inside brackets.

My Style

for (i = 0; i < 10; i++)
{
    DoSomething();
}

Not my style

for (i = 0; i < 10; i++)
    {
        DoSomething();
    }

Whitespace

Add spaces after commas in method parameters but don’t space around the parenthesis.
My style

public void DoSomething(string inString, bool inValue)
{
   string a = "a";
   string b = "b";
   SomeWork(a, b);
}

Not my style

public void DoSomething ( string inString, bool inValue )
{
   string a = "a";
   string b = "b";
   SomeWork( a, b );
}

No space when declaring an array.

My Style

string[] myArray = new string[] {"String1", "String2"};

Not my style

string [] myArray = new string [] {"String1", "String2"};

Curly Brackets

Always put the curly brackets on the next line. Why? Think of the brackets as left-most column. The opening bracket should be directly above the closing bracket, in the left-most column. Or think of the brackets as a section you want to isolate from everything else. The brackets (start section) should never share a line. You should be able to easily highlight all the lines in the bracketed section and not include any code outside the brackets.

My Style

for (i = 0; i < 10; i++)
{
    if (SomeBoolCheck())
    {
        DoSomething();
    }
}

Not my style

for (i = 0; i < 10; i++) {
    if (SomeBoolCheck()) {
        DoSomething();
    }
}

Again, in every instance where you use a curly bracket, put it on the next line.

if

Almost always use brackets even if it is only one line.

My Style

if (SomeBoolCheck())
{
    DoSomething();
}

Not my style

if (SomeBoolCheck())
    DoSomething();

The only time I use a one line if statement is when it really is only one line. And when I do this, I always have an empty line afterwards.

My Style

public void DoSomething(object inParam)
{
    if (inParam == null) return;

    DoSomething();
}

Not my style

public void DoSomething(object inParam)
{
    if (inParam == null)
        return;
    DoSomething();
}

Variable names

Member variables or fields

All public variables are in camel case with the first letter uppercase. I feel that having the first letter lowercase is distracting in most instances.

My style

public string FirstName;
public string LastName;

All private member variables start with an underscore and are in camel case with the first letter uppercase.

My style

private string _FirstName;
private string _LastName;

Not my style

private string _firstName;
private string _lastName;

Properties

I don’t really differentiate public or private properties, as I rarely have private properties and in the rare instances where I do, I don’t change the syntax in any way. Also, I always have a space between properties.

My style

public string FirstName {get; set;}

public string LastName {get; set;}

Always use an autoproperty unless you have at least one line of code to add to the get or set.

A Property that must have a manual backing field should have the backing field right under the property. Why, because if you think about it, it is part of the property and if you copy it (or just copy the contents on the lines with and within the brackets), the backing property should come along with the copy and paste.

My Style

public string FirstName
{
    get { return _FirstName; }
    set
    {
        _FirstName = value;
        NotifyPropertyChanged("FirstName");
    }
} private string _FirstName;

Not my style

private string _FirstName;

// .... more code

public string FirstName
{
    get { return _FirstName; }
    set
    {
        _FirstName = value;
        NotifyPropertyChanged("FirstName");
    }
}

Note: In my example, I am using a property for a ViewModel in the MVVM format. I would really prefer the following syntax. Someday, I will figure out how to do this without including 3rd party software.

[NotifyPropertyChanged]
public string FirstName {get; set;}

[NotifyPropertyChanged]
public string LastName {get; set;}

Methods

Naming

Methods should be named very clearly based on what they do. Length is not a problem due to intellisense. For example, imaging you want to have a function that eats a cookie. You would name it as follows. Also, I don’t do anything different for public verses private (or protected or internal) methods. They are all camel case with the first letter uppercase.

public void EatACookie()
{
    // ... code to eat a cookie
}

Parameters

All parameters in functions are in lowercamel case. Remember, having the first letter of a name be lowercase is distracting to me. However, I get by this by and mark the variable with the preposition “in”. In rare cases where I use a ref or an out for a parameter, I use those prepositions where “in” would be.

This also adds an additional benefit of marking the parameter variables differently than internal variables.

My style

public void EatACookie(Cookie inCookie)
{
    // ... code to eat a cookie
}

Not my style

public void EatACookie(Cookie cookie)
{
    // ... code to eat a cookie
}

Variables declared in a method

I basically just go all lowercase using the same name as the object when possible, or the most self documenting variable name as possible.

public void EatACookie(Cookie inCookie)
{
    Mouth mouth = new Mouth()
    mouth.Teeth.Chew(inCookie, 27);
    mouth.Swallow();
}

However, if the word needs camel case, I often add a short tag in front similar to method parameters only I usually use “loc” or “tmp” to mark them as local or temporary variables. Again, I use the same name as the object when possible, or the most self documenting variable name as possible.

My style

public void EatACookie(Cookie inCookie)
{
    CookieMonster tmpCookieMonster = new CookieMonster ()
    tmpCookieMonster.EatCookie(inCookie);
}

Final remarks

I am sure I have more styles I use, and I will add them as I go.

Why Interface-based design leads to good Unit Tests?

Interface-based design leads to good Unit Tests because you can more easily have a separation of concerns, limit the test to one object, and eliminate dependencies by not having to have “real” dependencies available to test a portion of your code.

I am going to explain this by example.

First, let me remind you of some rules for writing good Unit Tests:

  1. You don’t touch the system so Unit Tests can run on a stable build device without corrupting the build system.
  2. You don’t have external dependencies so the build system can run in an isolated environment.
  3. The tests should run quickly.
  4. Each test should test one thing only.

Imagine you have code that tests authenticating to a UNC path.  You have these two classes:

  • BusinessObject
  • NetworkShare

BusinessObject contains an instance of NetworkShare.  The code is not really significant as this is theoretical. We’ll get to code in the next few articles.

You need to write Unit Tests for BusinessObject.cs.

Why is this a problem? Because it requires a system with a UNC share to run the class and so testing is difficult.

Now, imagine that BusinessObject.cs didn’t actually have an instance of NetworkShare, but instead an Interface was created called IAuthenticateRemotely. And Your code now includes these files.

  • BusinessObject
  • IAuthenticateRemotely
  • NetworkShare : IAuthenticateRemotely

Now BusinessObject has an instance of IAuthenticateRemotely instead of an instance of NetworkShare.  Now you can write Unit Tests for the BusinessObject class by simply creating any fake class in your Unit Test code that implements IAuthenticateRemotely. Your test class would simply be a fake. Lets say the IAuthenticateRemotely had a bool Authenticate() function. You would create a fake class for your test and implement this function as follows.

public bool Authenticate()
{
    return true;
}

Notice that the function doesn’t actually do anything. That is because a Unit Test for the BusinessObject class only needs to test the BusinessObject class.

Please feel free to make any comments as necessary.

Return to C# Unit Test Tutorial

WPF Localization at run-time

I needed a better WPF Localization solution and I came up with one and posted it over on my WPF blog.

I would love some feed back, so if you are interested, check it out.

How to change language at run-time in WPF with loadable Resource Dictionaries and DynamicResource Binding (Example 1)

C# Dictionary

In C# there is an object called Dictionary<TKey, TValue> that can be used to store data.  The Dictionary<TKey, TValue> is essentially a collection of KeyValuePair<TKey, TValue> objects.

C# Dictionary Example 1 – A word dictionary

In this example, we create a simple dictionary with a few words and there definitions and show you how they are accessed.

using System;
using System.Collections.Generic;
using System.Linq;

namespace DictionaryExample
{
    class Program
    {
        static void Main(string[] args)
        {
            Dictionary<String, String> words = new Dictionary<string, string>();
            words.Add("Hello", "An expression or gesture of greeting.");
            words.Add("Goodbye", "A concluding remark or gesture at parting.");
            words.Add("Computer", "A programmable usually electronic device that can store, retrieve, and process data.");
            words.Add("Friend", "One attached to another by affection or esteem");

            Console.WriteLine("Word - Definition");
            Console.WriteLine("===================================================");
            foreach (KeyValuePair<string, string> pair in words)
            {
                Console.WriteLine(string.Format("{0} - {1}", pair.Key, pair.Value));
            }
        }
    }
}

Accessing values in a C# Dictionary

You can access the value using the key. In the case of our word dictionary, the word is the key and the definition is the value.

While you could access the value as follows, there is a problem with the below method.

    private string GetDefinition(String inWord, Dictionary<String, String> inDictionary)
    {
        return inDictionary[inWord];
    }

Do you know what the problem is?  Right, it doesn’t handle a missing value.  If the value doesn’t exist, this will throw a KeyNotFoundException.

Handling a missing value in a C# Dictionary

There are two ways to prevent the KeyNotFoundException.

Method 1 – Use TryGetValue()

TryGetValue() return a bool It takes in the Key and also an out reference. It populates the out reference. Here is an example.

    private string GetDefinition(String inWord, Dictionary<String, String> inDictionary)
    {
        string retVal;
        // String is set to null if the value is not found
        return inDictionary.TryGetValue(inWord, out retVal) ? retVal : ;
    }

I am not a big fan of how the TryGetValue() function was implemented to return a bool However, I understand why it was implemented to return a bool. One might wonder why it returns bool. You may be thinking that TryGetValue() could return a value if found, null otherwise, right? Wrong! Reason 1 – Don’t forget that the value might actually be null. Reason 2 – While this Dictionary used a nullable type, string, another implementation might implement using a type that is not nullable, such as int.

Method 2 – Using ContainsKey()

Alternately you could check if the value exists first using ContainsKey(). Here is an example.

    private string GetDefinition(String inWord, Dictionary<String, String> inDictionary)
    {
        return inDictionary.ContainsKey(inWord) ? inDictionary[inWord] : string.Empty;
    }

I prefer this because to me, it is more readable than the TryGetValue() function, but feel free to make your own opinion.

Looping through a C# Dictionary

Now imagine you wanted to get all the words and their definitions that start with a certain letter. In this case you are creating a Dictionary that is a subset of the full Dictionary. You could do this with a foreach loop. Notice that the object in the foreach loop is a KeyValuePair.

        private Dictionary<String,String> GetWordsAndDefinitionsWhereWordsStartWith(Dictionary<String, String> inDictionary, char inChar)
        {
            Dictionary<String, String> wordsAndDefinitionsWhereWordsStartWithC = new Dictionary<string, string>();
            foreach (KeyValuePair<string, string> pair in inDictionary)
            {
                if (pair.Value.StartsWith(inChar.ToString(), StringComparison.CurrentCultureIgnoreCase))
                    wordsAndDefinitionsWhereWordsStartWithC.Add(pair.Key, pair.Value);
            }
            return wordsAndDefinitionsWhereWordsStartWithC;
        }

You could alternately use LINQ against the C# Dictionary to get the method body to be a single line.

    private Dictionary<String,String> GetWordsAndDefinitionsWhereWordsStartWith(Dictionary<String, String> inDictionary, char inChar)
    {
        return inDictionary.Where(pair => pair.Value.StartsWith(inChar.ToString(), StringComparison.CurrentCultureIgnoreCase)).ToDictionary(pair => pair.Key, pair => pair.Value);
    }

You could just get the words and not the definitions in a List<String> as well.

    private List<String> GetWordstartingWith(Dictionary<String, String> inDictionary, char inChar)
    {
        List<String> wordsStartingWith = new List<String>();
        foreach (KeyValuePair<string, string> pair in inDictionary)
        {
            if (pair.Value.StartsWith(inChar.ToString(), StringComparison.CurrentCultureIgnoreCase))
                wordsStartingWith.Add(pair.Key);
        }
        return wordsStartingWith;
    }

Again, you could use LINQ against the C# Dictionary to make this function one line.

    private List<String> GetWordstartingWith(Dictionary<String, String> inDictionary, char inChar)
    {
        return (from pair in inDictionary where pair.Value.StartsWith(inChar.ToString(), StringComparison.CurrentCultureIgnoreCase) select pair.Key).ToList();
    }

References

LANDesk Support Tools – Android Edition (Demo)

This is my first real project written for Android. Yes, I wrote it in C# using Mono for Android.

How to connect to the LANDesk MBSDK using C#?

This article is to demonstrate to LANDesk admins how to connect to the LANDesk MBSDK with C#.

Prerequisites

LANDesk

  1. A LANDesk Core Server accessible via the network.
  2. Credentials to connect to the LANDesk Core Server.

Basically if you can hit the MBSDK with a browser and login, you are good to go.
http://CoreServer/mbsdkservice/msgsdk.asmx

Visual Studio

  1. It is assumed that you have Visual Studio Professional installed

Step 1 – Create a Visual Studio Project

  1. In Visual Studio, Go to File | New | Project.
  2. Select that project type.
    Note: For this example I chose Console Application.
  3. Give the Project a name.
    Note: I named my project TalkToMBSDK.
  4. Click OK.
    Note: I went ahead and left my client application configured for .NET 4 even though I know the server currently is .NET 3.5 Sp1.

Step 2 – Add a Web Reference to the MBSDK

  1.  In you new Visual Studio project, right-click on the project and click Add Service Reference.
    Note: We actually need a Web  Reference but this is how we get there.
  2. Click Advanced on the bottom left.
  3. Click on Add Web Reference, also on the bottom left.
  4. Enter the URL to the MBSDK on your Core Server: http://CoreServer/mbsdkservice/msgsdk.asmx
  5. Change the Web Reference Name (on the right) to mbsdk.
    Note: You can name it whatever you want, but because there is an object called MBSDK (all uppercase), I chose to make the namespace mbsdk (all lowercase).
  6. Click Add Reference.

Step 3 – Test using the LANDesk SDK

  1. In the Program.cs add the following code.  You next steps are in the code comments.
using System.Net;
using TalkToMBSDK.mbsdk;

namespace TalkToMBSDK
{
    class Program
    {
        static void Main(string[] args)
        {
            // Step 1 - You need to use your credentials
            string user = "SomeUser";
            string password = "SomePassword";
            string domain = "SomeDomain.tld";

            // Step 2 - Configure a CredentialCache object with the URL and your creds
            string uri = "http://CoreServer/MBSDKService/MsgSDK.asmx";
            CredentialCache MyCredentialCache = new System.Net.CredentialCache();
            MyCredentialCache.Add(new System.Uri(uri), "NTLM", new NetworkCredential(user, password, domain));

            // Step 3 - Create an MBSDK object and set its CredentialCache object to the one you just created
            MBSDK sdk = new MBSDK();
            sdk.Credentials = MyCredentialCache;

            // Step 4 - Go ahead an call methods from the MBSDK
            // Note: If you get 401 unathorized, are you a LANDesk Administrator?
            string[] configs = sdk.GetClientConfigurations();
            DeviceList list = sdk.ListMachines("");
            string who = sdk.WhoAmI();
        }
    }
}

Have fun LANDesk Admins.

A test of encapsulation security in C#

I am taking a Computer Security course as part of my Masters of Computer Science and a specific question inspired the idea of testing the security of Encapsulation in C#.

I was curious, if exposing an object that is not exposed would be as simple as changing a single bit with a hex editor.

So I created two projects:

A dll that doesn’t expose two objects.

namespace EncapsulatedLibrary
{
    class Class1
    {
        public int i = 27;
    }

    class Class2
    {
        public int i = 29;
    }
}

An executable that references the dll and tries to use objects that are not exposed.

using EncapsulatedLibrary;

namespace TestLink
{
    class TestLinkProgram
    {
        static void Main(string[] args)
        {
            Class1 c1 = new Class1();
            int val1 = c1.i;
            Class2 c2 = new Class2();
            int val2 = c2.i;
        }
    }
}

Ok, now if you compile these, the dll compiles fine, but the exe fails to build.

Now try to use a hex editor to change the compiled version of the dll to expose these objects.

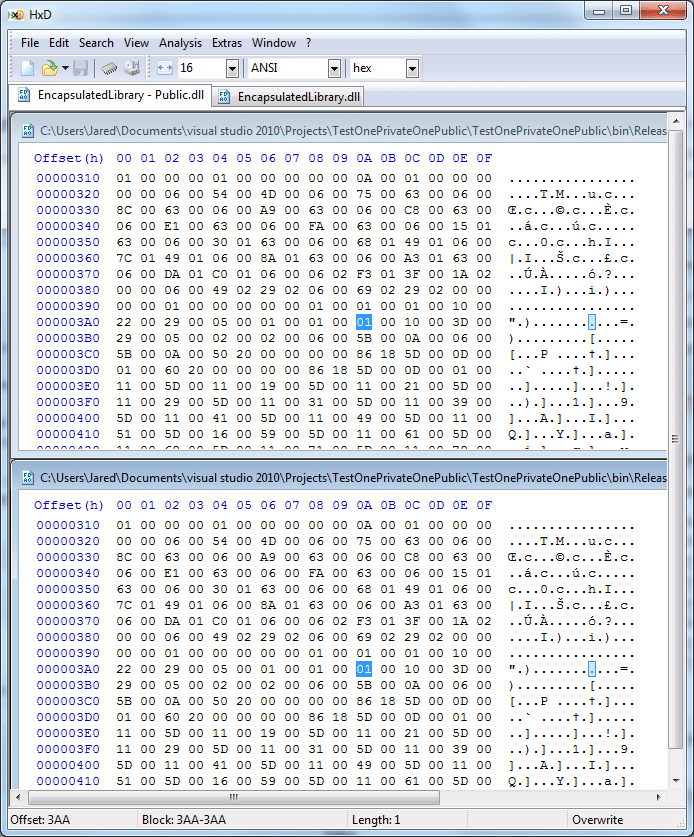
So real quick, I copied the dll and then changed the classes to public and recompiled. Then using a hex editor, HxD, I compared the two files.

Sure enough, on row 00000390, the 13th octet, I changed it from 00 to 01 and now Class1 is public.
On the very next row, 000003A0, the 10th octet, I changed it from 00 to 01 and now Class2 is public.

With this simple hack, I have made two objects public that should not be public. While in this example, this is not malicious, there are ways this could be used maliciously. Imagine if you had functionality limitations on users and they should not have rights to do certain processes but due to exposing a library, they can do these processes.

So now the next question left to be answered is this: What tools exist as controls to prevent such an attack?

How to find the duplicate in an array using Big O of N?

Question

Write an algorithm that finds the duplicate in an array using Big O of N, not Big O of N^2.

Information

The array is an integer array and has a MAX_VALUE items (lets just use 1000 as an example). All integers are between 0 and MAX_VALUE (pretend the input is limited to values between 0 and MAX_VALUE). There is only one duplicate and you are not sure where it is. What is the most efficient way to find it.

    int[] i = new int[1000];

There is one duplicate and it is the worst case duplicate.  You can simulate a worst case duplicate as follows:

    for (int i = 0; i < 999; i++)
    {
        array[i] = i+1;
    }
    array[999] = 999;

So the duplicates are the second to last and the last.

Answer

This is one possible answer that assumes the values are between 0 and MAX_VALUE.

    /// <summary>
    /// Efficient because it has a Big O of n.
    /// </summary>
    public int FindDuplcate(int[] inArray)
    {
        bool[] tmpArray = new bool[1000];
        for (int i = 0; i < inArray.Length; i++)
        {
            if (tmpArray[inArray[i]] == true)
                return i;
            tmpArray[inArray[i]] = true;
        }
        return -1;
    }

Incorrect answers

Here is a little test app with two incorrect answers and two possible correct answer. Feel free to comment with your answers.

using System;
using System.Collections.Generic;
using System.Linq;
using System.Text;
using System.Collections;

namespace FindDuplicateInArray
{
    class Program
    {
        const int MAX_VALUE = 1000;        

        static void Main(string[] args)
        {
            // Worst case
            int[] array = new int[MAX_VALUE];
            for (int i = 0; i < MAX_VALUE - 1; i++)
            {
                array[i] = i + 1;
            }
            array[MAX_VALUE - 1] = MAX_VALUE - 1;

            // Incorrect answer: Big O of N^2
            //IFindADuplicateInArrays dupFinder1 = new BruteForceDupFinder();
            //int dup = dupFinder1.FindDuplcate(array);

            // Incorrect answer: Big O of N^2
            //IFindADuplicateInArrays dupFinder2 = new LessBruteForceDupFinder();
            //int dup = dupFinder2.FindDuplcate(array);

            // Possible correct answer: Big O of N but with a limitation
            //IFindADuplicateInArrays dupFinder3 = new EfficientDupFinderWithLimitation();
            //int dup = dupFinder3.FindDuplcate(array);

            // Possbile correct answer: Big O of N
            IFindADuplicateInArrays dupFinder3 = new EfficientDupFinder();
            int dup = dupFinder3.FindDuplcate(array);

            Console.WriteLine(dup);
        }

        public interface IFindADuplicateInArrays
        {
            int FindDuplcate(int[] inArray);
        }

        /// <summary>
        /// Incorrect Answer: This is simple N*N alogithm. Big 0 = N^2
        /// </summary>
        public class BruteForceDupFinder : IFindADuplicateInArrays
        {
            #region IFindADuplicateInArrays Members

            public int FindDuplcate(int[] inArray)
            {
                for (int i = 0; i < inArray.Length; i++)
                {
                    for (int j = 0; j < inArray.Length; j++)
                    {
                        if (i != j && inArray[i] == inArray[j])
                            return j;
                    }
                }
                return -1;
            }

            #endregion
        }

        /// <summary>
        /// Incorrect Answer: This is N(N-1)/2 which is N*N/2-n/2 so remove the constants N^2-N. 
        /// When there is N^2-N you can keep the N that grows fastest: Big O = N2
        /// But the original alrogithm is less N^2 than just N^2.
        /// </summary>
        public class LessBruteForceDupFinder : IFindADuplicateInArrays
        {
            #region IFindADuplicateInArrays Members

            public int FindDuplcate(int[] inArray)
            {
                for (int i = 0; i < inArray.Length; i++)
                {
                    for (int j = i + 1; j < inArray.Length; j++)
                    {
                        if (inArray[i] == inArray[j])
                            return j;
                    }
                }
                return -1;
            }

            #endregion
        }

        /// <summary>
        /// Possible Answer: Efficient because it has a Big O of n.
        /// Limitation: If an item in the array is greater than the MAX_VALUE, 
        ///             an ArrayIndexOutOfBoundsException occurs.
        /// </summary>
        public class EfficientDupFinderWithLimitation : IFindADuplicateInArrays
        {
            #region IFindADuplicateInArrays Members

            public int FindDuplcate(int[] inArray)
            {
                bool[] tmpArray = new bool[1000];
                for (int i = 0; i < inArray.Length; i++)
                {
                    if (tmpArray[inArray[i]] == true)
                        return i;
                    tmpArray[inArray[i]] = true;
                }
                return -1;
            }

            #endregion
        }

        /// <summary>
        /// Possible Answer: Efficient because it has a Big O of n.
        /// </summary>
        public class EfficientDupFinder : IFindADuplicateInArrays
        {
            #region IFindADuplicateInArrays Members
            public int FindDuplcate(int[] inArray)
            {
                Dictionary<int, bool> table = new Dictionary<int, bool>();
                for (int i = 0; i < inArray.Length; i++)
                {
                    if (table.Keys.Contains(inArray[i]))
                        return i;
                    table.Add(inArray[i], true);
                }
                return -1;
            }
            #endregion
        }
    }
}

Run this through Visual Studio’s Performance Analysis tool once for each answer (comment and uncomment). To really see the difference, change MAX_VALUE to 1 million.

WPF MVVM Tutorial

WPF jobs trend up according to Indeed.com

According to Indeed.com the amount of WPF job trends up rapidly.

Since XAML is going to be used in Windows 8 as well, it is not going away any time in the next decade. Also, declarative UI will improve in the future, not disappear. So there is job security in this.