Archive for the ‘WPF’ Category.

Tutorial – Binding to Resources.resx for strings in a WPF Application: A technique to prepare for localization

Update: This is no longer a recommended way to do localization in WPF.
Use this project from NuGET: WPFSharp.Globalizer
Also read this post: How to change language at run-time in WPF with loadable Resource Dictionaries and DynamicResource Binding

Introduction

Ok, so if you are going to have a string visible in your WPF application and your application can be in multiple languages, you are facing the localization problem.

Usually people as themselves two questions:

  • Do I localize or not?
  • How do I localize?

The answers are usually not now and I don’t know. So no localization work is done at first. Later, you wish you were more prepared for localization.

Well, I am here to tell you that you can at least prepare to be localized by doing a few simple steps:

  1. Centralize your strings in a publicized Resources.resx file.
  2. Add a reference to your Properties.
  3. Replacing any statically entered text with the name of the string resource.
  4. Do you best to use dynamic sizing.

Preparing your strings for localization

If you are going to have a string in your WPF application, it is a good idea to store those strings in a centralized place for localization purposes. Usually in Visual Studio, that is in Resources.resx.

Cialis is an additional impotence problems treatment, http://www.horizonhealthcareinc.com/ which is gaining interest at a faster pace. The reason for more popular at a faster pace is because of its effectiveness.

Often a string is entered directly into an the WPF XAML. This is not recommended. Maybe you are thinking that you don’t need to localize your application, so this is not important to you. Ok, really what you are thinking is:

“I don’t know how to do it and if I ever get big enough to need localization, at that point, I will figure it out.”

Well, what if I told you that using Resources.resx is extremely easy?

What if I told you that it hardly takes more time at all?

If it easy and hardly time consuming at all, you would do it, right? I would. Hence this post.

Step by step guide for Preparing your strings for locaization

I have a project called LicenseAgreementManager. Right now this only needs to display a license agreement in English, but maybe someday, this will need to display a license agreement in any language.

Preparation – Create a new project or use an existing project

In Visual Studio, create a new WPF Applcation project.

I named my project LicenseAgreementManager.

Right away, you already have at least one string statically entered into your XAML, the text for the window title.

Step 1 – Add all your strings to the Resources.resx file

  1. Double-click on Resources.resx in your WPF Project. This found under the ProjectName | Properties option in your Solution Explorer tree.
  2. Change the Access Modifier drop down menu from Internal to Public.
  3. Enter your strings in the Resources.resx by giving them a unique name and a value of the desired string. A comment is also optional.

You now have a publicized Resource.resx file and a few strings inside it.

Step 2 – Add a reference to your Properties

  1. In your project, open your MainWindow.xaml file.The XAML looks as follows:
    <Window x:Class="LicenseAgreementManager.MainWindow"
            xmlns="http://schemas.microsoft.com/winfx/2006/xaml/presentation"
            xmlns:x="http://schemas.microsoft.com/winfx/2006/xaml"
            Title="MainWindow" Height="350" Width="525">
        <Grid>
    
        </Grid>
    </Window>
    
  2. Add a line to reference your Properties in the Windows element.
    <Window x:Class="LicenseAgreementManager.MainWindow"
            xmlns="http://schemas.microsoft.com/winfx/2006/xaml/presentation"
            xmlns:x="http://schemas.microsoft.com/winfx/2006/xaml"
            xmlns:p="clr-namespace:LicenseAgreementManager.Properties"
            Title="MainWindow" Height="350" Width="525">
    

Step 3 – Replace static text with strings from the Resources.resx

  1. Change the Title attribute from static text to instead use access the string from your Resources.resx named EULA_Title.
    <Window x:Class="LicenseAgreementManager.MainWindow"
            xmlns="http://schemas.microsoft.com/winfx/2006/xaml/presentation"
            xmlns:x="http://schemas.microsoft.com/winfx/2006/xaml"
            xmlns:p="clr-namespace:LicenseAgreementManager.Properties"
            Title="{x:Static p:Resources.EULA_Title}"
            Height="350" Width="525">
    

That was pretty easy, wasn’t it.

As you add elements that have strings, use the Resources.resx.

Step 4 – Try to use dynamic sizing

  1. As best as possible, remove any dynamic sizing.I have just added some items and removed the sizing as best as possible. Here is my XAML.
    <Window x:Class="LicenseAgreementManager.MainWindow"
            xmlns="http://schemas.microsoft.com/winfx/2006/xaml/presentation"
            xmlns:x="http://schemas.microsoft.com/winfx/2006/xaml"
            xmlns:p="clr-namespace:LicenseAgreementManager.Properties"
            Title="{x:Static p:Resources.EULA_Title}"
            SizeToContent="WidthAndHeight"
            xml:lang="en-US">
        <Grid>
            <Grid.RowDefinitions>
                <RowDefinition Height="Auto"/>
                <RowDefinition Height="Auto"/>
            </Grid.RowDefinitions>
    
            <RichTextBox Name="_EulaTextBox" HorizontalAlignment="Stretch"  VerticalAlignment="Stretch"/>
            <StackPanel Grid.Row="1" Margin="0,10,0,0" Name="stackPanel2" HorizontalAlignment="Stretch"  VerticalAlignment="Stretch">
                <RadioButton Content="{x:Static p:Resources.EULA_Accept}" Margin="20,20,20,0" Name="radioButton1" />
                <RadioButton Content="{x:Static p:Resources.EULA_NotAccept}" Margin="20,20,20,0" Name="radioButton2" />
                <Button Content="{x:Static p:Resources.Next_Button}" Name="button1" Margin="20,20,35,20"  HorizontalAlignment="Right" />
            </StackPanel>
        </Grid>
    </Window>
    
  2. What changes did I make above that I couldn’t do through the Visual Studio GUI?
    1. I removed Height and size from almost every element.
    2. I added SizeToContent=”WidthAndHeight” to the Windows element.
    3. I added some extra size to the margins.

Conclusion

You don’t have to be localized to be prepared for easy localization. By doing the above simple steps, when it comes time to add localization, you will be ready.

If you want to go on an finish localization. You might want to read some of my sources.

Sources:

http://compositeextensions.codeplex.com/Thread/View.aspx?ThreadId=52910
http://msdn.microsoft.com/en-us/library/ms788718%28v=VS.90%29.aspx
http://msdn.microsoft.com/en-us/library/ms746621.aspx


Copyright ® Rhyous.com – Linking to this article is allowed without permission and as many as ten lines of this article can be used along with this link. Any other use of this article is allowed only by permission of Rhyous.com.

Tutorial – Creating a StaticResource and Binding to it

The XAML allows you to provide what are called StaticResources. Such resources can be given to a Window or to certain controls.

For this tutorial, I assume you are in Visual Studio 2008. I assume that you already know how to create a new Project and choose WPF Application. All examples assume you have a new WPF Application.

So lets get started with three examples of binding to StaticResources.

Example 1 – Making a String a StaticResource and Binding to it

This example will demonstrate instantiating a String as a StaticResource and binding a TextBox to it.

Step 1 – Add the elements

  1. Add three TextBox elements into the default Grid control.
            <ListBox Margin="12,12,0,0" Name="listBox1" Height="100" HorizontalAlignment="Left" VerticalAlignment="Top" Width="120" />
            <ListBox Margin="138,12,20,0" Name="listBox2" Height="100" VerticalAlignment="Top" />
            <TextBox Margin="12,118,0,121" Name="textBox1" Width="120" IsReadOnly="True" HorizontalAlignment="Left" />
            <TextBox Margin="138,118,20,121" Name="textBox2" Width="120" IsReadOnly="True" HorizontalAlignment="Left" />


Step 2 – Add the static resources

  1. Add an xmlns reference to the System namespace. This is done by adding the xmlns:System line to as an attribute to the top Window element as shown:
    <Window x:Class="StaticResourceBinding.Window1"
        xmlns="http://schemas.microsoft.com/winfx/2006/xaml/presentation"
        xmlns:x="http://schemas.microsoft.com/winfx/2006/xaml"
        xmlns:System="clr-namespace:System;assembly=mscorlib"
        Title="Window1" Height="300" Width="300">
    
  2. Create a Windows.Resources section in the XAML and add three Strings to it as StaticResources.
        <Window.Resources>
            <System:String x:Key="FirstName">Jared</System:String>
            <System:String x:Key="LastName">Barneck</System:String>
            <System:String x:Key="Alias">Rhyous</System:String>
        </Window.Resources>
    

Step 3 – Adding Binding to each TextBox element’s Text property

  1. Configure the three TextBox elements to bind to each String added as a StaticResource by adding a Text attribute.
            <TextBox Text="{StaticResource FirstName}" Height="23" Margin="51,25,107,0" Name="textBox1" VerticalAlignment="Top" />
            <TextBox Text="{StaticResource LastName}" Height="23" Margin="51,54,107,0" Name="textBox2" VerticalAlignment="Top" />
            <TextBox Text="{StaticResource Alias}" Height="23" Margin="51,83,107,0" Name="textBox3" VerticalAlignment="Top" />
    

The final XAML looks as follows. No changes were made to the code behind at all.

<Window x:Class="StaticResourceBinding.Window1"
    xmlns="http://schemas.microsoft.com/winfx/2006/xaml/presentation"
    xmlns:x="http://schemas.microsoft.com/winfx/2006/xaml"
    xmlns:System="clr-namespace:System;assembly=mscorlib"
    Title="Window1" Height="300" Width="300">
    <Window.Resources>
        <System:String x:Key="FirstName">Jared</System:String>
        <System:String x:Key="LastName">Barneck</System:String>
        <System:String x:Key="Alias">Rhyous</System:String>
    </Window.Resources>
    <Grid>
        <TextBox Height="23" Margin="51,25,107,0" Name="textBox1" VerticalAlignment="Top" Text="{StaticResource FirstName}"/>
        <TextBox Height="23" Margin="51,54,107,0" Name="textBox2" VerticalAlignment="Top" Text="{StaticResource LastName}"/>
        <TextBox Height="23" Margin="51,83,107,0" Name="textBox3" VerticalAlignment="Top" Text="{StaticResource Alias}"/>
    </Grid>
</Window>

Example 2 – Declaring an array as a StaticResource and Binding a ListBox to it

This example will demonstrate instantiating arrays as StaticResources and binding a ListBox to the arrays.

To show an example of building onto existing or previous learned knowledge, we are going to also implement binding each TextBox's Text properties to the ListBox's SelectedItem property.

Step 1 – Add the elements

  1. Add two ListBox and two TextBox elements into the default Grid control.
            <ListBox Margin="12,12,0,0" Name="listBox1" Height="100" HorizontalAlignment="Left" VerticalAlignment="Top" Width="120" />
            <ListBox Margin="138,12,20,0" Name="listBox2" Height="100" VerticalAlignment="Top" />
            <TextBox Margin="12,118,0,121" Name="textBox1" Width="120" IsReadOnly="True" HorizontalAlignment="Left" />
            <TextBox Margin="138,118,20,121" Name="textBox2" Width="120" IsReadOnly="True" HorizontalAlignment="Left" />
    

Step 2 – Add the static resources

  1. Add an xmlns reference to the System namespace. This is done by adding the xmlns:System line to as an attribute to the top Window element as shown:
    <Window x:Class="StaticResourceBinding.Window1"
        xmlns="http://schemas.microsoft.com/winfx/2006/xaml/presentation"
        xmlns:x="http://schemas.microsoft.com/winfx/2006/xaml"
        xmlns:System="clr-namespace:System;assembly=mscorlib"
        Title="Window1" Height="300" Width="300">
    
  2. Create a Windows.Resources section in the XAML and add two arrays as StaticResources: one an array of strings, and one an array of integers.
        <Window.Resources>
            <x:Array x:Key="StringList" Type="System:String">
                <System:String>Line 1</System:String>
                <System:String>Line 2</System:String>
                <System:String>Line 3</System:String>
                <System:String>Line 4</System:String>
            </x:Array>
            <x:Array x:Key="IntArray" Type="System:Int32">
                <System:Int32>100</System:Int32>
                <System:Int32>200</System:Int32>
                <System:Int32>300</System:Int32>
                <System:Int32>400</System:Int32>
            </x:Array>
        </Window.Resources>
    

Step 3 – Adding Binding

  1. Configure one ListBox's Text property to bind to the String array and the other ListBox's Text property to bind to the Int32 array.
            <ListBox ItemsSource="{StaticResource StringList}" Margin="12,12,0,0" Name="listBox1" Height="100" HorizontalAlignment="Left" VerticalAlignment="Top" Width="120" />
            <ListBox ItemsSource="{StaticResource IntArray}" Margin="138,12,20,0" Name="listBox2" Height="100" VerticalAlignment="Top" />
    
  2. We will also add binding to show you how you can combine binding to StaticResources and binding to another element’s property.Bind one TextBox to the listBox1.SelectedItem property and bind the other to the listBox2.SelectedItem.
            <TextBox Text="{Binding ElementName=listBox1, Path=SelectedItem}" Margin="12,118,0,121" Name="textBox1" Width="120" IsReadOnly="True" HorizontalAlignment="Left" />
            <TextBox Text="{Binding ElementName=listBox2, Path=SelectedItem}" Margin="138,118,20,121" Name="textBox2" Width="120" IsReadOnly="True" HorizontalAlignment="Left" />
    
  3. Build your application and run it. Notice as you select an item in the list, it displays.

The final XAML looks as follows. No changes were made to the code behind at all.

<Window x:Class="StaticResourceBinding2.Window1"
    xmlns="http://schemas.microsoft.com/winfx/2006/xaml/presentation"
    xmlns:x="http://schemas.microsoft.com/winfx/2006/xaml"
    xmlns:System="clr-namespace:System;assembly=mscorlib"
    Title="Window1" Height="300" Width="300">
    <Window.Resources>
        <x:Array x:Key="StringList" Type="System:String">
            <System:String>Line 1</System:String>
            <System:String>Line 2</System:String>
            <System:String>Line 3</System:String>
            <System:String>Line 4</System:String>
        </x:Array>
        <x:Array x:Key="IntArray" Type="System:Int32">
            <System:Int32>100</System:Int32>
            <System:Int32>200</System:Int32>
            <System:Int32>300</System:Int32>
            <System:Int32>400</System:Int32>
        </x:Array>
    </Window.Resources>
    <Grid>
        <ListBox ItemsSource="{StaticResource StringList}" Margin="12,12,0,0" Name="listBox1" Height="100" HorizontalAlignment="Left" VerticalAlignment="Top" Width="120" />
        <ListBox ItemsSource="{StaticResource IntArray}" Margin="138,12,20,0" Name="listBox2" Height="100" VerticalAlignment="Top" />
        <TextBox Text="{Binding ElementName=listBox1, Path=SelectedItem}" Margin="12,118,0,121" Name="textBox1" Width="120" IsReadOnly="True" HorizontalAlignment="Left" />
        <TextBox Text="{Binding ElementName=listBox2, Path=SelectedItem}" Margin="138,118,20,121" Name="textBox2" Width="120" IsReadOnly="True" HorizontalAlignment="Left" />
    </Grid>
</Window>

Example 3 – Adding Resources to a Control

In the previous two examples, we added the resources to the main Window object. However, a resource can be added to a control.

This example will demonstrate instantiating an array as a StaticResources for a control. We will then bind a TabControl’s ItemSource property to this array. This will cause a Tab to be created for each item in the array.

Step 1 – Add the elements

  1. Add a TabControl into the default Grid control.
            <TabControl Name="tabControl1">
    

Step 2 – Add the static resources

  1. Add an xmlns reference to the System namespace. This is done by adding the xmlns:System line to as an attribute to the top Window element as shown:
    <Window x:Class="StaticResourceBinding.Window1"
        xmlns="http://schemas.microsoft.com/winfx/2006/xaml/presentation"
        xmlns:x="http://schemas.microsoft.com/winfx/2006/xaml"
        xmlns:System="clr-namespace:System;assembly=mscorlib"
        Title="Window1" Height="300" Width="300">
    
  2. Create a Grid.Resources section in the XAML and add an array as a StaticResource under the Grid control.
            <Grid.Resources>
                <x:Array x:Key="TabList" Type="System:String">
                    <System:String>Tab 1</System:String>
                    <System:String>Tab 2</System:String>
                    <System:String>Tab 3</System:String>
                </x:Array>
            </Grid.Resources>
    

Step 3 – Adding Binding to the TabControl’s ItemSource Property

  1. Bind the TabControl's ItemSource property to bind to the String array.
            <TabControl Name="tabControl1" ItemsSource="{StaticResource TabList}">
    

The final XAML looks as follows. No changes were made to the code behind at all.

<Window x:Class="StaticResourceBinding3.Window1"
    xmlns="http://schemas.microsoft.com/winfx/2006/xaml/presentation"
    xmlns:x="http://schemas.microsoft.com/winfx/2006/xaml"
    xmlns:System="clr-namespace:System;assembly=mscorlib"
    Title="Window1" Height="300" Width="300">
    <Grid>
        <Grid.Resources>
            <x:Array x:Key="TabList" Type="System:String">
                <System:String>Tab 1</System:String>
                <System:String>Tab 2</System:String>
                <System:String>Tab 3</System:String>
            </x:Array>
        </Grid.Resources>
        <TabControl Name="tabControl1" ItemsSource="{StaticResource TabList}">
        </TabControl>
    </Grid>
</Window>

Hey, there is nothing wrong with more examples, so if you have an example of your own feel free to add it as a comment.


Copyright ® Rhyous.com – Linking to this post is allowed without permission and as many as ten lines of this page can be used along with this link. Any other use of this page is allowed only by permission of Rhyous.com.

A WPF Progress Bar

UPDATE: It turns out it would have been easier to use BackgroundWorker and MVVM so I wrote a post on doing that.A Progress Bar using WPF’s ProgressBar Control, BackgroundWorker, and MVVM

… original post below …

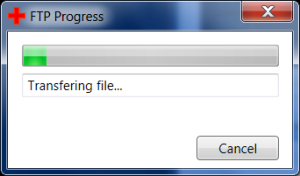
Today I needed a progress bar for as I was creating a c# tool that FTPs a file.  I wanted to show progress as the FTP file was uploaded.

I found a good solution at Mikes Code Blog. He has a post and a follow-up post.

WPF Progress Bar code

I created the progress bar as described and it worked. Here is a screen shot:

Thanks Mike!

Tutorial – Binding one element property to another

The properties of WPF elements can be bound to properties of other WPF Elements. Lets do some simple examples of binding one element to another.

For this tutorial, I assume you are in Visual Studio 2008.  I assume that you already know how to create a new Project and choose WPF Application.  All examples assume you have a new WPF Application.

I am the believer that one example isn’t enough, so I am going to give you three examples:

Example 1 – Binding and Element’s property to CheckBox.IsChecked

This example will demonstrate binding a Button‘s IsEnabled property to a CheckBox‘s IsChecked property.

Step 1 – Add the elements

  1. Add two items from the Toolbox:
    • CheckBox
    • Button

    The Button is named button1 and the CheckBox is named checkBox1.

  2. Change the text of the checkBox1 to “Enable button”.  This can be done either in the Properties or in the XAML.

Step 2 – Adding Binding to the Button

  1. In the XAML, locate the button1 element.
  2. Add the following to the button1 element:IsEnabled="{Binding ElementName=checkBox1, Path=IsChecked}"In your project, ElementName could be any item. In this example, we only have two elements so far: button1, and checkBox1.The XAML now looks like this (only two new lines exist):
    <Window x:Class="BindingATextBoxToASlider.Window1"
        xmlns="http://schemas.microsoft.com/winfx/2006/xaml/presentation"
        xmlns:x="http://schemas.microsoft.com/winfx/2006/xaml"
        Title="Window1" Height="300" Width="300">
        <Grid>
            <Button Content="Button" Height="23" Margin="12,34,416,0" Name="button1" VerticalAlignment="Top" Width="75" IsEnabled="{Binding ElementName=checkBox1, Path=IsChecked}"/>
            <CheckBox Content="CheckBox" Height="16" Margin="12,12,408,0" Name="checkBox1" VerticalAlignment="Top" />
        </Grid>
    </Window>
    
  3. Compile and run your program.
  4. Check and uncheck the box an watch the binding do its work as it enables and disables the button.

Ok, so that was pretty cool. We have a simple example of binding one Element to another.

You can shoot yourself in the foot or Don’t be stupid!

Yes, you can shoot yourself in the foot by doing something stupid.

You could bind an element to itself. Let’s try it just so you can see it happen.

Add the same binding you added to button1 to checkBox1.

Compile and see what happens.

Example 2 – Binding and Element’s property to Slider.Value

This example uses a Slider and a TextBox.

Step 1 – Add the elements

  1. Add two items from the Toolbox:
    • TextBox
    • Slider

    The Slider is named slider1 and the TextBox is named textBox1.

Step 2 – Adding Binding to the TextBox

  1. In the XAML, locate the textBox1 element.
  2. Add the following to the textBox1 element:Text="{Binding ElementName=slider1, Path=Value}"ElementName can be any item. In this example, we only have two elements so far: slider1, and textBox1.The XAML now looks like this (only two new lines exist):
    <Window x:Class="BindingATextBoxToASlider.Window1"
        xmlns="http://schemas.microsoft.com/winfx/2006/xaml/presentation"
        xmlns:x="http://schemas.microsoft.com/winfx/2006/xaml"
        Title="Window1" Height="300" Width="300">
        <Grid>
           <TextBox Height="23" Margin="79,62,99,0" Name="textBox1" VerticalAlignment="Top" Text="{Binding ElementName=slider1, Path=Value}"/>
            <Slider Height="22" Margin="79,34,99,0" Name="slider1" VerticalAlignment="Top" />
        </Grid>
    </Window>
    
  3. Compile and run your program.
  4. Slide the slider and watch the binding do its work as its value is displayed in the textBox1 as it changes.

Calculations in XAML Bindings are Unsupported

Ok, so maybe you want to try to do calculations in the XAML Binding. It doesn’t work.

You can enter this and while it will compile, the Binding won’t work:

Text="{Binding ElementName=slider1, Path=(int)Value}"

You can enter this and while it will compile, the Binding won’t work:

Text="{Binding ElementName=slider1, Path=Value + 1}"

Example 3 – Binding and Element’s property to CheckBox.IsChecked

Ok, lets do a slight more complex example. We are going to have more than two elements. We are going to have a ListBox that contains a list of items (ListBoxItems). We are going to have a TextBox that displays the content of the selected item.

Step 1 – Add the elements

  1. Add two items from the Toolbox:
    • TextBox
    • ListBox
  2. Add multiple items to listBox1. This can be done either in the XAML or by clicking on the button for Items in the Properties of the listBox1.

Step 2 – Adding Binding to the TextBox

  1. In the XAML, locate the textBox1 element.
  2. Add the following to the textBox1 element:Text="{Binding ElementName=listBox1, Path=SelectedItem.Content}"Notice that we are using a property of a property for the Path. This is allowed. SelectedItem is a property of listBox1, and Content is a property of SelectedItem.The XAML now looks like this (only two new lines exist):
    <Window x:Class="BindingATextBoxToAListBoxSelectedItem.Window1"
        xmlns="http://schemas.microsoft.com/winfx/2006/xaml/presentation"
        xmlns:x="http://schemas.microsoft.com/winfx/2006/xaml"
        Title="Window1" Height="300" Width="300">
        <Grid>
            <TextBox Height="23" Margin="12,23,12,0" Name="textBox1" VerticalAlignment="Top" Text="{Binding ElementName=listBox1, Path=SelectedItem.Content}"/>
            <ListBox Margin="12,52,12,110" Name="listBox1">
                <ListBoxItem>c:</ListBoxItem>
                <ListBoxItem>d:</ListBoxItem>
                <ListBoxItem>e:</ListBoxItem>
                <ListBoxItem>f:</ListBoxItem>
                <ListBoxItem>g:</ListBoxItem>
                <ListBoxItem>h:</ListBoxItem>
            </ListBox>
        </Grid>
    </Window>
    
  3. Compile and run your program.
  4. Select different items in the list and watch the textBox1 change to display the content of the selected item.

Copyright ® Rhyous.com – Linking to this post is allowed without permission and as many as ten lines of this page can be used along with this link. Any other use of this page is allowed only by permission of Rhyous.com.

WPF Data Binding Tutorial

Introduction

This document assumes that you understand the concepts of object oriented programming and more specifically with C# programming, such as Classes or Objects, Methods, Properties, Events, etc. If not, it will be much harder to follow along.

This tutorial will cover the basics of data Binding in a WPF application. When you are done with this tutorial, you should be able to create a basic WPF-based graphical program that uses Binding. We will cover the different types of data Binding as well as what works and sometimes what doesn’t.

What is data Binding?

The idea of data Binding is to link a variable of any Type (int, string, object, etc…) to a graphical object’s Property that has the same type.

For example, lets say you have a Button object called myButton in your GUI like this: . The words “Click Me!” is a string property in the Button object: myButton.Text.

Imagine you have a string variable called strProperty in some part of your code that on its own has no way to interact with your GUI code. Lets say you want to change the myButton.Text property to match that string variable. Binding allows the button’s text string to always match a string property in some other object not really related to your GUI so if you change strProperty to equal “Enable” your button text will look like . If you then change the strProperty to “Disable” the button text will automatically change to be without out your back end code having to make any interaction with the GUI on its own.

Without Binding, you would have to write code yourself that would interact with the GUI and update the myButton.Text property when ever you update the string in code. In order to do this without Binding, you would also have to intermingle your background code with your GUI code. This can make it difficult to update or modify your GUI because GUI code is strung throughout all parts of your application. You don’t just have to update your GUI, you have to update all your code that interacts with the GUI.

So Binding allows you to have a back end code that is independent of the GUI. This is especially useful when the GUI needs to be updated or improved or when multiple GUIs exists (skins) and you can switch between them.

There are programming styles associated with developing a GUI separate from the back-end. Two of which are Model-View-Control (MVC) or Model-View-ViewModel (MVVM). This tutorial is not going to cover these, however, it is probably wise for you become familiar with these.

However, there is no reason you are limited to Binding to back end code. You can bind to code that is in the WPF GUI and very powerful applications can be written with little to no back end code.

Requirements for data Binding in WPF

In order to using data Binding, you should have the following requirements:

  1. Your project should be a WPF Application, or your project should include a WPF Window or WPF Control.
  2. Objects your elements bind to should implement System.ComponentModel.INotifyPropertyChanged.

Types of data Binding and resources

There is are multiple types of Binding. Elements bind to some type of resource and there are multiple types of resources. Static and Dynamic resource binding which uses the StaticResource Markup Extension or the DynamicResource Markup Extension.

The Binding source can also be “any public property, including properties of other controls, common language runtime (CLR) objects, XAML elements, ADO.NET DataSets, XML Fragments, and so forth.” (Reference: http://msdn.microsoft.com/en-us/magazine/cc163299.aspx).

Go to next: 1.1 Binding one element property to another


Copyright ® Rhyous.com – Linking to this page is allowed without permission and as many as ten lines of this page can be used along with this link. Any other use of this page is allowed only by permission of Rhyous.com.

How to resolve the "Could not create an instance of Type" error when "Reloading the designer" in Visual Studio 2008?

So, I recently started trying to implement the application I am developing using an MVVM model.

However, I ran into this annoying problem where when I have my main window’s XAML code including this line:

            <uc_treeview:PluginTreeViewControl Margin="0,0,0,29" MinWidth="240" />

My PluginTreeViewControl object looks as follows:

using System.Collections.ObjectModel;
using System.Windows.Controls;
using System.Windows.Input;
using LANDesk.HealthCheck.PluginOutput;
using LANDesk.HealthCheckViewer.LoadOnDemand.Sections;

namespace LANDesk.HealthCheckViewer.LoadOnDemand.PluginTreeView
{
    public partial class PluginTreeViewControl : UserControl
    {
        //readonly GroupViewModel mGroup;

        public PluginTreeViewControl()
        {
            InitializeComponent();

            Output o = new Output();
            OutputViewModel viewModel = new OutputViewModel(o.PluginGroups);
            base.DataContext = viewModel;
        }
    }
}

So I found that the lines after the InitializeComponent() function are causing my attempts to “Reload the designer” to fail. If I comment them out, the designer reloads. Of course, then if I have to uncomment them before compiling or debugging, and comment them again, when working in the Designer.

So after a while a thought came to me that maybe their is some type of “if” statement that would be true for the designer but not for runtime. So I researched and found this: DesignerProperties.GetIsInDesignMode Method

After reading about this, I changed my code in my Constructor to this:

    public PluginTreeViewControl()
    {
        InitializeComponent();

        // This "if" block is only for Visual Studio Designer
        if (DesignerProperties.GetIsInDesignMode(this))
        {
            return;
        }
        Output o = new Output();
        OutputViewModel viewModel = new OutputViewModel(o.PluginGroups);
        base.DataContext = viewModel;
    }

And wouldn’t you know it, I have solved the issue entirely. The Designer now reloads just fine (as it doesn’t seem to error) and at run time the “if” statement is always false so the lines I need always run.

Also, the overhead of an “if (DesignerProperties.GetIsInDesignMode(this))” in inconsequential. However, I attempted to remove this overhead in Release builds as follows:

    public PluginTreeViewControl()
    {
        InitializeComponent();

        // This "if" block is only for Visual Studio Designer
        #if DEBUG
        if (DesignerProperties.GetIsInDesignMode(this))
        {
            return;
        }
        #endif
        Output o = new Output();
        OutputViewModel viewModel = new OutputViewModel(o.PluginGroups);
        base.DataContext = viewModel;
    }

Now, I don’t have a problem with my Designer. This workaround makes me super happy!

Learning the Model-View-ViewModel (MVVM) pattern for WPF and C#

So, I recently came across some information on a development style called Model-View-ViewModel or MVVM.

There is a Microsoft article written by Josh Smith about MVVM here:
http://msdn.microsoft.com/en-us/magazine/dd419663.aspx

And an MSDN blog here:
http://blogs.msdn.com/johngossman/archive/2005/10/08/478683.aspx

Basically the idea is that you separate the code for three elements:

There is a book by Josh Smith on Advanced MVVM here:
http://joshsmithonwpf.wordpress.com/advanced-mvvm/

So I have recently become aware of this model and will learning more about this over time.

I am developing an Application at work and I will try to use the MVVM pattern.

How to process command line parameters or arguments in a WPF application?

UPDATE 10/25/2010:
Avoid using Environment.CommandLine. It appears much easier, but isn’t as robust. I learned a while ago that the command line arguments can be accessed using Environment.CommandLine. This is only different than the process below in that it is way easier and the first argument is the full path of the executable. So all this work is not exactly necessary, right? Wrong! I tried Environment.CommandLine for a while and it didn’t last. There are times when this executable is launched by another executable and the Environment.CommandLine is not set even though the other executable launched this executable with parameters. So I had to return to using the steps below anyway.


Ok, so I wanted to handle command line parameters, which is easy in every other language, however, the need for easy was overlooked in WPF. It is not obvious and you are not going to figure it out without being told how to do it.

Microsoft provides a sample here, you can look at.
http://msdn.microsoft.com/en-us/library/aa972153.aspx

I am going to walk you through creating a new WPF Project in Visual Studio 2008. Then I will walk you through handling command line parameters (arguments).

  1. Open Visual Studio 2008.
  2. Go to File | New | Project.
  3. Under Visual C#, choose WPF Application and give the project a name and then hit OK.
  4. Go to Project | ProjectName Properties (where ProjectName is the name of your project).
  5. In the Properties of you project, click on Debug.
  6. Enter three parameters intothe Command line arguments text field: Param1 Param2 Param3
  7. Close the properties window.
  8. Double-click on App.xaml to open it. It looks like this:
    <Application x:Class="ParametersForWPF.App"
        xmlns="http://schemas.microsoft.com/winfx/2006/xaml/presentation"
        xmlns:x="http://schemas.microsoft.com/winfx/2006/xaml"
        StartupUri="Window1.xaml">
        <Application.Resources>
    
        </Application.Resources>
    </Application>
    
  9. Add a carriage return after StartupUri=”Window1.xaml” and start type inside the bracket the word Startup=. As soon as you see an equals sign you will get a pop up with the words . Double-click on that. The name Application_Startup will automatically be added.
    <Application x:Class="ParametersForWPF.App"
        xmlns="http://schemas.microsoft.com/winfx/2006/xaml/presentation"
        xmlns:x="http://schemas.microsoft.com/winfx/2006/xaml"
        StartupUri="Window1.xaml"
        Startup="Application_Startup">
        <Application.Resources>
    
        </Application.Resources>
    </Application>
    

    Note: This will also automatcially update the App.xaml.cs file which originally looks as follows:

    using System.Windows;
    
    namespace ParametersForWPF
    {
        /// <summary>
        /// Interaction logic for App.xaml
        /// </summary>
        public partial class App : Application
        {
        }
    }
    

    But after adding the Startup=”Application_Startup” line, a function called Application_Startup is automatically added.

    using System;
    using System.Collections.Generic;
    using System.Configuration;
    using System.Data;
    using System.Linq;
    using System.Windows;
    
    namespace ParametersForWPF
    {
        /// <summary>
        /// Interaction logic for App.xaml
        /// </summary>
        public partial class App : Application
        {
    
            private void Application_Startup(object sender, StartupEventArgs e)
            {
    
            }
        }
    }
    
  10. Now we only want to work with arguments if there are some, so lets add an if statement inside the Application_Startup function as shown:
            private void Application_Startup(object sender, StartupEventArgs e)
            {
                if (e.Args.Length > 0)
                {
    
                }
            }
    
  11. Ok, so the next step is to create a public static string[] member variable to hold the arguments and assign the arguments array to it. I called my member variable mArgs. I use prefix it with m so I know it is a member variable.
    using System;
    using System.Collections.Generic;
    using System.Configuration;
    using System.Data;
    using System.Linq;
    using System.Windows;
    
    namespace ParametersForWPF
    {
        /// <summary>
        /// Interaction logic for App.xaml
        /// </summary>
        public partial class App : Application
        {
            public static String[] mArgs;
    
            private void Application_Startup(object sender, StartupEventArgs e)
            {
    
                if (e.Args.Length > 0)
                {
                    mArgs= e.Args;
                }
            }
        }
    }
    
  12. Now, in order to access the data in Windows1.xaml.cs, just call the App.mArgs array in the constructor as shown.
            public Window1()
            {
                InitializeComponent();
                String[] args = App.mArgs;
    
            }
    
  13. Put a break point on the line and start with debugging and sure enough you will see your arguments properly assigned to the String[] args variable. So you now have your parameters accessible in your WPF application.Hope this helps you.

    Copyright ® Rhyous.com – Linking to this article is allowed without permission and as many as ten lines of this article can be used along with this link. Any other use of this article is allowed only by permission of Rhyous.com.

Where to get free training and tutorial videos for WPF?

So WPF doesn’t seem very well documented. I have been struggling to find good documentation and learn all its intricacies. I like tutorials and training videos and examples and samples, all of which have been difficult to come by.

So I thought I would share with everyone the following web site where Microsoft provides quite a lot of training videos on WPF.

WPF Videos
http://windowsclient.net/learn/videos_wpf.aspx

If you take time to watch all these videos, you will probably be a master at WPF very quickly.

A good site for learning WPF ListView as GridView development in C# and WPF

So i needed to make a table layout in WPF and I noticed that it is not that simple to learn.

However, I found a really good site that teaches you how to populate a ListView using a GridView from XML, a DataTable, data from a database, etc…

The new WPF GridView customized 1 of 3
http://www.codeproject.com/KB/miscctrl/GridView_WPF.aspx

I spent all day trying to figure out what this site taught me in less than an hour.