Archive for the ‘Mono Develop’ Category.

A Hello World Android App in C#

This post is a continuation of Writing Android apps in C# using MonoDroid.

Writing your first MonoDroid project

Now that you have installed and configured MonoDroid and its prerequisites, you are ready to create your first project.

  1. Open Visual Studio.
  2. Go to File | New | Project.
  3. Choose “Mono for Android”. This is a new project type added by the Mono for Android Visual Studio 2010 Plugin.
  4. Give the project a name and click OK.

You now have a sample MonoDroid app.

Running your first MonoDroid App in an Emulator

Now that you have a sample MonoDroid app, learning to deploy it to an Android device and to test it is the next step.

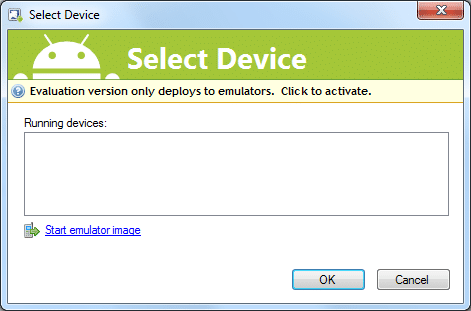
  1. Simply press F5 in your “Mono for Android” Visual Studio project. The following screen appears however, there are no running Android devices.
  2. Click the link to “Start emulator image”.
  3. Wait until your Android emulator starts and you see the graphical display and not just a text display.
  4. Select your emulator from the Running Devices list and click OK.
  5. Wait. It is going to deploy the mono library to your emulator and deploy your app and this can take time.

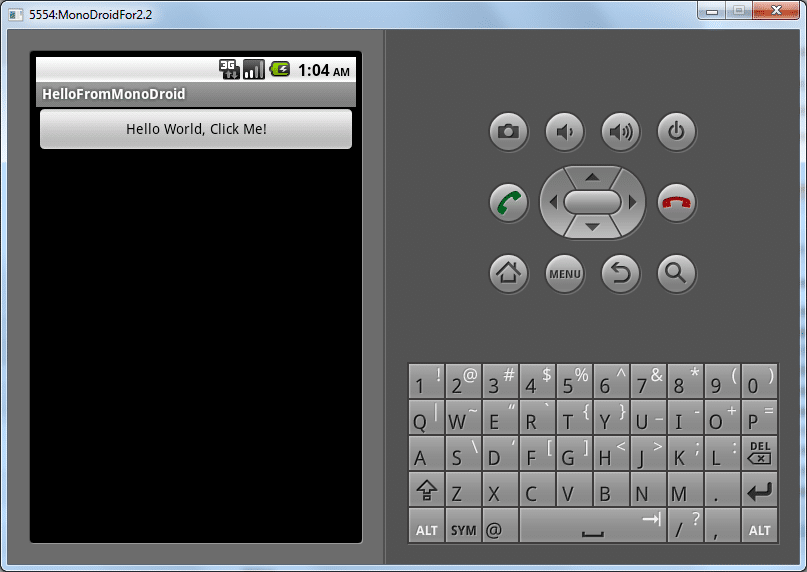
You application should now be running in your Android emulator.

This is just a sample application that increments a counter and displays how many times you have click the button.

You are now ready to start writing your own application.

More Tutorials

Xamarin has multiple Tutorials to help you get a little further along.

MonoDroid Tutororials by Xamarin

Writing Android apps in C# using MonoDroid

As C# developers, many of us would prefer to write Android Apps in C# as well. Novell had promised us MonoDroid, but we were quite concerned as to whether MonoDroid would ever be released when Novell was dismantled.

However, Xamarin spawned from the ashes like a phoenix to restore the viability of MonoDroid, restoring our hopes to writing in C# for the Android platform.

Though I am hopeful that MonoDroid will become popular allowing C# to be a commonly used language for Android devices, there is still some question as to whether Xamarin and its MonoDroid product will survive.

Xamarin is a new company and needs to survive first. Its business is to sell MonoDroid, which is not open source, but is a proprietary product. Unfortunately, MonoDroid may cost too much, preventing adoption among app developers. Xamarin requires a customer base and a continual adoption rate if it is going to survive. If the company folds, what is going to happen to the library and the apps that use it?

Is Development with MonoDroid Free? Yes and No!

Yes and no.

Yes because anybody can use and develop with MonoDroid at no cost. It isn’t until you need to publish an app to the app store that you need to buy a license. You can use the MonoDroid trial for as long as you want. Here is a quote from the trial website. [2]

The evaluation version of Mono for Android does not expire, but enables development and testing against the Android Emulator only.

No, because you need to buy a license once either of the following become true:

  1. You need to test your code directly on a real device and not just an emulated device
  2. You are ready to publish an app to the app store

So what is the cost of MonoDroid? Depends on if you buy Professional, Enterprise, or Enterprise Priority. On the Xamarin store, the following table can be found. To see it you have to add MonoDroid to your cart and then click the “Show product comparison” link. [1]

Professional Enterprise Enterprise Priority
Deploy to your devices Has this feature Has this feature Has this feature
Publish to app stores Has this feature Has this feature Has this feature
Enterprise distribution Has this feature Has this feature
Priority support queue Has this feature
Guaranteed response time Has this feature
License expiration Never Never Never
Update subscription 1 Year 1 Year 1 Year
License usage Original User Seat Seat
Price (USD) $399 $999 $2,499

These costs are very low for business or enterprise customers who have C# developers and want to write Android apps.  The cost of training a C# developer to develop apps for Android in Java may be far greater than training them to develop apps for Android using C# and buying a MonoDroid license.

Is MonoDroid easy to set up?

Update
MonoDroid is not down to a one-click installer.

Here is the old method of Installing without the One-click Installer

MonoDroid is simple to set up.  Xamarin has some simple steps that can be found on their web site. They have MonoDroid installation instructions for installing MonoDroid for use with any of three environments.

  1. Visual Studio  (Important! Visual Studio Express is not supported)
  2. MonoDevelop on Windows
  3. MonoDevelop on Mac OSX

If you don’t have a Visual Studio license and you can’t afford one, then go with MonoDevelop because Visual Studio Express is noted to be enough [3].

However, the Visual Studio install is four simple steps.

  1. Install the Java SDK
  2. Install the Android SDK
  3. Configure your simulator
  4. Install the Mono for Android Visual Studio 2010 Plugin

These are very easy steps to complete, and I won’t repeat the steps here, but once you complete them, you are ready to start writing Android apps in C#.

Once you feel you have everything installed, click the following link to continue reading.

Writing your first MonoDroid project

http://android.xamarin.com/Installation/Windows

10 Step process for developing a new WPF application the right way using C#

It makes a difference if you do something the right way from the beginning.  Everything seems to work out so much better and takes less time over all.

Here are some basic steps that I have learned will help you do it right the first time. These steps are from my experience, mostly because I did it wrong the first few times.  These are not exact steps. They are subject to change and improve.  In fact, you might have improvements to suggest immediately when you read this. But if you are new to WPF, then reading these steps before you start and following them, will have you closer it doing it the right way the first time.  It is much more pleasant to tweak a pretty good process than it is to go in with no idea for a process and do it wrong.

Step 1 – Prepare the idea

  1. Some one has an idea
  2. Determine the minimal features for release 1.
  3. Determine the minimal features for release 2.
    1. Alter minimal features for release 1 if it makes sense to do so.
  4. Determine the minimal features for release 3.
    1. Alter minimal features for release 1 and 2 if it makes sense to do so.

Step 2 – Design the Application’s back end business logic (simultaneous to Step 3)

  1. Design the backend
  2. Apply the “Keep it simple” idea to the business logic and makes changes as necessary.
  3. Apply the “Keep it secure” idea to the business logic and makes changes as necessary.
  4. Repeats steps 2 and 3 if necessary.
  5. Backend development can start now as the UI and the back end should not need to know about each other, though this coding is listed as the Step 5 item.

Step 3 – Design the UI using WPF (simultaneous to Step 2)

  1. Determine what development model should be used to separate the UI from the business logic.
    1. Model-View-ViewModel (MVVM) is the model I recommend for WPF.
    2. Gather libraries used for the model (such as common MVVM libraries that include the common ViewModelBase and RelayCommand objects)
  2. Consider using a 3rd party WPF control set will be used.  Many 3rd party companies provide WPF controls that are better and easier to use than those included by default.
    1. If you decided to use 3rd party controls, purchase or otherwise obtain the libraries for these 3rd party controls.
  3. Consider designing two WPF interfaces or skins (I will call these Views from here on out) for each screen. This will help drive the separation of the back end code from the WPF code. Also if developing two Views is not simple, it indicates a poor design.
  4. Design the interface(s) (you may be doing two Views) using SketchFlow (take time to include the libraries for the 3rd party WPF Controls in your SketchFlow project and design with them)
    1. SketchFlow allows you to design the UI, which is commonly done in paint, but instead does this in XAML, and is actually the WPF code your application will use.
  5. SketchFlow allows you to deliver the design (or both Views if you did two) as a package to the customer.
    1. Deliver it immediately and get feedback.
    2. Make changes suggested by the customer if in scope.
  6. Take time to make the XAML in SketchFlow production ready.
  7. Deliver the XAML to the customer again, to buy of that the design changes are proper.
    1. Make changes suggested by the customer if in scope.

Step 4 – Determine the delivery or install method

  1. Determine the delivery method.
  2. Determine when to develop the delivery method.
    1. The easier the application is, the longer you can wait to determine the installer or delivery method.
    2. The more complex the install or delivery method, the sooner this should be started.

Step 5 – Develop the business logic

  1. Develop the application designed in step 2.
  2. Get the application working without UI or silently. Note: Start the next step, Develop the UI, as soon as enough code is available here.

Step 6 – Add Bindings to the UI

  1. Start the UI project by copying the XAML from the SketchFlow document to your Visual Studio or Expression Blend project.
  2. Determine a method for setting the DataContext without linking the View to any ViewModel or Model dlls.
  3. Create a project for the ViewModel code and develop it to interact with the business logic using Binding.
  4. Remember to develop two Views for every UI screen as this will help, though not guarantee, that the the MVVM model was correctly used.

Step 7 – Develop the View Model

  1. You should now have a backend code and a View, and now you start creating the View Model.
  2. This should be in a separate dll than the View or ViewModel.
  3. The ViewModel should never link to the View but can link to Model and Business libraries, though you may consider interface-based design and only link to an interface library.
  4. Make sure to use the properties that the View is binding to.

Step 8 – Consider a other platforms

Macintosh

Macintosh owns a significant market share.  Determine if this application needs to run on Macintosh as well. Sure, since we are running C# your options are limited to either rewriting in objective C and Coca, or using Mono with a MonoMac UI.  I recommend the latter.

Note: It is critical that the UI and business logic are separated to really make this successful.

  1. Completely ignore the WPF design and have Macintosh users users assist the design team in designing the new UI.  Macintosh’s have a different feel, and trying to convert the same UI is a mistake.
  2. Create the MonoMac UI project.
  3. Create a project similar to the ViewModel project in Windows, to link the UI to the business logic.

BSD/Linux/Unix

BLU (BSD/Linux/Unix) doesn’t exactly own a significant market share. However, it is still important to determine if this application needs to run on on BLU as well. Sure, since we are running C# your options are limited to either rewriting in C++, or using Mono with a GTK# or Forms UI.

  1. Completely ignore the WPF and Macintosh designs and have Linux users assist the design team in designing the new UI. Linux have a different feel, and trying to convert the same UI is a mistake.
  2. Create the GTK# project.
  3. Create a project similar to the ViewModel project in Windows, to link the UI to the business logic.
  4. GTK# doesn’t support binding, but still keep the UI separate from the business logic as much as possible.
  5. Also, don’t develop for a single open source flavor, but use standard code that compiles and any BSD/Linux/Unix platform.

Mobile Platforms

  1. Do you need to have this app on IOS or Android or Windows Phone?
  2. Completely ignore the WPF and Macintosh and Linux designs and have Android or IOS users assist the design team in designing the new UI. Mobile platforms have a different feel, and trying to convert the same UI is impossible as the screens are much smaller.

Step 9 – Develop the delivery method

Again, you may need to do this way sooner if the application is complex.

  1. Develop the install or delivery method.
  2. If you decided to deploy to Macintosh or BLU you may have to develop separate install or delivery methods for those platforms as well.
  3. Remember to have a plan and a test for your first patch even if you have to mock a sample patch before you release.
  4. Remember to have a plan and a test for upgrading your application even if you have to mock a sample upgrade version before you release.

Step 10 – Deliver the finished Products

  1. Once finished, deliver this product.
  2. If you decided to create a Macintosh or BLU version, deliver them when ready as well.  It is OK and maybe preferred to deliver these at different times.

Installing the latest version of Mono on FreeBSD or How to install and use portshaker?

Mono is basically the .NET Framework on FreeBSD or other open source platforms. This allows development in C# on FreeBSD.  C# is an extremely popular language that is not slowing down.  It’s popularity stems from that fact that this language and its features allows for rapid development that is much faster than many other languages.

The version of Mono available in the ports tree is not the latest version available. Just like FreeBSD has a release version and a development version, Mono has a release version and a development version.  The development version is so much newer that it is hard not to recommend it over the release version.

Step 1 – Install the latest ports

This is already documented here:

How to install ports on FreeBSD?

Step 2 – Install portshaker and portshaker-config

The team at BSD# have a tool called portshaker that adds mono ports to the ports tree.  Install it as follows.

#
#
cd /usr/ports/ports-mgmt/portshaker-config
make BATCH=yes install

Note: Notice I didn’t just install portshaker, I installed portshaker-config which has portshaker as a dependency, so you get both installed with one command.

Step 3 – Configure portshaker

The example portshaker.conf.example is configured correctly for default configurations, so all we need to do is copy it.

# cp /usr/local/etc/portshaker.conf.example /usr/local/etc/portshaker.conf

Step 4 – Run portshaker

Yes, it is that easy.  Simply run portshaker.

# portshaker

Note: You may be prompted to merge a few files. I diffed and chose either install or continue each time.

Note: Running portshaker uses subversion to download so if you need to use an HTTP proxy, you have to configure subversion to use an HTTP proxy as it doesn’t use the FreeBSD HTTP_PROXY environment variable.

Your ports tree is now updated by portshaker.

Step 5 – Install mono

The mono port should now be updated to the latest version.

#
#
cd /usr/ports/lang/mono
make BATCH=yes install

Mono is now installed on your system.

There is an example of building a hello world app here:

C# (Mono) on FreeBSD

Binding Visibility to a bool value in WPF

Please go here for updates to this post:

Binding Visibility to a bool value in WPF

I was putting code in my ViewModel that returns Visibility but I didn’t really like that very much. If the UI is created with something other than WPF, that is really not going to work. Since I intend to do cross compile my code in Mono, which doesn’t have WPF but uses either Forms or GTK#, I have already encountered this issue. What I really want to use is bool.

The solution is IValueConverter. If you just want the code and don’t want to read this post, just scroll to the bottom and grab the

IValueConverter is part of PresentationFramework (in PresentationFramework.dll) so it isn’t available in Mono, but that is OK because you don’t instantiate it in the ViewModel, you use it in the View so it will only be used when the GUI is part of WPF. So if you are separating your View into a separate DLL, this would be included in the View DLL, that way when you compile everything else, with say a different GUI that uses GTK#, you won’t get a compiler error because PresentationFramework doesn’t exist in Mono.

BooleanToVisibilityConverter

Well, there is an object already created for you called BooleanToVisibilityConverter, but it is limited. True is converted Visibility.Visible. False is converted to Visibility.Collapsed.

Here we see a problem. Visibility has three possible values but a Boolean only has two.

Boolean Visibility
True Visible
False Collapsed
Hidden

This will cover many of the scenarios, but not all.

Here is how it would be used.

For this example, I have this Person class.

    public class Person
    {
        public Person() { }
        public String FirstName { get; set; }
        public String LastName { get; set; }
        public String Age { get; set; }
    }

Here is a simple View for this object. It has a Grid that has a Label and TextBox for each property in the Person object. It also has a CheckBox. The CheckBox gives us a easy bool value, IsChecked. This works similar to a bool property in a ViewModel.

<Window x:Class="TestBooleanToVisibilityConverter.MainWindow"
        xmlns="http://schemas.microsoft.com/winfx/2006/xaml/presentation"
        xmlns:x="http://schemas.microsoft.com/winfx/2006/xaml"
        xmlns:local="clr-namespace:TestBooleanToVisibilityConverter"
        Title="MainWindow"
        SizeToContent="WidthAndHeight"
        >
    <Grid Margin="20">
        <Grid.RowDefinitions>
            <RowDefinition Height="Auto" />
            <RowDefinition Height="Auto" />
        </Grid.RowDefinitions>
        <Grid Name="PersonViewGrid">
            <Grid.Resources>
                <BooleanToVisibilityConverter x:Key="BoolToVisConverter"/>
            </Grid.Resources>
            <Grid.ColumnDefinitions>
                <ColumnDefinition Width="Auto" />
                <ColumnDefinition Width="Auto" />
            </Grid.ColumnDefinitions>
            <Grid.RowDefinitions>
                <RowDefinition Height="Auto" />
                <RowDefinition Height="Auto" />
                <RowDefinition Height="Auto" />
            </Grid.RowDefinitions>
            <Label Content="First Name:" Grid.Column="0" Grid.Row="0" />
            <TextBox Grid.Column="1" Grid.Row="0" Name="firstNameTextBox"
                     Text="{Binding Path=FirstName, Mode=TwoWay, ValidatesOnExceptions=true, NotifyOnValidationError=true}" MinWidth="175" />
            <Label Content="Last Name:" Grid.Column="0" Grid.Row="1" />
            <TextBox Grid.Column="1" Grid.Row="1" Name="lastNameTextBox"
                     Text="{Binding Path=LastName, Mode=TwoWay, ValidatesOnExceptions=true, NotifyOnValidationError=true}" MinWidth="175" />
            <Label Content="Age:" Grid.Column="0" Grid.Row="2"
                   Visibility="{Binding IsChecked, ElementName=ShowAgeCheckBox, Converter={StaticResource BoolToVisConverter}}"/>
            <TextBox Grid.Column="1" Grid.Row="2" Name="ageTextBox"
                     Text="{Binding Path=Age, Mode=TwoWay, ValidatesOnExceptions=true, NotifyOnValidationError=true}" MinWidth="175"
                   Visibility="{Binding IsChecked, ElementName=ShowAgeCheckBox, Converter={StaticResource BoolToVisConverter}}"/>
        </Grid>
        <Grid Grid.Row="1">
            <CheckBox Name="ShowAgeCheckBox" Content="Show Age" />
        </Grid>
    </Grid>
</Window>

I am not using MVVM for this example, but instead there is a just a single object created in the code behind for demo purposes.

using System;
using System.Windows;

namespace TestBooleanToVisibilityConverter
{
    /// <summary>
    /// Interaction logic for MainWindow.xaml
    /// </summary>
    public partial class MainWindow : Window
    {
        public MainWindow()
        {
            InitializeComponent(); Person p = new Person() { FirstName = "Michael", LastName = "Michaels", Age = "33" };
            PersonViewGrid.DataContext = p;
        }

    }
}

Ok, now build the project and you will see that the Label and TextBox for Age are hidden until you check the box.

Writing your own Bool to Visibility Converter

Sometimes you may need to write you own Converter.  For example, in the above project, it is annoying how the CheckBox moves up and down in position because Visibility.Collapsed is used instead of Visibility.Hidden.  You may want to use Visibility.Hidden instead.

You can write your own Converter that returns Visibility.Hidden instead of Visibility.Collapsed.

BooleanToVisibleOrHidden.cs

using System;
using System.Windows.Data;
using System.Windows;

namespace TestBooleanToVisibilityConverter
{
    class BoolToVisibleOrHidden : IValueConverter
    {
        #region Constructors
        /// <summary>
        /// The default constructor
        /// </summary>
        public BoolToVisibleOrHidden() { }
        #endregion

        #region IValueConverter Members
        public object Convert(object value, Type targetType, object parameter, System.Globalization.CultureInfo culture)
        {
            bool bValue = (bool)value;
            if (bValue)
                return Visibility.Visible;
            else
                return Visibility.Hidden;
        }

        public object ConvertBack(object value, Type targetType, object parameter, System.Globalization.CultureInfo culture)
        {
            Visibility visibility = (Visibility)value;

            if (visibility == Visibility.Visible)
                return true;
            else
                return false;
        }
        #endregion
    }
}

Here we do the conversion ourselves and now we have a different conversion table.

Boolean Visibility
True Visible
Collapsed
False Hidden

Now replace the Converter object in your XAML.  We only change Line 15.

      <local:BoolToVisibleOrHidden x:Key="BoolToVisConverter"/>

This works, but it could be improved. This still leaves us having to choose between two objects.

Creating a Converter that supports a choice of Hidden or Collapsed.

Here we will provide a property that determines if we should collapse or not.

Add a property called Collapse and return the appropriate Visibility based on that property. Here is the new object. As you see, the code changes to add this feature is really just an empty bool property and an if statement that used the bool property.

using System;
using System.Windows.Data;
using System.Windows;

namespace TestBooleanToVisibilityConverter
{
    class BoolToVisibleOrHidden : IValueConverter
    {
        #region Constructors
        /// <summary>
        /// The default constructor
        /// </summary>
        public BoolToVisibleOrHidden() { }
        #endregion

        #region Properties
        public bool Collapse { get; set; }
        #endregion

        #region IValueConverter Members
        public object Convert(object value, Type targetType, object parameter, System.Globalization.CultureInfo culture)
        {
            bool bValue = (bool)value;
            if (bValue)
            {
                return Visibility.Visible;
            }
            else
            {
                if (Collapse)
                    return Visibility.Collapsed;
                else
                    return Visibility.Hidden;
            }
        }

        public object ConvertBack(object value, Type targetType, object parameter, System.Globalization.CultureInfo culture)
        {
            Visibility visibility = (Visibility)value;

            if (visibility == Visibility.Visible)
                return true;
            else
                return false;
        }
        #endregion
    }
}

Now in your XAML you have the option to do nothing, which uses the bool default value false, or to set the Collapse property to true as shown below.

      <local:BoolToVisibleOrHidden x:Key="BoolToVisConverter" Collapse="True"/>

We now support either feature with the following table. We probably at this point would rename the object to BooleanToVisibilityConverter, but Microsoft already took that object name so I will leave it named as is.

Boolean Visibility
True Visible
False – Collapse=True Collapsed
False – Collapse=False Hidden

We are starting to get a little more usability from one object.

Adding the Reverse feature so False is Visible and True is Collapsed or Hidden

Lets say we want to change the CheckBox so that instead of saying “Show Age” it says “Hide Age”.

            <CheckBox Name="ShowAgeCheckBox" Content="Hide Age" />

Now we have to reverse the mapping. If Reverse=”True” we want the mapping to be like this:

Boolean Visibility
False Visible
True – Collapse=True Collapsed
True – Collapse=False Hidden

This is also quite simple. We add another bool property called Reverse. Then key of that in another if statement.

using System;
using System.Windows.Data;
using System.Windows;

namespace TestBooleanToVisibilityConverter
{
    class BoolToVisibleOrHidden : IValueConverter
    {
        #region Constructors
        /// <summary>
        /// The default constructor
        /// </summary>
        public BoolToVisibleOrHidden() { }
        #endregion

        #region Properties
        public bool Collapse { get; set; }
        public bool Reverse { get; set; }
        #endregion

        #region IValueConverter Members
        public object Convert(object value, Type targetType, object parameter, System.Globalization.CultureInfo culture)
        {
            bool bValue = (bool)value;

                if (bValue != Reverse)
                {
                    return Visibility.Visible;
                }
                else
                {
                    if (Collapse)
                        return Visibility.Collapsed;
                    else
                        return Visibility.Hidden;
                }
        }

        public object ConvertBack(object value, Type targetType, object parameter, System.Globalization.CultureInfo culture)
        {
            Visibility visibility = (Visibility)value;

                if (visibility == Visibility.Visible)
                    return !Reverse;
                else
                    return Reverse;
        }
        #endregion
    }
}

Now you can reverse this very easily in the XAML.

      <local:BoolToVisibleOrHidden x:Key="BoolToVisConverter" Collapse="True" Reverse="True" />

And now you have a much more full featured converter.

Additional Thoughts

I have to wonder why the developers didn’t do this originally with the BooleanToVisibilityConverter object. It is so simple. This is a perfect example of where Microsoft would benefit from Open Sourcing some of their code. A dozen people would have contributed this change by now if they had and all Microsoft would have to do is look at the submitted code, approve, and check it in.

C# (Mono) – Reading and writing to a text file

C# (Mono) on FreeBSD
File access is made simple with C# (Mono) on FreeBSD.

Reading a text file with C# (Mono)

To read a file, use a StreamReader object. However, it is easy if you don’t do a new StreamWriter("File.txt") but instead use File.OpenText("File.txt") to create the StreamReader. Once you have the stream, you just need to run the stream’s ReadToEnd() function.

Here is a snippet to read a text file as a string.

// Open the file into a StreamReader
StreamReader file = File.OpenText("SomeFile.txt");
// Read the file into a string
string s = file.ReadToEnd();

Now that you have the text file as a string, you can manipulate the string as you desire.

Writing to a text file with C# (Mono)

To write a text file, use StreamWriter.

string str = "Some text";
// Hook a write to the text file.
StreamWriter writer = new StreamWriter("SomeFile.txt");
// Rewrite the entire value of s to the file
writer.Write(str);

You can also just add a line to the end of the file as follows:

string str = "Some text";
// Hook a write to the text file.
StreamWriter writer = new StreamWriter("SomeFile.txt");
// Rewrite the entire value of s to the file
writer.WriteLine(str);

Example for learning

An example of these in a little project file made with MonoDevelop.

using System;
using System.IO;

namespace FileAccess
{
	class MainClass
	{
		public static void Main (string[] args)
		{
			string FileName="TestFile.txt";

			// Open the file into a StreamReader
			StreamReader file = File.OpenText(FileName);
			// Read the file into a string
			string s = file.ReadToEnd();
			// Close the file so it can be accessed again.
			file.Close();

			// Add a line to the text
			s  += "A new line.\n";

			// Hook a write to the text file.
			StreamWriter writer = new StreamWriter(FileName);
			// Rewrite the entire value of s to the file
			writer.Write(s);

			// Add a single line
			writer.WriteLine("Add a single line.");

			// Close the writer
			writer.Close();
		}
	}
}

Well, this should get you started.

Russian Government going Open Source…and the future

Well, I have seen governments claim they are going to open source before, but not from Russia, and not with such a realistic plan to migrate over a few years.

Here is a link to the article via Google translate:

Putin ordered the transfer of power on Linux

The now

Business drives software development.  Open Source communities help, but even today much of the ongoing development for Linux is driven by businesses such as Red Hat and Novell and others.  If you think your Linux code is being written by unpaid developers in their spare time, you are somewhat correct but only partially.  Most changes are made by developers who are paid.

While communities are nice, they can’t match the hours or output of experienced developers working forty to sixty hours a week.

Looking Ahead…the Apps…and C# (Mono)

The more open source is used in business, the more development power it will have.  But it is not the open source Operatings Systems that prevent people from moving to Linux or BSD.  Ubuntu, SUSE, Fedora, CentOS, PC-BSD, and numerous others are all very usable desktops that are user friendly.  It is the software that runs on them that everyone is waiting for.

The market is already there to make millions extra if you application runs cross platform, one Windows, MAC, Linux, and BSD.

But most the applications written for Windows, the business desktop of today, are using .NET Framework. So naturally those companies are going to want to make their code cross platform.  And they are going to find it is easier than they thought to move their applications between platforms using C#.  I have recently decided that C# is the future of applications on all platforms.

Some MAC and Linux users don’t like Microsoft and will fight off the idea of a Microsoft provided development platform such as C# (Mono) on their systems.  But when a corporation decides that you must run software X, and software X requires .NET, and you have to either give up your MAC or Linux box for a Windows box, or use C# (Mono), then users will come around.

If you are a company writing software for Windows only today and using C#, you need to take a look at Mono. Even if the return on investment of developing a C# (Mono) based version of your product is a slight loss to break even, it is an investment in the future.  Once written, maintenance costs will be less than the original development costs and that slight loss to break even margin will turn to a small profit.  And with the experience, you next app will migrate to C# (Mono) that much easier and soon, all you apps will run anywhere that C# (Mono) can run.

This is going to take off in a way Java hasn’t because developers for windows prefer and will continue to prefer .NET over Java.  And when it comes to business apps, Java just isn’t the language of choice.  Business applications are written in C#.

C# (Mono) on FreeBSD

Well, if you have read my blog at all, you will realize that I have a developer job writing in C# on Windows, but it is my personal hobby to use FreeBSD.

I am very excited about Mono. I love the C# language. I also love FreeBSD.

I am going to go ahead and say something bold. Few people now realize this yet, but the ability to code in C# on open source platforms is going to be the single most important feature in the coming years. It will eventually be a standard library that will exist or be one of the first items installed on every system.

For more information:

http://www.mono-project.com/Mono:FreeBSD
Packaging for Mono and related applications on FreeBSD (http://www.freebsd.org) is handled by the BSD# Project. The purpose of this project is to maintain the existing Mono/C# ports in the FreeBSD ports tree, port new applications, and work on resolving FreeBSD specific issues with Mono. BSD# is entirely user supported and is not an official FreeBSD or Mono project.

For Licensing information:

http://www.mono-project.com/Licensing

Installing Mono

Mono is a port and as always a port is easy to install on FreeBSD.

Note: The version of mono in ports is not necessarily the latest and greated. I recommend that you install the latest version of mono. See this article.
Installing the latest version of Mono on FreeBSD or How to install and use portshaker?

#
#
cd /usr/ports/lang/mono
make BATCH=yes install

Compiling Hello World in Mono

The mono compiler is gmcs. It is simple to compile C# code.

  1. Create a new file called hw.cs. C# class files end in .cs.
  2. Add this text to the file:
    using System;
    
    namespace HelloWorld
    {
         class HelloWorld
        {
            static void Main(string[] args)
            {
                System.Console.WriteLine("Hello World");
            }
        }
    }
    
  3. Save the file.
  4. Compile the code to create an hw.exe program.
    # gmcs hw.cs

Running a Mono Program

Mono programs must be run using the “mono” command.

# mono hw.exe
Hello World

A Mono IDE: MonoDevelop

There is an IDE for Mono called MonoDevelop. MonoDevelop is a port and as always a port is easy to install on FreeBSD.

#
#
cd /usr/ports/devel/monodevelop
make BATCH=yes install

The Mono Develop port integrated with KDE to add itself to the KDE menu under Applications | Development | MonoDevelop. So you can run it from there.

This IDE allows you to create C# solutions. It is possible to run compile them on FreeBSD and run them on Windows, or compile them on Windows and run them on FreeBSD.

Is It Really Cross Platform

C# and Mono are supposed to be cross platform. So I can write it in Windows using Visual Studio or I can write in FreeBSD using Mono Develop and either way it should run on both Windows and FreeBSD and any other platform that supports mono.

So here are the results of my quick tests:

Test 1 – Does the Hello World app run in Windows.

Yes. I copied the file to a Windows 7 64 bit box and ran it. It worked.

Test 2 – Does a GTK# 2.0 Project run in Windows

No. I created a GTK# 2.0 project on FreeBSD in Mono Develop, and didn’t add anything to it, I just compiled it. I copied the file to windows and ran it. However, it crashed.

Supposedly you have to install the GTK# for .NET on the windows box, but it still didn’t work.

Test 3 – Does a Windows Form Application compiled in Visual Studio 2010 in Window 7 run on FreeBSD

Not at first. I created a basic Windows Form application, and didn’t add anything to it, I just compiled it. I copied it to FreeBSD and ran it. It crashed. However, by default .NET 4.0 is used.

Yes, if compiled with .NET 3.5 or earlier. I changed the project to use .NET 3.5 and tried again. It ran flawlessly.

Test 4 – Does a Windows Presentation Foundation project compiled in Visual Studio 2010 in Window 7 run on FreeBSD

No. There is PresentationFramework assembly so the application crashes immediately. I tried multiple .NET versions.

Note: I didn’t really test much more than the basics. I just created new projects, left them as is and tried them. It would be interesting to see a more fully developed application tested and working on both platform and to know what issues were encountered in doing this.

No WPF

Unfortunately there is no WPF and no plans for it. Of course, WPF stand for Windows Presentation Foundation, and so the who “Windows” part of that might need to be changed to something like XPF, Xorg Presentation foundation.

However since there is Moonlight, which is to Silverlight as Mono is to C# and .NET, and Silverlight is a subset of WPF, I have to assume that WPF will arrive in mono eventually, even if it is by way of Moonlight first.