Archive for the ‘Unit Tests’ Category.

Parameter Value Coverage by Type

This article is a reference to Unit Testing with Parameter Value Coverage (PVC).

Primitive or Value Types

See this reference.

Short Name .NET Class Type Width Range (bits)
byte Byte Unsigned integer 8 0 to 255
sbyte SByte Signed integer 8 -128 to 127
int Int32 Signed integer 32 -2,147,483,648 to 2,147,483,647
uint UInt32 Unsigned integer 32 0 to 4294967295
short Int16 Signed integer 16 -32,768 to 32,767
ushort UInt16 Unsigned integer 16 0 to 65535
long Int64 Signed integer 64 -9223372036854775808 to 9223372036854775807
ulong UInt64 Unsigned integer 64 0 to 18446744073709551615
float Single Single-precision floating point type 32 -3.402823e38 to 3.402823e38
double Double Double-precision floating point type 64 -1.79769313486232e308 to 1.79769313486232e308
char Char A single Unicode character 16 Unicode symbols used in text
bool Boolean Logical Boolean type 8 True or false
object Object Base type of all other types
string String A sequence of characters
decimal Decimal Precise fractional or integral type that can represent decimal numbers with 29 significant digits 128 ±1.0 × 10e−28 to ±7.9 × 10e28

byte

  1. Zero, 0, which is also byte.MinValue.
  2. A positive byte between 0 and 255.
  3. byte.MaxValue or 255

sbyte

  1. Zero, 0, which is also sbyte.MinValue.
  2. A positive sbyte between 0 and 127.
  3. A negative sbyte between -128 and 0.
  4. sbyte.MaxValue or 127
  5. sbyte.MinValue or -128

int

  1. A positive int between 0 and 2,147,483,647
  2. A negative int between -2,147,483,648 and 0
  3. Zero, 0
  4. int.MaxValue or 2,147,483,647
  5. int.MinValue or -2,147,483,648

uint

  1. Zero, 0, which is also uint .MinValue.
  2. A positive uint between 0 and 4,294,967,295.
  3. uint .MaxValue or 4,294,967,295

short

  1. A positive short between 0 and 32,767
  2. A negative short between -32,768 and 0
  3. Zero, 0
  4. short.MaxValue or 32,767
  5. short.MinValue or -32,768

ushort

  1. Zero, 0, which is also ushort .MinValue.
  2. A positive ushort, such as 1 through 65,535.
  3. ushort.MaxValue or 65,535

long

  1. A positive long between 0 and 9,223,372,036,854,775,807
  2. A negative long between -9,223,372,036,854,775,808 and 0
  3. Zero, 0
  4. long.MaxValue or 9,223,372,036,854,775,807
  5. long.MinValue or -9,223,372,036,854,775,808

ulong

  1. Zero, 0, which is also ulong.MinValue.
  2. A positive ulong between 0 and 18,446,744,073,709,551,615.
  3. ulong.MaxValue or 18,446,744,073,709,551,615

float

  1. A positive float between 0 and 3.402823E+38
    1. Note: This includes the float.Epsilon, but you could test double.Epsilon separately
  2. A negative float between -3.402823E+38 and 0
  3. Zero, 0.0
  4. float.MaxValue or 3.402823E+38
  5. float.MinValue or -3.402823E+38
  6. float.NaN
  7. float.PositiveInfinity
  8. float.NegativeInfinity

double

  1. A positive double between 0 and 1.79769313486232E+308
    1. Note: This includes the double.Epsilon, but you could test double.Epsilon separately
  2. A negative double between -1.79769313486232E+308 and 0
  3. Zero, 0.0
  4. double.MaxValue or 1.79769313486232E+308
  5. double.MinValue or -1.79769313486232E+308
  6. double.NaN
  7. double.PositiveInfinity
  8. double.NegativeInfinity

decimal

  1. A positive double between 0 and 79,228,162,514,264,337,593,543,950,335
  2. A negative double between -79,228,162,514,264,337,593,543,950,335 and 0
  3. Zero, 0
  4. double.MaxValue or 79,228,162,514,264,337,593,543,950,335
  5. double.MinValue or -79,228,162,514,264,337,593,543,950,335

string

  1. A null string
  2. An empty string, String.Empty, or “”
  3. One or more spaces ” “
  4. One or more tabs ” “
  5. A new line or Environment.NewLine
  6. A valid string.
  7. An invalid or junk string
  8. A string with many special characters: `~!@#$%^&*()_-+=,.<>/\?[]{}|
  9. Unicode characters such as Chinese
  10. An long string, over 256 characters, or even 1 million characters.
  11. (Occasionally) Case sensitivity. For example, for string comparisons, case sensitivity of a string is a required Parameter Value Coverage test.

Struct

  1. This one takes thought. You need to define this per struct you create. For example, if your struct is a point with int values X and Y, then it is simply the int list above twice, once for X and once for Y.

Enum

  1. Any of the enums.
  2. You may need to do each of the enums, depending on how your enum is used.

Class or Reference Types

Class Object

Objects that are defined with the class keyword need the following tested:

  1. Null (This might go away or become optional in .NET 4.8)
  2. Instantiated
  3. Class properties can be primitive or value types, reference types, etc., and may need to be tested according to the type of the property.

Array, List, Dictionary, and other collections

Array, List, Collection

  1. Null
  2. Empty (instantiated with no items)
  3. Not empty but values of array are tested according to the value type. For example, an int[] would need to have the values tested in the ways listed above for int.
    1. Pay attention to how the code you are testing uses teh items in an array or list. If the items are objects, do you need to check if the list has a null item in the list?

Dictionary

  1. Null
  2. Empty (instantiated with no items)
  3. Key exists
  4. Key doesn’t exist
  5. Value at key is tested according to its value type. For example, a Dictionary<string, int> would need to have the values tested in the ways listed above for int.

Excluding Integration and other tests when running Unit Tests locally in Visual Studio

Often, a solution may have both Unit Tests and Integration Tests. Unit Tests should be highly specific, and should be testing one class object. Integration Test could be vastly more complex and could use Selenium, or require a real database server, etc. Even if a solution doesn’t have Integration Tests, it may have slow Unit Tests. For example, I have a test that takes about 2 minutes to run because it is testing that when creating 10 million random strings, the character distribution is pretty equal.

I don’t want to either slow Unit Tests or Integration Tests to run every single time I build on my local dev box. I do have an automated build system and builds kick off on check-in. At that time, these slow tests will run every time. But locally, it is just an unnecessary delay.

Usually I am writing in a specific project and that project has specific tests and I can easily choose to only run tests in my current project. But what if I am updating a library that many projects use. I want to know quickly if anything is broke, so I need to run most of the tests in the entire solution.

Visual Studio allows for tests to be tagged with a TestCategoryAttribute.

You can mark different tests with different names: [TestCategory(“Slow”)], [TestCategory(“Integration”)], [TestCategory(“Performance”)], [TestCategory(“Selenium”)]

Example:

[TestMethod]
[TestCategory("Slow")]
public void TestDistributionInTenMillionCharacters()
{
    // some code here
}

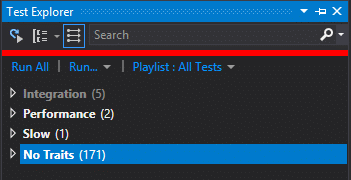
All other tests are left without a test category. Now, if you want to run all tests that aren’t slow, you can do this in Visual Studio Test Explorer by grouping tests using the “Traits” selection option.

Once you have marked all tests with an appropriate TestCategoryAttribute, you can sort by Trait. Now it is simple to click-to-highlight the No Traits group and click Run | Selected Tests.

Eliminating Cylclomatic Complexity by replacing switch/case with a method or a Dictionary<TKey, func<>>

Cyclomatic Complexity is a measurement of how many paths your code could traverse. Switch/case statements are often immediate Cyclomatic Complexity concerns.

Cyclomatic Complexity Example

Imagine the following code:

public void Foo(int val)
{
    switch (val)
    {
        case 0:
            // ... code here
            break;
        case 1:
            // ... code here
            break;
        case 2:
            // ... code here
            break;
        case 3:
            // ... code here
            break;
        case 4:
            // ... code here
            break;
        case 5:
            // ... code here
            break;
        case 6:
            // ... code here
            break;
        case 7:
            // ... code here
            break;
    }
}

In the above code, there are 8 paths. The Cyclomatic Complexity is not small. This makes unit tests difficult. It is complexity that is unnecessary. Unnecessary complexity leads to bugs.

Replacing a switch/case statement

Almost invariably, the switch/case statement can be replaced in a way that removes the cyclomatic complexity.

Note: While this article is about C#, it might be helpful to note that Python didn’t even implement a switch/case statement.

There are three replacements methods I am going to dicuss here.

  1. Replace with a Method
  2. Replace with a Method and a dictionary provided parameter.
  3. Replace with Dictionary<TKey, Func<>>

To know which one to choose, you have analyze the code. In the above example, I left out the code. I just put a place holder for it.

// ... code here

After analyzing the code, you should be able to pick one of the following:

Method

So you should use a method if you can.

Example 1
Imagine the following snippet. This is an easy one. You should pick out the replacement without having to be told what it is.

public void Foo(int val)
{
    switch (val)
    {
        case 0:
            Bar.Do(0);
            break;
        case 1:
            Bar.Do(1);
            break;
        case 2:
            Bar.Do(2);
            break;
        case 3:
            Bar.Do(3);
            break;
        // , ... , 
        case 7:
            Bar.Do(7);
            break;
    }
}

As you can see here, each method is easily following a pattern. We can replace the switch statement with a single method call.

public void Foo(int val)
{
    Bar.Do(val);
}

Look, that one was obvious and it was intended to be obvious. It isn’t always going to be obvious.

Example 2
Imagine the following snippet. This is also an easy one, but not quite as easy as above. Hopefully, you pick out the replacement without having to be told what it is.

public void Foo(int val)
{
    switch (val)
    {
        case 0:
            Bar.Do0();
            break;
        case 1:
            Bar.Do1();
            break;
        case 2:
            Bar.Do2();
            break;
        case 3:
            Bar.Do3();
            break;
        // , ... , 
        case 7:
            Bar.Do7();
            break;
    }
}

Notice there is a pattern. We know the method name to call on Bar because we can see the pattern: “Do” + val

We could easily use reflection to eliminate cyclomatic complexity here.

Note: While reflection is often deemed slow and a cause of performance issues, in practice, unless looping through large data sets, any performance loss from reflection is not measurable.

public void Foo(int val)
{
    typeof(Bar).GetMethod("Do" + val).Invoke();
}

We traded Cyclomatic Complexity for Reflection and a possible, but unlikely performance issue. If this code is used in a loop for millions of instances in a data set, you might not want to do this.

Method and a dictionary provided parameter

Example 1
Imagine the code is more like this, in which different case statements call different overloaded values.

public void Foo(int val, ObjA a)
{
    switch (val)
    {
        case 0:
            Bar.Do(a, 3);
            break;
        case 1:
            Bar.Do(a, 7);
            break;
        case 2:
            Bar.Do(a, 5);
            break;
        case 3:
            Bar.Do(a, 100);
            break;
        case 4:
            Bar.Do(a, 9);
            break;
        case 5:
            Bar.Do(a, 12);
            break;
        case 6:
            Bar.Do(a, -1);
            break;
        case 7:
            Bar.Do(a, int.MaxValue);
            break;
    }
}

So every case statement is doing something different. However, notice that what it does differently is a static int. We can create a static parameter dictionary of type Dictionaryint, int>.

internal Dictionary<int, int> ParamMap = new Dictionary<int, int> { {0,3}, {1,7}, {2,5}, {3,100}, {4,9}, {5,12}, {6,-1}, {7, int.MaxValue } };

public void Foo(int val, ObjA a)
{
    Bar.Do(a, ParamMap[val]);
}

This uses a static, prebuilt dictionary that completely eliminates Cyclomatic Complexity.

Notice all the Cyclomatic Complexity is gone. This code never branches. There is very little left to test.

Example 2
Imagine the code is more like this, in which different case statements call different overloaded values.

public void Foo(int val, ObjA a, ObjB b, ObjC c)
{
    switch (val)
    {
        case 0:
            Bar.Do(a);
            break;
        case 1:
            Bar.Do(b);
            break;
        case 2:
            Bar.Do(c);
            break;
        case 3:
            Bar.Do(a, c);
            break;
        case 4:
            Bar.Do(b, c);
            break;
        case 5:
            Bar.Do(b, c, a);
            break;
        case 6:
            Bar.Do(b, c, a * .01);
            break;
        case 7:
            Bar.Do(a, b, c);
            break;
    }
}

This looks harder doesn’t it. The Cyclomatic Complexity can still be simplified. How are we going to do it?

Well, one option is to use a Dictionary<int, object[]>.

public void Foo(int val, ObjA a, ObjB b, ObjC c)
{
    var Dictionary<int, object[]> paramMap = new Dictionary<int, object[]>();
    paramMap.Add(0, new []{ a });
    paramMap.Add(1, new []{ b });
    paramMap.Add(2, new []{ c });
    paramMap.Add(3, new []{ a, c });
    paramMap.Add(4, new []{ b, c });
    paramMap.Add(5, new []{ b, c, a });
    paramMap.Add(6, new []{ b, c, a * .01 });
    paramMap.Add(7, new []{ a, b, c });
    typeof(Bar).GetMethod("Do").Invoke(paramMap[val]); // Reflection allows for passing in a dynamically sized list of parameters.
}

The solution is almost exactly the same as above. The differences are:

  1. The dictionary is dynamic, based on the passed in parameters, so we have to build it dynamically.
  2. The parameters are dynamic so we call the method with reflection to allow for dynamic parameters.

The dictionary still completely eliminates Cyclomatic Complexity. Notice all the Cyclomatic Complexity is gone. This code never branches. There is very little to test.

There is the overhead of creating a Dictionary and the overhead of reflection, but again, unless you plan to use this for looping through large data sets, the performance difference is negligible.

Dictionary<TKey, Func<>>

Sometimes there isn’t much common at all. Sometimes, the complexities very greatly.

public void Foo(int val, Obj a)
{
    switch (val)
    {
        case 0:
            // ... code goes here
            break;
        ....
    }
}

Imagine the code in the “code goes here” section is vastly different. Imagine you just can’t find much common ground. In these situations, you can use Dictionary<TKey, Func<>>. The pattern is to put the dictionary in its own class file. Then the object that uses it can have an injectable IDictionary<TKey, Func<>>. Injection options are: Constructor injection, Method injection, property injection. I lean toward a property injection variation called a Lazy Injectable Property.

Question: What generic paramaters should be used for the Dictionary?
Answer: The TKey is clearly the type of the val property, which in the example is an int.

Question: What generic parameters should be used for the Func<>?
Answer: Well, you need to think through to get this answer. First, you need to find the Lowest Common Parameter Set. Second you need to check the return type.

Finding the Lowest Common Parameter Set

If you look at one of the above methods, you can easily get the lowest common parameter set by writing down each and every parameter pass in. Remember this method from above in Example 2?

public void Foo(int val, ObjA a, ObjB b, ObjC c)
{
    // Switch/case statement here . . .
}

The lowest common parameter set is: a, b, c. If you look at the full implementation further up, you will notice that none of the methods take in val, so val is not included in the parameter set as it is the Dictionary’s key.

So now we can create our Dictionary. We will have three input parameters.

Note: Not all variables are passed in. Some may be local to the class or method.

Action<> vs Func<>

This is easy. The only notable difference is that Action<> takes in parameters and returns void. Func<> takes in parameters and returns the type specified in the last generic type.

So as there is no return value in the above example, we can use this code:

public Class FuncDictionary : Dictionary<int, Action<ObjA, ObjB, ObjC>>
{
    public FuncDictionary()
    {
        this.Add(0, (a, b, c) => { Bar.Do(a); } ); // Parameters b, c are ignored. That is ok.
        this.Add(1, (a, b, c) => { Bar.Do(b); } );
        this.Add(2, (a, b, c) => { Bar.Do(c); } );
        this.Add(3, (a, b, c) => { Bar.Do(a, c); } );
        this.Add(4, (a, b, c) => { Bar.Do(b, c); } );
        this.Add(5, (a, b, c) => { Bar.Do(b, c, a); } );
        this.Add(6, (a, b, c) => { Bar.Do(b, c, a * .01); } );
        this.Add(7, (a, b, c) => { Bar.Do(a, b, c); } );
    }
}

Now look at the foo code.

// Lazy injectable property
internal IDictionary<int, Action<ObjA, ObjB, Objc> ActionDictionary
{
    get { return _ActionDictionary ?? (_ActionDictionary = new FuncDictionary()); }
    set { _ActionDictionary = value; }
} private IDictionary<int, Action<ObjA, ObjB, Objc> _ActionDictionary;

public void Foo(int val, ObjA a, ObjB b, ObjC c)
{
    ActionDictionary[val].Invoke(a, b, c);
}

In all the previous methods, we resolved Cyclomatic Complexity by taking a method with 8 branches, and reducing that 1 method to 0 branches. We can also get 100% code coverage with 1 unit test.

1, Methods
0, Cyclomatic Complexity

In this final Dictionary<TKey, Func<>> example, we end up with 8 methods that need testing.

8, Methods
0, Cyclomatic Complexity each

We still have to test all 9 methods (8 funcs in in the FuncDictionary and the original method). However, when that work was in the switch/case statement, that code would be harder to isolate for unit tests. With the refactor to Dictionary<TKey, Func<>>, all eight methods are isolated and unit tests are simplified. The single responsibility is followed. The code is simply S.O.L.I.D. You could even inject interfaces with Dependency Injection that provide those methods. The Switch/Case statement appeared easier to write, but it usually leads to more code coupling, makes code harder to unit test and maintain; not to mention adds difficulty to future edits or replacing code, or the difficulty of dependency injection.

Unit testing calls to complex extension methods

This article isn’t about unit testing an extension method. That is pretty straight forward. This article is about unit testing and object that calls an extension method where the extension method is difficult to test. Likely the method is difficult to test because it touches an external system, such as a database or a remote web service.

If you have an extension method that is simple and doesn’t touch and external system, it is easy to unit test. Look at the example below. There is nothing blocking you from Unit Testing code that calls this method.

public static int Add(this int left, int right) 
{
    return left + right;
}

Now image the extension method is more complex, say for a shopping cart.

public static void PlaceOrder(this Order order) 
{
    SaveToDb(Order);
    ChargeCreditCard(Order.CreditCardDetails);
}

How are you going to unit test code that calls an extension method that place an order and charges a customer’s Credit Card. Yikes. That is little harder to Unit Test, right?

How to Unit Test a call to a complex extension method

Imagine you have the following code:

  1. An object you are test called ObjectUnderTest
    public class ObjectUnderTest
    {
        private void MyObject = new MyObject();
    
        public object SomeFunction() 
        {
            return myObj.DoWork(val);
        }
    }
    
  2. An dependent object MyObject : IMyObject
    public class MyObject : IMyObject
    {
     // ... some code
    }
    
  3. An extension method on IMyObject: DoWork(this IMyObject obj, string value).
    public static object DoWork(this IMyObject obj, string value)
    {
        // really complex stuff and touches external systems
    }
    

You need Unit Tests for SomeFunction(). Imagine that all other code is 100% unit tested. But you are struggling with how to Unit Test SomeFunction because it has two dependencies:

  1. MyObject
  2. DoWork

The Unit Tests should not call the real DoWork because it does really complex stuff and touches external systems. However, you need the parent method to provide a valid return value.

Well, you could just drop the ExcludeFromCodeCoverageAttribute on the method and move on. But what if there are a half-dozen other objects that call the parent method that also need to be tested and they need a return value from SomeFunction()? It would be best to solve this in this object as so you only change one class file, not a half-dozen.

One option to resolve this is to use dependency injection. Dependency Injection (DI) simply means that any dependencies can be injected. When some people hear DI, they think they immediately need the huge overhead of an IoC Container. IoC containers are nice and have their uses. But using an IoC container only to allow unit tests substitute a dependency is a huge overkill. If your project already has an IoC container, feel free to use it. Otherwise, I recommend you use a simpler option. I prefer an internal lazy injectable property.

Creating a Lazy Injectable Property

An internal lazy injectable property is a property that is instantiated on first use if it is null, but always for code with internal access to swap out the property value. Here is the syntax:

Note: This assumes your unit tests references your project already, has InternalsVisibleTo configured, and has Moq from NuGet applied to the test project.

    internal IMyObject MyObjectProperty
    {
        get { return _MyObject ?? (_MyObject = new MyObject()); }
        set { _MyObject= value; }
    } private List<object> _MyObject;

Look how simple the above code is. If _MyObject is null, the first time MyObjectProperty is called, it is instantiated to a new MyObject().It is internal because only the unit test will every replace it. I don’t really want this property exposed elsewhere. We can use InternalsVisibleTo to allow the Unit Tests access.Now my ObjectUnderTest will look like this:

public class ObjectUnderTest
{
    internal IMyObject MyObjectProperty
    {
        get { return _MyObject ?? (_MyObject = new MyObject()); }
        set { _MyObject= value; }
    } private IMyObject _MyObject;

    public object SomeFunction()
    {
        var val = "doesn't matter for this example";
        return MyObjectProperty.DoWork(val);
    }
}

Now, in the unit test, the MyObjectProperty can be replaced with a mock IMyObject.

[TestMethod]
public void SomeFunctionTest()
{    // Arrange
    var mockMyObject = new Mock<IMyObject>();
    var objUnderTest = new ObjectUnderTest();
    objectUnderTest.MyObjectProperty = mockMyObject.Object;

    // More to come . . .
}

However, it is questionable whether this is even necessary. Does MyObject do anything that requires this level of abstraction? Not in this example. It isn’t the object itself that is complex, it is the extension method that really needs to be injectable.

Creating a Lazy Injectable Property for a method

You might be asking yourself, “What about the extension method? It is a method not an object. How can I inject that?” Well, you can. Remember, even methods can be treated as objects. The answer doesn’t change much. The only difference is understanding how to treat a method as an object.You can objectify methods using multiple objects such as Action, Func, Predicate, delegate, etc. I am not going to go into how to do that here beyond the minimal needed to accomplish this task.

Quick tip: Use Action for void methods, Predicate for methods return bool, Func for methods with any return value, delegate if you have ref or out paramters.

Here are the steps:

  1. Create the following Lazy Injectable Property inside ObjectUnderTest:

    Note: I am using Func because it has a return value of object. (See the Quick Tip a few lines up.) Since I have two paramters and a return type, I will specifically use the generic Func.

        internal Func<IMyObject, string, object> DoWorkMethod
        {
            [ExcludeFromCodeCoverage]
            get { return _DoWorkMethod ?? (_DoWorkMethod = (obj, val) => { return obj.DoWork(val); }); }
            set { _DoWorkMethod = value; }
        } private Func<IMyObject, string, object> _DoWorkMethod;
    
  2. Change SomeFunction() to run the method via the Action object instead of running the method directly.
        public object SomeFunction()
        {
            var val = "doesn't matter for this example";
            return DoWorkMethod.Invoke(MyObjectProperty, val);
        }
    
  3. In your Unit Test, you can create your ObjectUnderTest. Then you can swap out the DoWork method object.
    [TestMethod]
    public void SomeFunctionTest()
    {
        // Arrange
        var mockMyObject = new Mock<IMyObject>();
        var objUnderTest = new ObjectUnderTest();
        objUnderTest.MyObjectProperty = mockMyObject.Object;
        bool methodWasCalled = false;
        objUnderTest.DoWorkMethod = (obj, val) => {
            methodWasCalled = true;
            return new object();
        };
            
        // Act
        var result = objUnderTest.SomeFunction();
    
        // Assert
        Assert.IsTrue(methodWasCalled);
    }
    

You are now 100% covered. The only code we can’t cover is the lambda call to obj.DoWork because we can’t Unit Test that as it touches an external system. Which is why we marked it with the ExcludeFromCodeCoverageAttribute.

A simple C# factory class

I have a project that is pretty small. Despite the small size, it is well-designed, using multiple layers, and interfaces, dependency injection, and unit tests. I need to create a production object at runtime and a mocked object at test time. I could easily use an IOC container. The problem with that is that most IOC containers (Autoface, Castle Windsor, Unity, etc.) are larger than my entire project. While I am a proponent of using IOC containers in large projects, I’m not a big proponent of using them in very small projects.

To make my code more unit testable, I am using a project called SystemWrapper that wraps standard system calls in an Interface and a Wrapper. Again, because my project is small, I didn’t bring in the SystemInterfaces and SystemWrapper dlls. This wrapper includes an ISmtpClient and an SmtpClientWrap object and I only brought in those two class files. The business logic uses the interface, ISmtpWrapper. This allows for me to unit test it by injecting a mock ISmtpClient.

I needed a simple factory that creates a new SmptClient in production runtime but allows for my unit test to create and use a mock ISmptClient during unit test time.

Here is what my factory should do:

Production

  1. Create a new SmptClientWrap object (which wraps an System.Net.SmptClient oject).
  2. Use setting from the app.config or web.config for the mail server, domain, user, and password.

Unit Test

  1. Create an mock of ISmptClient (using Moq).

Here is the simple factory class that I wrote:

using System.Configuration;
using System.Net;
using SystemInterface.Net.Mail;
using SystemWrapper.Net.Mail;

namespace Rhyous.System.Factory
{
    public class SmtpClientFactory
    {
        public ISmtpClient GetNewSmtpClient()
        {
            return CreateCredentialsMethod();
        }

        public delegate ISmtpClient CreateCredentialsDelegate();

        public CreateCredentialsDelegate CreateCredentialsMethod = () => new SmtpClientWrap(ConfigurationManager.AppSettings["SmtpServer"])
        {
            Credentials = new NetworkCredential
            {
                Domain = ConfigurationManager.AppSettings["SmtpDomain"],
                UserName = ConfigurationManager.AppSettings["SmtpUser"],
                Password = ConfigurationManager.AppSettings["SmtpPassword"]
            }
        };
    }
}

In the above class, the GetNewSmptClient returns an ISmtpClient. I use a delegate to create a concrete ISmtpClient called SmtpClienWrap. The default delegate implementation gets the data from the app.config or web.config.

Now I can inject a concrete ISmtpClient into my code:

    using (var smtpClient = SmtpClientFactory.GetNewSmtpClient())
    {
        var mailer = new Mailer(smtpClient);
    }

Note: I could make SmptClientFactory static or make it a singleton. I’m thinking about both.

Now in a test, I am able to create a mock ISmtpClient. Here is an example.

        [TestMethod]
        public void ReplacingTheCreateCredentialsDelegateWorks()
        {
            var factory = new SmtpClientFactory();
            bool _wasCalled = false;
            factory.CreateCredentialsMethod = () =>
            {
                _wasCalled = true;
                return new Mock<ISmtpClient>().Object;
            };
            var client = factory.GetNewSmtpClient();
            Assert.IsTrue(_wasCalled);
        }

The one problem with my factory is that it is pretty specific to one class. It might be interesting to make it more generic.

using System;

namespace Rhyous.Factory
{
    public class ObjectFactory<TInterface, TObject>
        where TInterface : class
        where TObject : TInterface, new()
    {
        public TInterface GetNewObject()
        {
            if (!typeof(TInterface).IsInterface)
            {
                throw new Exception("The first generic, TInterface, must be an interface.");
            }
            return CreateObjectMethod();
        }

        public delegate TInterface CreateObjectDelegate();

        public virtual CreateObjectDelegate CreateObjectMethod
        {
            get
            {
                return _CreateObjectMethod ?? (_CreateObjectMethod = () => Activator.CreateInstance<TObject>());
            }
            set { _CreateObjectMethod = value; }
        }
        public CreateObjectDelegate _CreateObjectMethod;
    }
}

Now I move my delegate (which is creation method of the factory) upstream to where I instantiate the factory.

    var smtpClientFactory = smtpClientFactory = new ObjectFactory<ISmtpClient, SmtpClientWrap>
                    {
                        CreateObjectMethod = () => new SmtpClientWrap(ConfigurationManager.AppSettings["SmtpServer"])
                        {
                            Credentials = new NetworkCredential
                            {
                                Domain = ConfigurationManager.AppSettings["SmtpDomain"],
                                UserName = ConfigurationManager.AppSettings["SmtpUser"],
                                Password = ConfigurationManager.AppSettings["SmtpPassword"]
                            }
                        }
                    };

    // Then later use the factory...

    using (var smtpClient = smtpClientFactory.GetNewSmtpClient())
    {
        var mailer = new Mailer(smtpClient);
    }

Anyway, have fun with this mini-factory. It might be useful on small projects where you don’t want an entire IOC container.

Hidden Cyclomatic Complexity due to Parameter Value Coverage

Cyclomatic Complexity

Cyclomatic complexity is the number of branches found in code.

For example:

public int Add(int x, int y)
{
     return x + y;
}

This appears to have a cyclomatic complexity of 1 as there are no branches in your code. One test will give you 100% code coverage.

Detecting Hidden Cyclomatic Complexity

If you have read about Parameter Value Coverage (PVC) you would be aware that some code will do different things without branching in your code. Perhaps the branch occurs in the underlying code. This is still complexity that your code needs to be tested for.

Example 1

Look at the above Add(int x, int y) method. This appears to have a cyclomatic complexity of 1 as there are no branches in this code. One test will provide 100% code coverage if you count coverage by lines.

However, what if your coverage includes different possibilities for the different possible values of your method parameters? What are the possibilities for an int? Well, this example is in C#, so we will assume C# rules. In C#, an int can’t be null. It can be positive, negative or 0. It also has a max value and a minimum value. That is 5 different options that may be involved in Cyclomatic Complexity.

int result = Add(2147483647, 1);

The above code will not result in the answer being 2147483648.

However, the code doesn’t branch if the options are positive, negative, or 0. They code only behaves different if the combination of both values overflow the integer by going above int.MaxValue or below int.MinValue. So the Cyclomatic complexity is 3. It isn’t 1 as most people would assume at first glance.

Example 2

Also look at this simple divide method. This appears to have a cyclomatic complexity of 1 as there are no branches in this code. One test will provide 100% code coverage if you count coverage by lines. However, your code does react differently due to different possibilities for the different possible values of your method parameters.

public int divide(int x, int y)
{
     return x / y;
}

In the above method what happens when either parameter value is 0? Will your code behave the same as if two non-zero values are passed in? Or is there hidden cyclomatic complexity?

Taking into account the hidden cyclomatic complexity, do you still feel this code will never branch? Or do different parameter values cause it to branch? What is the Cylomatic complexity of this method?

If the second value is 0, the code is going to throw a DivideByZeroException. Really, that is the only difference. Since this is divide, it is impossible to overflow the integer, so int.MaxValue and int.MinValue don’t come into play. So the cyclomatic complexity is 2, not 1.

Conclusion

Cyclomatic Complexity is a great tool to measure the complexity of you code. However, failure to test and measure for different possible parameter values can give one a false sense of simplicity and an incorrect Cyclomatic Complexity score.

Branching can occur even in a single line of code. You have been warned!

Row Tests or Paramerterized Tests (MsTest) – Xml

In a previous post, I discussed Parameter Value Coverage (PVC). One of the easiest ways to add PVC to your test suite is to use Row Tests, sometimes called Parameterized Tests. Row test is the idea of writing a single unit test, but passing many different values in.

Different testing frameworks implement row tests differently.

MsTest uses an attribute called DataResourceAttribute. This supports anything from a csv, Excel file or xml, to a full-blown database.

For a single Unit Test, NUnit’s Row tests are far superior. However, for a larger test project, you will see that DataSourceAttribute with external data sources, scales nicely and compares to NUnits TestCaseSource. However, it is not as easy to get it right the first time. It needs a step by step tutorial.

Step 1 – Create a the Project

  1. In Visual Studio click File | New | Project.
  2. Select Unit Test Project for C#.
  3. Give it a name and a path and click OK.

Step 2 – Add an Xml file

  1. Create a folder in your visual studio project called Data.
  2. Right-click on the data folder and choose Add | New Item.
  3. Create new Xml file named: Data.xml
  4. Add the following to the Xml.
<?xml version="1.0" encoding="utf-8" ?>
<Rows xmlns:xsi="http://www.w3.org/2001/XMLSchema-instance"
      xmlns:x="urn:Row">
  <!-- Schema -->
  <xsd:schema targetNamespace="urn:Row" attributeFormDefault="unqualified" elementFormDefault="qualified" xmlns:xsd="http://www.w3.org/2001/XMLSchema" >
    <xsd:element name="Row">
      <xsd:complexType>
        <xsd:sequence>
          <xsd:element type="xsd:int" name="Value1"/>
          <xsd:element type="xsd:int" name="Value2"/>
          <xsd:element type="xsd:int" name="ExpectedValue"/>
          <xsd:element type="xsd:string" name="Message"/>
        </xsd:sequence>
      </xsd:complexType>
    </xsd:element>
  </xsd:schema>
  <!--End Schema-->
  <x:Row>
    <x:Value1>3</x:Value1>
    <x:Value2>2</x:Value2>
    <x:ExpectedValue>2</x:ExpectedValue>
    <x:Message>2 is less than 3</x:Message>
  </x:Row>
  <x:Row>
    <x:Value1>-1</x:Value1>
    <x:Value2>0</x:Value2>
    <x:ExpectedValue>-1</x:ExpectedValue>
    <x:Message>-1 less than 0</x:Message>
  </x:Row>
  <x:Row>
    <x:Value1>10</x:Value1>
    <x:Value2>5</x:Value2>
    <x:ExpectedValue>5</x:ExpectedValue>
    <x:Message>5 is less than 10</x:Message>
  </x:Row>
</Rows>

Note: This Xml is designed as such so the Schema is inline. That allows us to specify the data type.

Step 3 – Set Xml File Properties

The XML file needs to be copied on build.

  1. Right-click on the Xml file and choose Properties.
  2. Change the Copy to output directory to: Copy if newer

Step 4 – Add a Unit Test method

Note: We won’t have a real project to test. We will just test Math.Min() for an example.

  1. Add a reference to System.Data.
  2. Add the TestContext property. (See line 9 below)
  3. Add a DataSource attribute to the test method. (See line 12 below)
    Notice that is uses Row not Rows (it doesn’t use the root element but the second element).
  4. Use TestContext.DataRow[0] to get the first column. (See line 16 below)
    Note: You can also access the column by the column name we used: TestContext.DataRow[Value1]

  5. Assign variables for the rest of the columns. (See lines 16-19 below)
  6. Add the test and the assert. (See lines 22 and 25)
using System;
using Microsoft.VisualStudio.TestTools.UnitTesting;

namespace MsTestRowTestXml
{
    [TestClass]
    public class UnitTest1
    {
        public TestContext TestContext { get; set; }

        [TestMethod]
        [DataSource("Microsoft.VisualStudio.TestTools.DataSource.XML", @"Data\Data.xml", "Row", DataAccessMethod.Sequential)]
        public void TestMethod1()
        {
            // Arrange
            int a = (int)TestContext.DataRow[0];
            int b = (int)TestContext.DataRow[1];
            int expected = (int)TestContext.DataRow[2];
            string message = TestContext.DataRow[3].ToString();

            // Act
            var actual = Math.Min(a, b);

            // Assert
            Assert.AreEqual(expected, actual, message);
        }
    }
}

You finished! Good job!.

Use Common Xml files for Parameter Value Coverage

While this method involved way more steps than anything with NUnit to set up, tt can actually be a bit quicker for subsequent tests and quite useful when testing larger projects. Once you have the Xml files setup, you can reuse them for many methods. For example, for every method that takes a long, you could use the same DataSource to get Parameter Value Coverage (PVC).

<?xml version="1.0" encoding="utf-8" ?>
<Rows xmlns:xsi="http://www.w3.org/2001/XMLSchema-instance"
      xmlns:x="urn:Row">
  <!-- Schema -->
  <xsd:schema targetNamespace="urn:Row" attributeFormDefault="unqualified" elementFormDefault="qualified" xmlns:xsd="http://www.w3.org/2001/XMLSchema" >
    <xsd:element name="Row">
      <xsd:complexType>
        <xsd:sequence>
          <xsd:element type="xsd:long" name="Value"/>
          <xsd:element type="xsd:string" name="Message"/>
        </xsd:sequence>
      </xsd:complexType>
    </xsd:element>
  </xsd:schema>
  <!--End Schema-->
  <x:Row>
    <x:Value>2147483648</x:Value>
    <x:Message>One more than int.MaxValue</x:Message>
  </x:Row>
  <x:Row>
    <x:Value>-2147483649</x:Value>
    <x:Message>One less than int.MinValue</x:Message>
  </x:Row>
  <x:Row>
    <x:Value>9223372036854775807</x:Value>
    <x:Message>long.MaxValue</x:Message>
  </x:Row>
  <x:Row>
    <x:Value>-9223372036854775808</x:Value>
    <x:Message>long.MinValue</x:Message>
  </x:Row>
  <x:Row>
    <x:Value>0</x:Value>
    <x:Message>0 (zero)</x:Message>
  </x:Row>
  <x:Row>
    <x:Value>1</x:Value>
    <x:Message>1 (one)</x:Message>
  </x:Row>
  <x:Row>
    <x:Value>2</x:Value>
    <x:Message>2 (one)</x:Message>
  </x:Row>
  <x:Row>
    <x:Value>-1</x:Value>
    <x:Message>-1 (minus one)</x:Message>
  </x:Row>
  <x:Row>
    <x:Value>-2</x:Value>
    <x:Message>-2, -2 (minus one)</x:Message>
  </x:Row>
</Rows>

Row Tests or Paramerterized Tests (MsTest) – CSV

In a previous post, I discussed Parameter Value Coverage (PVC). One of the easiest ways to add PVC to your test suite is to use Row Tests, sometimes called Parameterized Tests. Row test is the idea of writing a single unit test, but passing many different values in.

Different testing frameworks implement row tests differently.

MsTest uses an attribute called DataResourceAttribute. This supports anything from a csv, Excel file or xml, to a full-blown database.

For a single Unit Test, NUnit’s Row tests are far superior. However, for a larger test project, you will see that DataSourceAttribute with external data sources, scales nicely and compares to NUnits TestCaseSource. However, it is not as easy to get it right the first time. It needs a step by step tutorial.

Step 1 – Create a the Project

  1. In Visual Studio click File | New | Project.
  2. Select Unit Test Project for C#.
  3. Give it a name and a path and click OK.

Step 2 – Add a csv file

  1. Create a folder in your visual studio project called Data.
  2. Right-click on the data folder and choose Add | New Item.
  3. Create new text file named: Data.csv
  4. Add the following to the csv.
Value1, Value2, ExpectedMinValue, Message
1,10, 1, 1 is less th an 10.
192, 134, 134, 134 is less than 192.
101, 99, 99, 99 is less than 101.
77, 108, 77, 77 is less than 108.
45, 37, 37, 37 is less than 34.
12, 18, 12, 12 is less than 18.

Step 3 – Save the CSV file with the correct encoding

Note: The CSV file needs to be saved with an encoding that doesn’t add junk characters.

  1. Click File | Advanced Save Options.
  2. Choose this Encoding option: Unicode (UTF-8 without signature) – Codepage 65001
  3. Click OK and then click save.

Note: VS 2017 doesn’t have an Advance Save Options menu item.

  1. Click File | Save Data.csv as.
  2. Click the drop down on the Save button and choose Save with Encoding.
  3. Choose this Encoding option: Unicode (UTF-8 without signature) – Codepage 65001
  4. Click OK and then click save.

Step 4 – Set CSV File Properties

The CSV file needs to be copied on build.

  1. Right-click on the CSV file and choose Properties.
  2. Change the Copy to output directory to: Copy if newer

Step 5 – Add a Unit Test method

Note: We won’t have a real project to test. We will just test Math.Min() for an example.

  1. Add a reference to System.Data.
  2. Add the TestContext property. (See line 9 below)
  3. Add a DataSource attribute to the test method. (See line 12 below)
  4. Use TestContext.DataRow[0] to get the first column. (See line 16 below)
    Note: You can also access the column by the column name we used: TestContext.DataRow[Value1]

  5. Assign variables for the rest of the columns. (See lines 16-19 below)
  6. Add the test and the assert. (See lines 22 and 25)
using System;
using Microsoft.VisualStudio.TestTools.UnitTesting;

namespace MsTestRowTestExample
{
    [TestClass]
    public class UnitTest1
    {
        public TestContext TestContext { get; set; }

        [TestMethod]
        [DataSource("Microsoft.VisualStudio.TestTools.DataSource.CSV", @"Data\Data.csv", "Data#csv", DataAccessMethod.Sequential)]
        public void TestMethod1()
        {
            // Arrange
            int a = Convert.ToInt32(TestContext.DataRow[0]);
            int b = Convert.ToInt32(TestContext.DataRow[1]);
            int expected = Convert.ToInt32(TestContext.DataRow[2]);
            string message = TestContext.DataRow[3].ToString();

            // Act
            var actual = Math.Min(a, b);

            // Assert
            Assert.AreEqual(expected, actual, message);
        }
    }
}

You finished! Good job!.

Use Common Csv files for Parameter Value Coverage

While this method involved way more steps than anything with NUnit to set up, tt can actually be a bit quicker for subsequent tests and quite useful when testing larger projects. Once you have the csv files setup, you can reuse them for many methods. For example, for every method that takes a string, you could use the same DataSource to get Parameter Value Coverage (PVC).

null, A null string
"", An empty string, String.Empty, or ""
" ", One or more spaces " "
"	", One or more tabs "	"
"
", A new line or Environment.NewLine
"Hello, world!", A valid string.
"&*^I#UYLdk1-KNnS1.,Dv0Hhfwelfnzsdase", An invalid or junk string
গঘ, Double-byte Unicode characters

Row Tests or Paramerterized Tests (NUnit)

In a previous post, I discussed Parameter Value Coverage (PVC). One of the easiest ways to add PVC to your test suite is to use Row Tests, sometimes called Parameterized Tests. Row test is the idea of writing a single unit test, but passing many different values in.

Different testing frameworks implement row tests differently.

NUnit has two options. The first implements them inline, with an attribute for each. Here is an example straight from NUnit’s website:

[TestCase(12,3,4)]
[TestCase(12,2,6)]
[TestCase(12,4,3)]
public void DivideTest(int n, int d, int q)
{
    Assert.AreEqual( q, n / d );
}

NUnit also implements a TestCaseSource attribute.

[Test, TestCaseSource("DivideCases")]
public void DivideTest(int n, int d, int q)
{
    Assert.AreEqual( q, n / d );
}

static object[] DivideCases =
{
    new object[] { 12, 3, 4 },
    new object[] { 12, 2, 6 },
    new object[] { 12, 4, 3 }
};

For a single Unit Test, NUnit’s Row tests are far superior. However, for a larger test project, you will see that TestCaseSource with with data sources, scales nicely. Imagine you have 10 test method that each take in the same 10 lines of data. With the TestCase attribute, you would have to write 10 attributes on all 10 test methods–that is 100 lines of attributes alone. Worse these are 10 exact code copies. That breaks the Don’t Repeat Yourself (DRY) principle of coding. With TestCaseSource, you implement the data for the Row tests in a single place and you add one attribute per test method.

Hint: Also, you might find many row test sources can be reused for other tests. Maybe storing them in a single data source repository would be a good idea, so they can be reused. Don’t do it for small tests. Only do it for large test projects that need to scale.

How to mock an Entity Framework DbContext and its DbSet properties

Entity Framework (EF) is a data access layer (DAL) that allows for easily accessing a database for your create, read, update, and delete (CRUD) actions. If you use Entity Framework, you don’t need to test your DAL CRUD actions. You just need to test your code that uses it.

With EF, you can mock your database, though it isn’t exactly easy. The database is interfaced through the DbContext. Tables are interfaces through a property of type DbSet where T is an object representing data in the table. For example, DbSet would represent your users. We can use a List to mock the database table. It would also be nice if we could easily have every table mocked by default.

Ok, now that we have established that EF 6 DbContext mocking isn’t easy, let’s change that. Let’s make it easy.

Using the following two classes, you can easily mock your DbContext with a single line of code:

var mockDbContext = EntityFrameworkMockHelper.GetMockContext<MyDbContext>();

Note: While this single line of code successfully mocks your DbContext, it doesn’t add any default data. You still have to do that work yourself, but now it should be easy because you can use the very easy to use Add method on any table.

MockDbContext.Object.People.Add(new Person{ FirstName = "John", LastName = "Doe" });

Or if you have a List of sample data already created, you can add that list with AddRange.

MockDbContext.Object.People.AddRange(SamplePeople);

And here are the two classes I wrote to help with this. I must admit, I spent over three days researching this and getting this working. So hopefully, this saves you from having to do the same.

using Moq;
using System.Collections.Generic;
using System.Data.Entity;

namespace LANDesk.Licensing.WebServices.Tests.Data
{
    public class MockedDbContext<T> : Mock<T> where T : DbContext
    {
        public Dictionary<string, object> Tables
        {
            get { return _Tables ?? (_Tables = new Dictionary<string, object>()); }
        } private Dictionary<string, object> _Tables;
    }
}
using System;
using Moq;
using System.Collections.Generic;
using System.Data.Entity;
using System.Linq;
using System.Linq.Expressions;

namespace LANDesk.Licensing.WebServices.Tests.Data
{
    public static class EntityFrameworkMockHelper
    {
        /// <summary>
        /// Returns a mock of a DbContext
        /// </summary>
        /// <typeparam name="T"></typeparam>
        /// <returns></returns>
        public static MockedDbContext<T> GetMockContext<T>() where T : DbContext
        {
            var instance = new MockedDbContext<T>();
            instance.MockTables();
            return instance;
        }

        /// <summary>
        /// Use this method to mock a table, which is a DbSet{T} oject, in Entity Framework.
        /// Leave the second list null if no adds or deletes are used.
        /// </summary>
        /// <typeparam name="T">The table data type</typeparam>
        /// <param name="table">A List{T} that is being use to replace a database table.</param>
        /// <returns></returns>
        public static DbSet<T> MockDbSet<T>(List<T> table) where T : class
        {
            var dbSet = new Mock<DbSet<T>>();
            dbSet.As<IQueryable<T>>().Setup(q => q.Provider).Returns(() => table.AsQueryable().Provider);
            dbSet.As<IQueryable<T>>().Setup(q => q.Expression).Returns(() => table.AsQueryable().Expression);
            dbSet.As<IQueryable<T>>().Setup(q => q.ElementType).Returns(() => table.AsQueryable().ElementType);
            dbSet.As<IQueryable<T>>().Setup(q => q.GetEnumerator()).Returns(() => table.AsQueryable().GetEnumerator());
            dbSet.Setup(set => set.Add(It.IsAny<T>())).Callback<T>(table.Add);
            dbSet.Setup(set => set.AddRange(It.IsAny<IEnumerable<T>>())).Callback<IEnumerable<T>>(table.AddRange);
            dbSet.Setup(set => set.Remove(It.IsAny<T>())).Callback<T>(t => table.Remove(t));
            dbSet.Setup(set => set.RemoveRange(It.IsAny<IEnumerable<T>>())).Callback<IEnumerable<T>>(ts =>
            {
                foreach (var t in ts) { table.Remove(t); }
            });
            return dbSet.Object;
        }

        /// <summary>
        /// Mocks all the DbSet{T} properties that represent tables in a DbContext.
        /// </summary>
        /// <typeparam name="T"></typeparam>
        /// <param name="mockedContext"></param>
        public static void MockTables<T>(this MockedDbContext<T> mockedContext) where T : DbContext
        {
            Type contextType = typeof(T);
            var dbSetProperties = contextType.GetProperties().Where(prop => (prop.PropertyType.IsGenericType) && prop.PropertyType.GetGenericTypeDefinition() == typeof(DbSet<>));
            foreach (var prop in dbSetProperties)
            {
                var dbSetGenericType = prop.PropertyType.GetGenericArguments()[0];
                Type listType = typeof(List<>).MakeGenericType(dbSetGenericType);
                var listForFakeTable = Activator.CreateInstance(listType);
                var parameter = Expression.Parameter(contextType);
                var body = Expression.PropertyOrField(parameter, prop.Name);
                var lambdaExpression = Expression.Lambda<Func<T, object>>(body, parameter);
                var method = typeof(EntityFrameworkMockHelper).GetMethod("MockDbSet").MakeGenericMethod(dbSetGenericType);
                mockedContext.Setup(lambdaExpression).Returns(method.Invoke(null, new[] { listForFakeTable }));
                mockedContext.Tables.Add(prop.Name, listForFakeTable);
            }
        }
    }
}

Authenticating to Salesforce with Silenium in C#

It is pretty easy to authenticate to Salesforce with Silenium in C#. Here are the steps.

  1. Add the following NuGET package to your project:
    Silenium WebDriver
  2. Use the following code:
        public static void LoginToSalesforce(string username, string password)
        {
            IWebDriver driver = new FirefoxDriver();
            driver.Url = "https://test.salesforce.com";
            driver.Navigate();
            var userNameTextBox = driver.FindElement(By.Id("username"));
            userNameTextBox.SendKeys(username);
            var passwordTextBox = driver.FindElement(By.Id("password"));
            passwordTextBox.SendKeys(password);
            var loginButton = driver.FindElement(By.Id("Login"));
            loginButton.Submit();
        }

Yes it is that easy.

How to write your first C# Unit Test with Visual Studio?

Visual Studio makes Unit Testing easy by bundling a Unit Test framework into it.

Imagine you have a string extension method as shown below and you wanted to unit test it.

using System;

namespace ConsoleApplication1
{
    public static class StringExtensions
    {
        public static bool IsPrimaryColor(this string inString)
        {
            string[] primaryColors = { "Red", "Yellow", "Blue" };
            foreach (var color in primaryColors)
            {
                if (inString.Equals(color, StringComparison.CurrentCultureIgnoreCase))
                    return true;
            }
            return false;
        }
    }
}

Creating a Unit Test project to test this method is very easy.

Step 1 – Create a C# Unit Test Project

  1. In Visual Studio (assuming you already have a project open), click on the Solution and choose Add new project.
  2. Select Templates | Visual C# | Test from the menu on the left.
  3. Select Unit Test Project.
  4. Enter a name for the project.
    Note: Use a good name convention, such as naming the test project the same as the project it tests but with “Tests” at the end.  For example if you have a project called MyProject you would name your test project MyProjectTests. No, it isn’t rocket science. We like to keep it simple.
  5. Click OK.

Step 2 – Give your Unit Test project a reference to the project to test

  1. Right-click on References under the newly created Unit Test project and choose Add reference.
  2. Select Solution from the right.
  3. Add the project you plan to test as a reference.

Step 3 – Create your C# test class and first test method

  1. A test class was already created by default called UnitTest1.cs. Feel free to rename it to an appropriate name.
    Note: Use a good name convention, such as naming the test class the same as the class it tests but with “Tests” at the end.  For example if you have an object called MyObject you would name your test project MyObjectTests.
  2. Add a using statement to reference the namespace of the class you plan to test.
  3. Rename the first Test method. You can’t miss it. It has the [TestMethod] attribute.
    Note: Use a good name convention, such as naming the test method so clearly that you know what it is testing just by the name. For example, StringExtensionIsBlueAPrimaryColorTest().
  4. Add code to make your first test. It is recommended you create your method using the Arrange, Act, Assert pattern.
  5. Add additional test methods as needed.
    using ConsoleApplication1;
    using Microsoft.VisualStudio.TestTools.UnitTesting;
    
    namespace StringExtensionTests
    {
        [TestClass]
        public class UnitTest1
        {
            [TestMethod]
            public void StringExtensionIsBlueAPrimaryColorTest()
            {
                // Arrange
                string color = "Blue";
    
                // Act
                bool actual = color.IsPrimaryColor();
    
                // Assert
                const bool expected = true;
                Assert.AreEqual(expected, actual);
            }
    
            [TestMethod]
            public void StringExtensionIsRedAPrimaryColorTest()
            {
                // Arrange
                string color = "Red";
    
                // Act
                bool actual = color.IsPrimaryColor();
    
                // Assert
                const bool expected = true;
                Assert.AreEqual(expected, actual);
            }
    
            [TestMethod]
            public void StringExtensionIsYellowAPrimaryColorTest()
            {
                // Arrange
                string color = "Yellow";
    
                // Act
                bool actual = color.IsPrimaryColor();
    
                // Assert
                const bool expected = true;
                Assert.AreEqual(expected, actual);
            }
    
            [TestMethod]
            public void StringExtensionIsBlackAPrimaryColorTest()
            {
                // Arrange
                string color = "Black";
    
                // Act
                bool actual = color.IsPrimaryColor();
    
                // Assert
                const bool expected = false;
                Assert.AreEqual(expected, actual);
            }
        }
    }
    

You have now created your first Unit Test. Go ahead and run it. You should be able to run it in Visual Studio starting with VS 2012. If you have an earlier version, you can run tests using other tools.

Thorough Unit Testing

OK. Now let’s think about what tests would be valid that we don’t have? Here are a few:

  • Case insensitive. All the following strings should return true: Red, red, rEd.
  • What if the string is blank? Null? Junk characters?

Now you write additional unit tests to test this method.

Note: It is too bad that Visual Studio’s MSTest doesn’t support Row tests. NUnit does support Row tests. With Row tests, the above Unit Test code would involve a single method that passing in multiple string values.

Creating a QUnit Test Project in Visual Studio 2010

You may want to Unit Test your JavaScript code and one library to do this with is QUnit.

QUnit is based on the idea of opening a web page to run your JavaScript tests. So here is how I create a new QUnit project in Visual Studio.

This article assumes that you have the following installed already:

  • Visual Studio 2010 or later
  • The NuGet Add-in for Visual Studio

Step 1 – Create a Visual Studio Project

  1. Open Visual Studio.
  2. Go to File | New | Project.
  3. Select ASP.NET Empty Web Application.
  4. Give the project a name:
    Note: For this walk-thru, I named mine QUnitExample
  5. Click OK.

Step 2 – Import QUnit

Method 1 – Using NuGet

This step requires internet access.

  1. Right-click on your Project and choose Manage NuGet Packages.
  2. Search for QUnit and locate QUnit for ASP.NET MVC.
  3. Click Install next to QUnit for ASP.NET MVC.
  4. Click Close.

You should now see a folder called Content with a QUnit.css file and a folder called Scripts with a QUnit.js file.

Note: The NuGet package had old files, so I had to update them manually following Method 2.

Method 2 – Just downloading the files

If the NuGet package is not up to date, you may want to download the files manually. Follow the steps above to get QUnit through NuGet and if it doesn’t work, download the latest files from the QUnit web site and replace the ones NuGet added to your project with the latest ones.

Step 3 – Create an HTML file to display test results

  1. Right-click on the project and Choose Add | New Item.
  2. Find and choose HTML Page.
  3. Give the page a name.
    Note: I named mine QUnitTestResults.htm.
  4. Open the QUnitTestResults.htm file for editing.
  5. I made the DOCTYPE tag simpler in line 1:
  6. Enter something in the Title: Line 4.
    Note: I called mine QUnit Test Results.
  7. Add a Link to the qunity.css file: Line 5.
  8. Add a script in the body that calls the qunit.js file: Line 8.
<!DOCTYPE html>
<html>
<head>
  <meta charset="utf-8">
  <title>QUnit Test Results</title>
  <link rel="stylesheet" href="/Content/qunit.css">
</head>
<body>
  <div id="qunit"></div>
  <div id="qunit-fixture"></div>
  <script src="/Scripts/qunit.js"></script>
  <script src="/Scripts/tests.js"></script>
</body>
</html>

Step 4 – Create your first QUnit Test

  1. Right-click on the Project and choose Add | New Folder.
  2. Rename the folder to TestScripts.
    Note: I like to keep the test scripts separate from the other scripts.
  3. Right-click on the TestScripts folder and Choose Add | New Item.
  4. Find and choose JScript File.
  5. Give the JavaScript file a name.
    I named mine ExampleTests.js.
  6. Open the ExampleTests.js file for editing.
  7. Add a test method to the ExampleTests.js file.
test("hello test", function () {
    ok(1 == "1", "Passed!");
});

Note: This test is straight from the QUnit home page.

Step 5 – Add the Tests to your HTML file

  1. Open the QUnitTestResults.htm file for editing.
  2. Add a script in the body that calls the ExampleTests.js file: Line 9.
<!DOCTYPE html>
<html>
<head>
  <meta charset="utf-8">
  <title>QUnit Test Results</title>
  <link rel="stylesheet" href="/Content/qunit.css">
</head>
<body>
  <div id="qunit"></div>
  <div id="qunit-fixture"></div>
  <script src="/Scripts/qunit.js"></script>
  <script src="/Scripts/tests.js"></script>
  <script src="/TestScripts/ExampleTests.js"></script>
</body>
</html>

Step 6 – Run the tests

  1. Right-click on the QUnitExample project and choose Set as StartUp Project.
  2. Right-click on QUnitTestResults.htm and choose Set As Start Page.
  3. Click Debug | Start Debugging.

Step 7 – Start testing your JavaScript files

Now you probably want to recreate this project in as an additional project to your production solution (if you haven’t done this already).

It is time to start testing your JavaScript file. If you add the script to your project as a link, then you don’t have to maintain two copies of it.

  1. Right-click on the Scripts folder and choose Add | Existing Item.
  2. Browse to the JavaScript file that you want to test and select it but don’t add it yet.
  3. Click the down arrow next to Add and choose Add as link.
  4. Right-click on the TestScripts folder and Choose Add | New Item.
  5. Find and choose JScript File.
    Note: My file is called MySample.js.
  6. Give the JavaScript file a name.
    Note: I named mine MySampleTests.js.
  7. Open the ExampleTests.js file for editing.
  8. Start adding tests.

Conclusion

This method allows for rudimentary testing of your JavaScript. However, it does not integrate with Visual Studio, or Code Coverage, or Gated Check-ins. So there is a lot more work that needs to be done.

Unit Testing with Parameter Value Coverage (PVC)

Parameter Value Coverage (PVC) is the ability to track coverage of a method based on the common possible values for the parameters accepted by the method.

Current code coverage tools fail to take into consideration the possibility that a value for a parameter is not handled resulting in a bug. However, there may not be any code addressing this value in any way, introducing the possibility of obtaining 100% code coverage or line coverage (LC) without detecting the bug.

If the common values for types, especially primitive types and known types, are documented and methods that use them are required to have a test for each possible parameter value, bugs can be avoided.

The following is a table of parameter value requirements for an int or System.Int32 and string or System.String. A unit test should exist for each of the possible values in order to have 100% PVC.

System.Int32 System.String
  1. A positive integer
  2. A negative integer
  3. Zero
  4. int.MaxValue or 2,147,483,647
  5. int.MinValue or -2,147,483,648
  1. A null string
  2. An empty string, String.Empty, or “”
  3. One or more spaces ” “
  4. One or more tabs ” “
  5. A new line or Environment.NewLine
  6. A valid string.
  7. An invalid or junk string
  8. Unicode characters such as Chinese

See Parameter Value Coverage by Type for more complete list of common Parameter Values per type.

Were code coverage tools enhanced to take into account Parameter Value Coverage (PVC), better tests would be written and more bugs would be found.

Such PVC lists should be created for each primitive type and a list of required parameter values to test against for each of primitive type should be standard for each language. You could also create a list of parameter values for you own types though you may find that your own type is actually a collection of primitive types and methods, and if they are tested with PVC, your class is automatically tested with PVC as well.

Finding bugs beyond 100% Code Coverage with PVC

100% code coverage or line coverage (LC) can fail to find many bugs. Developers often write a unit test with only the goal to get as close to 100% LC as they can. Unfortunately, they are only covering the written code, but bugs may exist due to code not written.

Here is a quick example. The method below is a very common example of a piece of code that looks so simple, most assume there is no way there is a bug, but after a brief analysis, the bug becomes obvious.

public class Adder()
{
    private int Add(int val1, int val2)
   {
        return val1 + val2;
   }
}

To get 100% LC, the following test could be used.

private void Add_Test()
{
    Adder adder = new Adder();
    var actual = adder.Add(1,2);
    var expected = 3;
    Assert.AreEqual(expected, actual)
}

You now have 100% LC, but have you found all the bugs? No you haven’t. Here are two problems:

  1. An int or System.Int32 is a 32-bit integer with a max value of 2,147,483,647. What happens if you add one or more to the max value?
  2. The minimum value is -2,147,483,648. What happens if you subtract one or more from the minimum value?

How should this problem be fixed?

  • Should you enabled “checked” to disallow overflows?
  • Should you return a long so two 32-bit integers can always be added together?
  • Or should you ignore the issue as it isn’t going to matter in your project?

Your answer may be different depending on your project. I am not going to tell you how to fix this bug in this article, that is not the point. The point is to show that 100% LC failed to find this bug, proving that some level of coverage is missing; some value is not being tracked and reported on.

What is the missing value? Parameter Value Coverage (PVC).

If PVC were taken into account, the test above only provides 20% coverage as only one of the five integer value types were tested. Reaching 80% to 100% PVC would have found this bug.

Every bug that is found internally will cost your business far less money overall than if a customer finds the bug.

Return to C# Unit Test Tutorial

Better Unit Tests in C#

When you test the right thing, you get better unit tests. Better unit tests often lead to better design, testable design, and easier maintainability of code.

Look at an example of testing a Copy() method in a Person object. You will see that as you unit test this method, you are forced to think. If you think about what you really want to test (instead of just thinking about 100% coverage), and test for that, it will lead you to changing your code for the better.

With a Copy() method, you want to make sure that every property in the Person object is copied. You want to make sure that any new Property added in the future is copied.

Lets see if we can do this. Lets start with our simple example Person object with a Copy() method and lets test the copy method.

using System;

namespace FriendDatabase
{
    public class Person
    {
        #region Properties
        public int Age { get; set; }
        public String FirstName { get; set; }
        public String LastName { get; set; }
        #endregion

        #region Methods
        public Person Copy()
        {
            Person retPerson = new Person();
            retPerson.Age = this.Age;
            retPerson.FirstName = this.FirstName;
            retPerson.LastName = this.LastName;
            return retPerson;
        }
        #endregion
    }
}

Lets list the three most obvious tests for the copy method.

  1. Age is the same value.
  2. FirstName is the same value.
  3. LastName is the same value.

If you are an expert at Unit Testing, you are probably already thinking that there are more tests to run that just these three tests.0

A simple Unit Test

A test for this that would give use 100% code coverage and covers the three most obvious tests would be as follows:

[Test]
public void Person_Copy_Test()
{
    // Step 1 - Arrange
    Person p = new Person() { FirstName = "John", LastName = "Johnson", Age = 0 };

    // Step 2 - Act
    Person copy = p.Copy();

    // Step 3 - Assert
    Assert.AreEqual(p.Age, copy.Age);
    Assert.AreEqual(p.FirstName, copy.FirstName);
    Assert.AreEqual(p.LastName, copy.LastName);
}

The code coverage is now 100%. But is this a good test? No.

What are the problems with our tests?

Problem 1 – The Unit Test does not guarantee every property is copied

In the Person.Copy() method, comment out the line that copies the Age. Run the test again.

Oops! The test still passes.

What is the problem? Well, int defaults to zero.

Change the age to a value other than zero and try again.  The test now fails.

[Test]
public void Person_Copy_Test()
{
    // Step 1 - Arrange
    Person p = new Person() { FirstName = "John", LastName = "Johnson", Age = 25 };

    // Step 2 - Act
    Person copy = p.Copy();

    // Step 3 - Assert
    Assert.AreEqual(p.Age, copy.Age);
    Assert.AreEqual(p.FirstName, copy.FirstName);
    Assert.AreEqual(p.LastName, copy.LastName);
}

This fixed this one problem.

Is the test good enough now? Of course not.

Problem 2 – The Unit Test does not guarantee every property is copied

Wait, you might be saying that my problem 2 is named the same as problem 1 and you might think this is a typo. It is not a typo.

We still have a similar problem to the first problem.

Imagine a new user developer takes over the code, and decides that a MiddleName property is needed. Go ahead and add a middle name property. Don’t modify the Copy() method yet. Now run your Unit Test again.

Our one test still passes.

Shouldn’t there be a test that fails because the copy is now failing to copy to all properties? Yes there should. We have just identified a new test that actually includes the previous three tests. The goal of our three tests were all the same overall goal. Our three tests were actually slightly wrong. Instead we really had only one test: Test that when Copy() is invoked, all properties should be copied.

Now that we have gain more insight on what we are actually testing, how do we test it? How do we test all properties. One idea might be to use reflection.

[Test]
public void Person_Copy_Test()
{
    // Step 1 - Arrange
    Person p = new Person() { FirstName = "John", LastName = "Johnson", Age = 25 };

    // Step 2 - Act
    Person copy = p.Copy();

    // Step 3 - Assert
    PropertyInfo[] propInfo = typeof(Person).GetProperties();
    foreach (var prop in propInfo)
    {
        object pObj = typeof(Person).GetProperty(prop.Name).GetValue(p, null);
        object copyObj = typeof(Person).GetProperty(prop.Name).GetValue(copy, null);
        Assert.AreEqual(pObj, copyObj);
    }
}

At first this looked like a good idea, because it will check each property for us, even properties added in the future. However, it turns out that because int and string have default values, This test didn’t exactly test what we wanted to test. This test still passes when it should fail and that is a problem.

Remember the test: to test that when Copy() is invoked, all properties should be copied.

We need guarantee that each property was called and to do this. If only we were using an interface, then we could mock the interface and assert that each public property were called…A good rule to live by when developing is if you hear yourself say or you think “if only…” you should actually try implementing the “if only…” you just thought of. So lets do that.

This is a little longer of a solution but a better design, so here are some steps to get there.

  1. Create an IPerson interface that has the properties and methods we want to guarantee exist.
    using System;
    
    namespace FriendDatabase
    {
        public interface IPerson
        {
            int Age { get; set; }
            String FirstName { get; set; }
            String MiddleName { get; set; }
            String LastName { get; set; }
    
            IPerson Copy();
            void CopyTo(IPerson inIPerson);
        }
    }
    
  2. Change the person object so that you can never get a Person object, you always get an IPerson.
  3. We also need to be able to mock the instance of IPerson that is getting created by the Copy method and our current design doesn’t allow for that. Lets change our Copy method and add a CopyTo method to make this possible.
    using System;
    
    namespace FriendDatabase
    {
        public class Person : IPerson
        {
            #region Constructor
            ///
    <summary> /// Nobody should use Person, but on GetPerson()
     /// which returns and IPerson
     /// </summary>
            protected Person()
            {
            }
            #endregion
    
            #region Properties
            public int Age { get; set; }
            public String FirstName { get; set; }
            public String MiddleName { get; set; }
            public String LastName { get; set; }
            private String NickName { get; set; }
            #endregion
    
            #region Methods
            public static IPerson GetPerson(string inFirstName, string inMiddleName, String inLastName = null, int inAge = 0)
            {
                return new Person()
                {
                    FirstName = inFirstName,
                    MiddleName = inMiddleName,
                    LastName = inLastName,
                    Age = inAge
                };
            }
    
            public IPerson Copy()
            {
                IPerson retIPerson = new Person();
                CopyTo(retIPerson);
                return retIPerson;
            }
    
            public void CopyTo(IPerson inIPerson)
            {
                inIPerson.Age = this.Age;
                inIPerson.FirstName = this.FirstName;
                inIPerson.LastName = this.LastName;
            }
            #endregion
        }
    }
    
  4. Now we need a Mocking tool. Download you favorite mocking library (RhinoMocks, NMock2, or MOQ). I am going to use NMock2 which can be downloaded here: NMock2
  5. Lets put the mocking library in a lib directory in your test project.
  6. Add a reference to the dll.
  7. Now lets change our test. Lets go ahead and use the reflection still, but this time, we want to guarantee that each property was called.
    [Test]
    public void Person_Copy_All_Properties_Copied_Test()
    {
        // Step 1 - Arrange
        Mockery mock = new Mockery();
        IPerson p = Person.GetPerson("John", "J.", "Johnson", 25);
        IPerson mockIPerson = mock.NewMock();
        PropertyInfo[] propInfo = typeof(IPerson).GetProperties();
    
        // Step 2 - Expect
        foreach (var prop in propInfo)
        {
            Expect.AtLeastOnce.On(mockIPerson).SetProperty(prop.Name);
        }
    
        // Step 3 - Act
        p.CopyTo(mockIPerson);
    
        // Step 4 - Assert
        mock.VerifyAllExpectationsHaveBeenMet();
    }
    

    Note: NMock2 requires a slight variation of the Arrange, Act, Assert (AAA) unit test model in that it is more Arrange, Expect, Act, Assert (AEAA), which is just as good and just as clean. One could argue that the expectations are part of the Arrange and I would somewhat agree with that too.

  8. Ok, now run your test again and it should fail because we are not calling MiddleName in our CopyTo() method. You have now written the correct unit test for the goal.

So by taking time to think of the correct test and Unit Testing the correct test, solving the right problem, we gained a few benefits.

  • Better future maintainability
  • Better design
  • Testable design

Now hopefully you can go and do this when you write your Unit Tests.

Return to C# Unit Test Tutorial