Archive for the ‘VMWare’ Category.

Is Windows 8 Pro Hyper-V the end of VMWare Workstation?

So I have had a license for VMWare Workstation through work since 2004. I have been a loyal user for eight years. However, my current job is not going to provide any further VMWare Workstation licenses.

Price of VMware Workstation vs Hyper-V

Because Hyper-V is included in Windows 8 Pro and the Microsoft Windows 8 Pro Upgrade is under $70 for a full version (not upgrade) of Windows 8 Professional System Builder DVD 64-Bit you are only looking at over $125.00 on sale (normally $199). VMWare Workstation alone is $249. VMWare Workstation is $50 more expensive than paying full retail price for the full version of Windows 8. If you are planning to buy Windows 8 Pro anyway, then technically, VMWare Workstation $249 too much.

Hyper-V vs VMWare Workstation

Having used both, I am going to mention some differentiating features.

  • Hyper-V virtual machines seem to snapshot and revert must faster than VMWare Workstation.
  • VMWare auto sizes the screen does, Hyper-V doesn’t.
  • VMWare workstation has a cool mode where you can run apps from the virtual machine as if they were regular desktop apps.
  • VMWare workstation works better with alternate operating systems.

There are advanced features that I haven’t tested. For example, when I worked at LANDesk we need to test PXE Booting so the ability for the virtual machine to PXE Boox was extremely important, and VMWare worked really well with PXE Booting. I haven’t tested Hyper-V with PXE Booting, so if you have please post and let me know if how it works.

Of course, don’t forget about Virtual Box. The open source edition, Virtual Box OSE, is free no matter what operating system is the host, whether it is Windows 8 or FreeBSD or Linux. It has been free for a while and yet VMWare Workstation is still popular so maybe it will remain popular despite Windows 8 Pro?

Installing VMWare Tools on FreeBSD 9

Virtualizing a FreeBSD server is common place. Knowing how to install VMWare Tools on a FreeBSD server without X11 is going to be extremely important. This article will provide the steps.

Lets get started.

Step 1 – Install FreeBSD as VMWare Guest.

Instructions for installing FreeBSD 9 are found here: How do I install FreeBSD 9?

It shouldn’t be much of an effort to follow these steps inside a VMWare guest.

Note: You may consider taking a snapshot here to save your current state.

Step 2 – Update FreeBSD and Install ports

Instructions for updating FreeBSD and installing ports are found here:
Update FreeBSD and Install ports

Note: You may consider taking a snapshot here to save your current state.

Step 3 – Install Prerequisites

Step 3.1 – Install Perl

Installing Perl is easy. Use either of the following commands.

From ports

# cd /usr/ports/lang/perl5.12
# make install

From packages

# pgk_add -r perl

Step 3.2 – Install compat6x-amd64

The compat6x-amd64 port is also easily installed.

From ports

# cd /usr/ports/misc/compat6x/
# make install

From packages

# pkg_add -r compat6x-amd64

Step 4 – Take a VMWare Snapshot

Important! Take a snapshot here! Do not skip this step.

Step 5 – Mount the VMWare Tools ISO

I am using VMWare workstation. Some steps may be slightly different if you are using ESXi or other VMWare solution.

  1. In VMWare Workstation, choose VM | Install VMWare Tools.
  2. In FreeBSD as root, create a directory to mount the CD-Rom to.
    # mkdir /cdrom
    
  3. Mount the cd-rom.
    # mount -t cd9660 /dev/cd0 /cdrom
    

Note: You may consider taking a snapshot here to save your current state.

Step 6 – Extract the vmware-freebsd-tools.tar.gz

Now that the drive is mounted, it should be easy to get to the vwmare-tools file.

  1. Copy the vmware-freebsd-tools.tar.gz file to a local location.
    # cp /cdrom/vmware-freebsd-tools.tar.gz /root
    
  2. Extract the vmware-freebsd-tools.tar.gz file.
    # cd /root
    # tar -xzf vmware-freebsd-tools.tar.gz
    

VMWare tools should now be extracted.

Step 7 – Recompile VMWare Tools Modules

Before you install VMWare tools on FreeBSD 9, you need the modules to work with FreeBSD 9. VMWare is slow to update the vmware tools for the FreeBSD guest. So you are just going to have to update them yourself.

Note: We are now at the point where we are going to do more and install more than you want to for your nice new clean server, but that is ok, because we have a snapshot and once we get the files compiled you can revert to the clean snapshot. Alternately if you have another FreeBSD system, you can do these steps on that system.

If you install without recompiling as of May 10, 2012, you will get this result.

Starting VMware Tools services in the virtual machine:
   Switching to guest configuration:                                   done
   Guest memory manager:                                              failed
   Blocking file system:                                              failed
   Guest operating system daemon:                                      done
Unable to start services for VMware Tools

Execution aborted.

Compiling the modules first should prevent the above failures.

Step 7.1 – Get FreeBSD Source

Download the FreeBSD Source as described here.

How to download FreeBSD source using svn?

Step 7.2 – Configure the /etc/make.conf

Right now there is a move toward compiling with clang over gcc. Because of changes due to this, you need to add the following line to your /etc/make.conf to compile with gcc. I have not tried to compile with clang yet.

  1. As root open the /etc/make.conf file with you favorite editor and add the following line:
    MK_CLANG_IS_CC=no
    
  2. Save and close the /etc/make.conf file.

Your /etc/make.conf is now configured.

Note 1: You may want to compile a custom kernel while you are at this. If so, check out this article: How to build and install a custom kernel on FreeBSD? If you do this, remember that you have to copy the new kernel to your clean system too.

Step 7.3 – Compile the vmmemctl module

Recompile vmmemctl using these steps.

  1. Go to the lib/modules/source directory under where you extracted vmware-freebsd-tools.tar.gz.
    # cd /root/vmware-tools-distrib/lib/modules/source/
    
  2. Extract vmmemctl.tar
    # tar -xf vmmemctl.tar
    
  3. Change to the vmmemctl-only directory.
    # cd vmmemctl-only
    
  4. Run make.
    # make
    
  5. Run make install.
    # make install
    

You have now built and installed the vmmemctl module.

Step 7.4 – Compile the vmblock module

  1. Go to the lib/modules/source directory under where you extracted vmware-freebsd-tools.tar.gz.
    # cd /root/vmware-tools-distrib/lib/modules/source/
    
  2. Extract vmblock.tar
    # tar -xf vmblock.tar
    
  3. Change to the vmblock-only directory.
    # cd vmblock-only
    
  4. Run make.
    # make
    
  5. Run make install.
    # make install
    

You have now built and installed the vmblock module.

Step 8 – Install VMWare Tools

You are now ready to install the VMWare Tools.

Note: If you are trying to keep you server clean and pristine, then copy the /root/vmware-tools-distrib directory off the server somewhere. THen revert to the snapshot you took just before Step 4. Copy the directory back to your clean snapshot and continue.

  1. Move into the directory created by the extraction.
    # cd /root/vmware-tools-distrib/
    
  2. Run vmware-install.pl
    # ./vmware-install.pl
    
  3. Select all the defaults.

Your vmware tools installation should go smoothly.

VMWare, RDP (MSTSC), WPF, and DisableHWAcceleration

I don’t know if you, like me, have a development box running Visual Studio 2010 and VMWare workstation. I develop in C# and WPF, and test the product in a VM. Then sometimes, when I work from home, I remote desktop into my development box.

When I am using RDP to remote control a VMWare Workstation host, and I run a WPF Application inside a VM, the WPF application doesn’t display. The window opens, and you see the frame of your windows, but the inside is just blank or a white/gray box. None of the WPF Controls are visible.

I have found two ways to fix this. One is permanent and one is temporary.

Option 1 – (Permanent) Set this registry key. Read more about this here on MSDN: Graphics Rendering Registry Settings

Windows Registry Editor Version 5.00

[HKEY_LOCAL_MACHINE\SOFTWARE\Microsoft\Avalon.Graphics]
"DisableHWAcceleration"=dword:00000001

Option 2 – (Temporary) Or just reboot the VM while connected to the VMWare Workstation host via RDP. It seems that the VM boots and the OS detects the lack of support and disabled hardware acceleration. However, once you reboot when you are not RDP’ed into the VMWare Workstation host, you have hardware acceleration back.

I took me a long time to figure this out, because there was little to nothing in a Google search. I came across this solution while looking for something else a month or so ago, and needed to use it again when working from home last night. I thought I would post it so I never have to look for it again.

Virtual Machines, Snapshots, Domain Membership, and trust relationship

Ok, so many of you have reverted to a snapshot of a virtual machine that is a member of an Active Directory domain only to see the error message saying something like this:

In XP:
“Windows cannot connect to the domain, either because the domain controller is down or otherwise unavailable, or because your computer account was not found. Please try again later. If this message continues to appear, contact your system administrator for assistance.”

In Windows 7:
“The trust relationship between this workstation and the primary domain failed.”

This happens whether you are using VMWare or VirtualBox. It also happened back when we were re-imaging to “revert” our drives.

This is caused because the Machine creates an account on the Domain. It actually maintains its own password and updates its own password every 30 days.  So as soon as the Machine account’s password is updated, you are going to be in this state.

Well, I started thinking that there has to be a solution for this. I found this article:
Working with Domain Member Virtual Machines and Snapshots

It mentions a possible option.

“Increase the computer account password age, or disable password changes altogether. Both these can reduce likelihood of the problem, but may reduce the level of security in the domain. On the other side, since this is probably a test, a QA or a demo environment, you may consider it as a valid option . These settings are available on the domain member (and not on the domain controller), and as such, you can change them on your computer before you create a snapshot out of it.”

While he mentions that it can be done, he doesn’t mention how to do it.  There is a Microsoft Knowledge-base article about this.  This is a WIndows 2000 article, but I will have to verify that it works in later versions.
How to disable automatic machine account password changes

It basically says to set this registry key:

KEY: HKEY_LOCAL_MACHINE\SYSTEM\CurrentControlSet\Services\Netlogon\Parameters
Property: DisablePasswordChange
Value: 1

Windows Registry Editor Version 5.00

[HKEY_LOCAL_MACHINE\SYSTEM\CurrentControlSet\services\Netlogon\Parameters]
"DisablePasswordChange"=dword:00000001

You may be able to do this on the Domain controller, by using this setting:

KEY: HKEY_LOCAL_MACHINE\SYSTEM\CurrentControlSet\Services\Netlogon\Parameters
Property: RefusePasswordChange
Value: 1

Windows Registry Editor Version 5.00
 
[HKEY_LOCAL_MACHINE\SYSTEM\CurrentControlSet\Services\Netlogon\Parameters]
"RefusePasswordChange"=dword:00000001

So I am going to try the first one, as it doesn’t require a global setting on the domain.  Lets see if it really works.

Update

I put the first registry key on all my VMs back when this was posted, which looks like October 22, 2010.  I haven’t had the problem since, so I would say this solution works.

I don’t know if the second key that goes on a Domain Controller works.  Maybe some one can try it out for me.

VirtualBox: It seems ready

Ok, so because my work has given me a license to VMWare Workstation, I have never really gone to the trouble of using VirtualBox.

But I really want to move to use FreeBSD (well, PC-BSD) on my laptop but I have to have a Windows 7 box for work.

So I had Windows 7 with PC-BSD in a VMWare Virtual Machine.

However, I am switching that as we speak.

I now have PC-BSD installed as my primary operating system, and Windows 7 in a VirtualBox Virtual Machine.

There are some features we use at LANDesk a lot, such as many snapshots, and PXE booting, and more.  I will test and follow-up on whether this is a good solution for me.

Ahhh…the dying vmware network is back…

Ok, so I posted this a while ago:
Why does VMWare guests lose network access constantly on Windows 7 64 bit?

Well this issue didn’t happen from the middle of December until last week, it started again.

I toggled a bunch of settings, but every setting is correct. There must be something else causing this.

Update: Found this. I will set my NIC to not go to sleep and see if that works. Seems like a bug to me.
http://communities.vmware.com/message/1462154#1462154

Update: That didn’t work.
Yeah, my computer went to sleep anyway, and with that setting, I couldn’t wake it up remotely. Lame.

(Resolved) ShrewSoft VPN Proxy Services Blocks DNS Requests for VMWare Workstation Guests

UPDATE: 3/5/2010
2.1.6 beta 6 addresses this issue, so please install this version and ignore the rest of the comments below.

Ok, so I am big support of ShrewSoft VPN Client and I am also a user of VMWare Workstation. However, I have found an incompatibility between the two.

I tell everyone here at work to use ShrewSoft VPN Client on their Windows 7 64 bit clients. However, they are all running VMWare as well. So I feel it is my responsibility to also inform them of this issue that was found by one of my coworkers.

PROBLEM
Well, a strange problem is seen on VMWare Guests running on a host with ShrewSoft VPN Client installed. No DNS requests are going out for the Guest. A DNS Request never leaves the host.

Troubleshooting
I seached the following term on the VMWare forums: DNS Bridged

The following VMWare Community discussion appeared:
DNS Name Resolution using a bridged network connection not working

Resolution
If you stop the ShrewSoft DNS Proxy Daemon, then the issue goes away.

Also, this is not really a reason to stop using ShrewSoft VPN. There is a post about Cisco’s VPN Client firewall causing the same issue.
Problems with networking using Workstation 7

How to install VMWare-tools on FreeBSD 8 or PC-BSD 8?

I have documentation on how to create a FreeBSD 8 Desktop environment here:
How to install and configure a FreeBSD 8 Desktop with Xorg and KDE?

However, if you install FreeBSD or PC-BSD as a VMWare guest, you will want to install two additional pieces of software when you are finished:

  1. You need to install the VMWare X11 driver (no, it will not be installed when you install the VMWare tools)
  2. You need to install VMWare-tools

This guide is to walk you through resolving the second of these two issues. I assume you followed my article for building the FreeBSD desktop, and if you did, these steps will work for you. But if you didn’t, I can’t guarantee that there won’t be some steps that are slightly different for you.

In order for me to consider the VMWare-Tools installed and working, the following features must work:

  • Clipboard Synchonization
  • Grab/Release Mouse Input when mouse enters/leaves the guests screen
  • Autofit Guest (automatically making the guests screen resolution take all available space)
  • Time Synchronization (the time in the VMWare guest will match the hosts time).

In this document, I successfully get these features working.

I have VMWare Workstation 6.5.3 build 185404 and the host is Windows 7.

Part 1 – Installing and Configuring the VMWare X11 Driver

Already posted on this here:
How to install the vmware video card driver on a FreeBSD 8 guest virtual machine?

Part 2 – Installing and Configuring VMWare Tools

Step 1 – Mount the VMware Tools virtual cd

  1. On the VMWare hosts make sure that your FreeBSD guest is selected and that you are not full screen so you have the VMWare Workstation application surrounding the FreeBSD guest.
  2. From the VMWare Workstation application, choose VM | Install VMWare tools…You will see a pop-up inside FreeBSD on the bottom left.
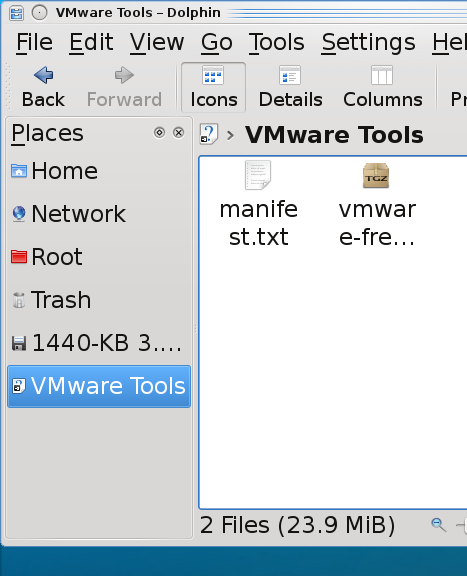
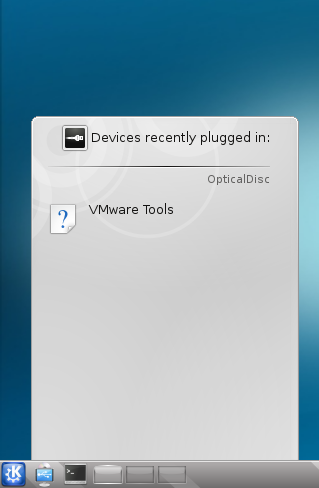
  3. Click on the popup where it says VMWare Tools. This will open Dolphin file browser.
  4. In the Dolphin file browser on the bottom left, you should see the VMWare Tools media. Click on it.

Step 2 – Extract the vmware-freebsd-tools.tar.gz

  1. Right click on vmware-freebsd-tools.tar.gz and choose Extract Archive to… Now you can extract to where you want, as long as you have the folder permission to write to, but the next steps describe where I extracted it to.
  2. Click on Home at the left. There is no need to create a folder as the extacted files will all be in one folder called vmwware-tools-distrib when extracted.
  3. Click OK. The vmware-freebsd-tools.tar.gz is extracted.

Step 3 – Open a shell as root

  1. Cick K | Applications | System | Konsole to open the shell.
  2. Type in su$ su
    Password:
    #

Step 4 – Install the freebsd6 compatibility package.

  1. Determine your architecture or processor type. If you are 64 bit, it will be amd64 even it is intel 64 bit. If you are 32 bit, it is likely x86. Type uname -a to determine what your architecture is and look at the last piece of information provided.

    # uname -a
    FreeBSD FBSD8.hsd1.ut.comcast.net. 8.0-RELEASE-p2 FreeBSD 8.0-RELEASE-p2 #0: Tue Jan 5 21:11:58 UTC 2010 root@amd64-builder.daemonology.net:/usr/obj/usr/src/sys/GENERIC amd64
    #

  2. Install the compat6x-[arch].tgz package, where you replace [arch] with your architecture.  This is already installed on PC-BSD.
    # pkg_add -r compat6x-amd64

Step 5 – Compile and Install the vmware-freebsd-tools

  1. Change to the directory where you extracted the vmware-freebsd-tools.tar.gz.

    # cd /home/jared/vmware-tools-distrib

  2. Run vmware-install.pl.# ./vmware-install.pl

    Just keep hitting enter and accepting the defaults until the vmware-tools are installed.

Step 6 – Start vmware tools

  1. As root run the following:

    # /usr/local/etc/rc.d/vmware-tools.sh start

    Or you could just reboot.

    Note: Since vmware-tools doesn’t exactly integrate with rcNG, you don’t need to add anything to /etc/rc.conf. The just dump a script into /usr/local/etc/rc.d and it is just a shell script and isn’t formatted to require it to be enabled by /etc/rc.conf.

Step 7 – Enabling VMWare user features
The vmware-user process must be launched to enable vmware-user features.

  • Clipboard Synchonization
  • Grab/Release Mouse Input when mouse enters/leaves the guests screen
  • Autofit Guest (automatically making the guests screen resolution take all available space)
  1. Configure vmware-user to run at KDE login by copying the /usr/local/bin/vmware-user shell script to the ~/.kde4/Autostart directory.  You could also create a symlink.
    $ cp /usr/local/bin/vmware-user ~/.kde4/Autostart

    Note: You don’t have to use the command.  In the System Settings under Advanced |Autostart there is an option to Add Script that you can use.

  2. Logout of KDE and log back in.

Step 8 – Running the VMWare-Toolbox
There may be some vmware settings you want to change on the VMWare guest. Not many are configurable through the vmware-toolbox on FreeBSD but at least one is configurable here called Time Synchronization. This feature will synchronize your vmware guest’s time with the hosts time.

  1. Run vmware-toolbox

    $ vmware-toolbox

  2. Check the box to enable time synchronization
  3. Feel free to explore and become familiar with the other settings, there aren’t many and two of the settings can only run as root.

Tuning Recommendations
I found a lot of tuning recommendations. However, if you chose Other | FreeBSD or Other FreeBSD 64 when creating your vm, these first two are set by default.

  1. It is recommended to have kern.hz set to 100 and it is by default so nothing to do here.
  2. It was recommended that on the host, in the vmx config file for the guest, that the following be configured:
    • ethernet0.virtualDev = “e1000”

    Again, if you chose Other | FreeBSD or Other FreeBSD 64 when creating your vm, this is set by default.

  3. Some people will recommend this setting in the vmx config file as well:
    • tools.syncTime = “TRUE”

    However, this is the same as the time synchronization setting we configured with the vmware-toolbox. It is safer to make the configuration in the vmware-toolbox tool.

If you know of any further tuning options, please comment them to me.


Copyright ® Rhyous.com – Linking to this article is allowed without permission and as many as ten lines of this article can be used along with this link. Any other use of this article is allowed only by permission of Rhyous.com.

How to install the vmware video card driver on a FreeBSD 8 guest virtual machine?

Well, I have documentation on how to create a FreeBSD 8 Desktop environment here:
How to install and configure a FreeBSD 8 Desktop with Xorg and KDE?

However, if you install FreeBSD as a VMWare guest, you will want to install two additional pieces of software when you are finished:

  1. You need to install the VMWare X11 driver (no, it will not be installed when you install the VMWare tools)
  2. You need to install VMWare-tools

This guide is to walk you through resolving the first of these two issues. I assume you followed my article for building the FreeBSD desktop, and if you did, these steps will work for you. But if you didn’t, I can’t guarantee that there won’t be some steps that are slightly different for you.

Part 1 – Installing and Configuring the VMWare X11 Driver

Step 1 – Install the VMWare X11 driver

  1. Change to the appropriate ports directory.

    # cd /usr/ports/x11-drivers/xf86-video-vmware

  2. Make (compile) and install the VMWare X11 driver

    # make install

The VMWare X11 driver is now installed.

Step 2 – Modify the /etc/X11/xorg.conf
Note: If you didn’t create an xorg.conf file, then you don’t need to do this step, so skip it.

  1. If you auto-created your xorg.conf, auto create it again.
    # Xorg -configure
  2. Move the auto created /root/xorg.conf.new to /etc/X11/xorg.conf.

    # mv /root/xorg.conf.new /etc/X11/xorg.conf

If you have a custom xorg.conf, then it may be easier to edit it manually.

  1. Edit the /etc/x11/xorg.conf as root.

    # ee /etc/x11/xorg.conf

  2. Change the “Device” section to look as follows.
    Section "Device"
            ### Available Driver options are:-
            ### Values: <i>: integer, <f>: float, <bool>: "True"/"False",
            ### <string>: "String", <freq>: "<f> Hz/kHz/MHz"
            ### [arg]: arg optional
            #Option     "HWcursor"                  # [<bool>]
            #Option     "Xinerama"                  # [<bool>]
            #Option     "StaticXinerama"            # <str>
            Identifier  "Card0"
            Driver      "vmware"
            VendorName  "VMware"
            BoardName   "SVGA II Adapter"
            BusID       "PCI:0:15:0"
    EndSection
    

Step 3 – Restart Xorg
If you are still in KDE, you must logout and log back in. You can probably do this without instructions, but if this is your first time using FreeBSD and KDE 4, a quick screen shot of how to do this won’t hurt. I do like my walk-thru’s to be newbie proof.

  1. At the bottom left of your window, click on the K icon, then Leave, then Logout.

  2. After clicking the Leave option, KDE will exit, and xorg will restart and you should be returned to the login screen. Now log back in.

Note: If you aren’t using KDM, then you will be returned to your logged in shell and you will have to launch Xorg and KDE yourself using the startx command.
Step 4 – Configure your screen resolution

  1. Click the K icon, then Applications | System.
  2. When the menu shifts, the system options appears. Select Screen Resize & Rotate.

  3. Now don’t be confused when this doesn’t open a window. It does launch the program, but for some reason it starts up minimized and is an icon at the bottom right of the panel. It looks like a little monitor (the red arrow is pointing to it).
  4. Click on the monitor icon to get the Configure Display window.
  5. Click the Size drop down menu and choose your new resolution.
  6. Click Apply.
  7. If the resolution fails, it should return to the previous resolution after about ten or fifteen seconds. If the resolution works, click the option to accept the resolution.

You should now have the VMWare Driver installed.

Part 2 – Installing and Configuring VMWare Tools

This is in a separate post here:
How to install VMWare-tools on FreeBSD 8?


Copyright ® Rhyous.com – Linking to this article is allowed without permission and as many as ten lines of this article can be used along with this link. Any other use of this article is allowed only by permission of Rhyous.com.

Why does VMWare guests lose network access constantly on Windows 7 64 bit?

I have a problem with VMWare

PROBLEM

My VMWare guests lose network access constantly on Windows 7 64 bit. This happens sometimes within an hour and sometimes longer. I haven’t really tracked that well.

The first step to troubleshooting is identifying the problem…then next is gathering data, so lets analyze what I have.

Setup

Operating System: Windows 7 64 bit
VMWare version: Workstation 6.5.3

Processor: Core 2 Quad
Memory: 8 GB

Physical cards
1 GB Ethernet
1 Wireless

VMNet0 – Bridged
VMNet1 – Host only
VMNet8 – NAT

Do I need three networks? Could that be problematic? According to this article it could be on Vista 64 bit, and that may hold true for Windows 7 64 bit.
http://communities.vmware.com/message/1137694;jsessionid=407F88A83287FEE2B3B60EC22A592ACB

Ok, so I really only need VMNet0 as I always plan to bridge in this environment. In other environments I might not though. I also have never remove these, but I am going to try it.

ACTIONS:
1. Deleted VMNet1
2. Deleted VMNet8
Note: I deleted those using the Virtual Network Editor | Host Virtual Adapters tab.

Settings
So I started looking at settings to see if there is a setting that doesn’t look right.

Found this setting: Automatic bridging

My problem may be the Automatic bridging settings, since mine is disabled and VMNet0 was configured to use the wireless adapter. I am only using the Ethernet adapter but even though it is a desktop, my PC came with a wireless card, which I am not going to use.

ACTIONS:
1. On the Virtual Network Editor | Automatic Bridging tab, I unchecked the automatic bridging option to disable it.
2. On the Virtual Network Editor | Host Virtual Network Mapping, changed VMNet0 to to be statically mapped to my physical wired Ethernet controller.
3. In windows, I went to my network settings and disabled my wireless network card, since I am not going to use it.

So here goes the test…lets see if my VMWare guest operatings system lose their networking capability.

UDPATE 7:48 AM 12/9/2009

Well, my network wasn’t working last night…so I would have to say the steps above didn’t NOT resolve the issue. Time to continue troubleshooting.

I now have configured the vmnat.exe and vmentdhcp.exe to be allowed in the firewall always.

UDPATE 7:48 AM 1/18/2010
So the three networks somehow came back. I removed them again and this time they stayed gone. This was about a month ago and my virtual hosts’ haven’t lost network access since.