Posts tagged ‘FreeBSD’

FreeBSD Wireless – Configuring a wireless interface on FreeBSD 8.1

FreeBSD Wireless

FreeBSD has strong support for wireless devices. Here is a quick overview of how to manage wireless interfaces on FreeBSD.

Prerequisites

For Wireless access requires the following:

  1. A wireless interface card
  2. wpa_supplicant
  3. An Access Point

Note: In later of versions of FreeBSD, since 2008, wpa_supplicant was included in base. If you are running an older version of FreeBSD, then wpa_supplicant was a port.  So if you are on FreeBSD 8, you have wpa_supplicant.

To complete this guide, we will also use:

  1. A FreeBSD desktop environment.
  2. wpa_gui

Note: wpa_gui is not included in the base system but is found in ports.

Step 1 – Determine what wireless interface card you have

Some wireless cards are built into the kernel, and may already be loaded.  If you know what card you have, skip this step.

  1. First, we need to find out what wireless card you have. Run ifconfig and look at the network cards you have.  Then to see which one is your wireless card, compare them to the wireless kernel module list here:
    http://www.freebsd.org/releases/8.1R/hardware.html#WLAN

    $ ifconfig
    em0: flags=8843 metric 0 mtu 1500
            options=219b
            ether 00:1e:37:d0:91:cb
            media: Ethernet autoselect
            status: no carrier
    lo0: flags=8049 metric 0 mtu 16384
            options=3
            inet6 fe80::1%lo0 prefixlen 64 scopeid 0x3
            inet6 ::1 prefixlen 128
            inet 127.0.0.1 netmask 0xff000000
            nd6 options=3

    Notice in the above configuration, no wireless card was discovered. Here is an example of one with a wireless card.

    em0: flags=8843<UP,BROADCAST,RUNNING,SIMPLEX,MULTICAST> metric 0 mtu 1500
            options=219b<RXCSUM,TXCSUM,VLAN_MTU,VLAN_HWTAGGING,VLAN_HWCSUM,TSO4,WOL_MAGIC>
            ether 00:1e:37:d0:91:cb
            media: Ethernet autoselect
            status: no carrier
    iwn0: flags=8843 metric 0 mtu 2290
            ether 00:1e:37:d0:91:cb
            media: IEEE 802.11 Wireless Ethernet autoselect mode 11g
            status: associated
    lo0: flags=8049<UP,LOOPBACK,RUNNING,MULTICAST> metric 0 mtu 16384
            options=3<RXCSUM,TXCSUM>
            inet6 fe80::1%lo0 prefixlen 64 scopeid 0x3
            inet6 ::1 prefixlen 128
            inet 127.0.0.1 netmask 0xff000000
            nd6 options=3<PERFORMNUD,ACCEPT_RTADV>
  2. Most wireless cards are PCI devices.  Run pciconf to look for your wireless network card type. This outputs a lot of information, I have snipped my output to isolate only the information about the wireless PCI card.
    $pciconf -lv
    ...
    none1@pci0:3:0:0:       class=0x028000 card=0x10108086 chip=0x42308086 rev=0x61 hdr=0x00
        vendor     = 'Intel Corporation'
        device     = 'Intel Wireless WiFi Link 4965AGN (Intel 4965AGN)'
        class      = network
    ...
  3. Now go to the current release notes for FreeBSD and look through the wireless kernel modules to see which one supports your hardware.
    http://www.freebsd.org/releases/8.1R/hardware.html#WLAN

    Note: I searched for 4965AGN and found my kernel module immediately.
  4. Keep the link open as you move to Step 2.

Step 2 – Make sure the kernel module is loading

If your wireless card is already detected and loading, skip this step.  If not, configure /boot/loader.conf to load your wireless card.

  1. Read the man page for your wireless kernel module, there is a link to it in the hardware notes, to see any special information about loading the kernel module for your kernel module.
  2. Configure the /boot/loader.conf to load the kernel module and make any other required settings to use the kernel module.Example 1 – The Intel iwn kernel module requires a line to load the kernel module and a second line to load the firmware.
    # Wireless
    if_iwn_load="YES"
    iwn4965fw_load="YES"

    Example 2 – The Intel iwi kernel module requires that you accept a license agreement:

    # Wireless
    if_iwi_load="YES"
    legal.intel_iwi.license_ack=1
  3. Save and close the /boot/loader.conf
  4. Now you can either reboot, or you can use kldload to load the kernel modules without rebooting.

Step 3 – Configure the wireless settings in /etc/rc.conf

The rc.conf is where the wireless network card is configured.

  1. In FreeBSD 8 and later, all wireless interfaces should be configured to use the generic wlan device. Then to enable wpa_supplicant, the wlan should be configured to use WPA.
    To make these configurations, add these lines to the /etc/rc.conf.

    wlans_iwn0="wlan0"
    ifconfig_wlan0="WPA DHCP"
  2. Save and close /etc/rc.conf.

Step 4 – Add your Access Point’s (AP) SSID to your /etc/wpa_supplicant.conf

There is a lot of information on how to add an SSID to your /etc/wpa_supplicant.conf file in the man page for wpa_supplicant.conf. But the process is simple.

  1. If you don’t know the SSID, discover or scan for the SSID by running ifconfig wlan0 scan.  Below is an example.
    $ ifconfig wlan0 scan
    SSID/MESH ID    BSSID              CHAN RATE   S:N     INT CAPS
    MyWifi          00:20:e1:96:54:32    6   11M -75:-95  100 E
    OpenNet         da:ce:41:d3:af:3a    6   54M -85:-95  100 IS
    MyWPA           00:24:7b:6b:71:27    1   54M -89:-95  100 EP   RSN WPA WPS
                    00:00:00:00:00:00    1   54M -89:-95  100 E
  2. Now add a network entry for the desired wireless device.  Examples are below:

    Open or no authentication

    network={
            ssid="MyWifi"
            key_mgmt=NONE
    }

    WPA or WPA2

    network={
            ssid="MyWPA"
            psk="SomeP@sswd!"
    }

    More examples

    For more examples, read the man page for wpa_supplicant.conf.

    $ man wpa_supplicant.conf

    Once the SSID is configured properly in the /etc/wpa_supplicant.conf, then an automatic connection to this AP will occur whenever the device is within range.

Step 5 – Install wpa_gui from ports

Often you don’t always know what wireless you are going to connect to and also often you don’t care to store the SSID configuration permanently in the /etc/wpa_supplicant.conf. This is common if you are getting online at an airport, coffee shop, or any hotspot that you don’t frequent. It would be nice to have a graphical interface that shows you the SSIDs available, allows you to connect, but doesn’t store the information. wpa_gui is this tool.

  1. Install wpa_gui from ports
    # cd /usr/ports/net/wpa_giu
    # make install
  2. Add the following two lines to the top of the /etc/wpa_supplicant.conf.
    ctrl_interface=/var/run/wpa_supplicant
    ctrl_interface_group=wheel
  3. Restart the wpa_supplicant.# /etc/rc.d/wpa_supplicant restart wlan0
  4. Run wpa_gui.
    $ wpa_gui
    Selected interface 'wlan0'
    Trying to connect to '/var/run/wpa_supplicant/wlan0'

    wpa_gui opens.

  5. Click Scan and a window listing the available SSIDs appears.
  6. Double-click on an SSID to get the configuration windows.  It will try to select the correct settings as best it can, so often you only need to add the psk or passkey, which is essentially a password.
  7. This will connect you to that SSID.

Note: If you do want to save the networks to the wpa_supplicant.conf by default, then add this line. Otherwise, they are not saved. You may or may not want them to be saved.

update_config=1

Additonal Notes

Note 1: PC-BSD has a network configuration tool, so if you are running PC-BSD, wpa_gui is not necessary.

Note 2: There is a command line tool called wpa_cli that is included in the base system.  wpa_cli is useful if you don’t have a graphical environment.

Note 3: I also configured link aggregation, or lagg, so my wired and wireless interfaces share the same MAC.

ifconfig_em0="up"
ifconfig_iwn0="`ifconfig em0 ether`"
ifconfig_iwn0="ether ${ifconfig_iwn0##*ether }"
wlans_iwn0="wlan0"
ifconfig_wlan0="WPA"
cloned_interfaces="lagg0"
ifconfig_lagg0="laggproto failover laggport em0 laggport wlan0 DHCP"

Resources

http://www.freebsd.org/doc/handbook/network-wireless.html
http://www.freebsd.org/releases/8.1R/hardware.html#WLAN
man wpa_supplicant
man wpa_supplicant.conf
man iwn
man iwi


Copyright ® Rhyous.com – Linking to this page is allowed without permission and as many as ten lines of this page can be used along with this link. Any other use of this page is allowed only by permission of Rhyous.com.

Playing DOS games on FreeBSD

I don’t know if many of you remember my post on old DOS games and how easy it is to play them using DOSBox.  Well, it may not surprise you that you can easily install DOSBox on FreeBSD. And yes, on FreeBSD you can play all your favorite old DOS games.

Of course, I assume you have a FreeBSD desktop.

Installing DOSBox on FreeBSD

To install from ports, do this:

#
#
cd /usr/ports/emulators/dosbox
make install

To install from packages do this:

# pkg_add -r dosbox

Configuring DOSBox on FreeBSD

Create a folder, probably in your home directory but it can be where ever you want, to store your DOS games.

# mkdir ~/Games/dos

The configuration file is in your home director: ~/.dosbox/dosbox-0.74.conf

Add the following line to the end of the config under the [autoexec] section.

# echo mount c /usr/home/username/Games/dos/ >> ~/.dosbox/dosbox-0.74.conf

Note: Make sure you have hte trailing slash ‘/’ as the path you mount to must end in a slash.

Running DOSBox on FreeBSD

DOSBox installs to /usr/local/bin/dosbox which is in $PATH so you can run DOSBox at anytime by simply typing in dosbox in a shell.

However, you can create an entry for it in KDE’s menu if you want.

DosBox

Now before you go on, type in intro and read each page as you will get lots of important information about how to use DOSBox in the intro.

C:\> intro

Now make sure to read these pages. They tell you how to go full-screen, capture/release your mouse, etc…

Downloading DOS Games

As mentioned in my previous post about DOS games, you can go here to this cleverly named site to download a lot of DOS games.

Abandonia

Loading a DOS Game

It is just like DOS.  Change to the directory where your game is and run the games exe file.

For example, if you downloaded The Bard’s Tale II: The Destiny Knight, you would type the following:

Z:\> c:
C:\> cd BARD\BARD2
C:\BARD\BARD2> DK.EXE

And your game is launched.

Have fun.  It would takes years to play all the old DOS games at Abandonia.

Installing Windows 7 into a virtual machine on FreeBSD using VirtualBox

My job at LANDesk requires that I write code in C# for an application that only runs on Windows Server.  I also have to test a lot of code on Windows 7. Like me, so many people are forced to run a version of Windows because they have special windows applications at work or because that is the platform we are developing for in our jobs.

If running windows is a must for you, as it is for me, then moving to FreeBSD exclusively is just not an option.  I want to run an FreeBSD, but running Windows 7 is a must too.

At first VMWare Workstation looked like it was going to solve this problem. But while its early versions worked on FreeBSD, they failed to port newer versions over.  Quemu just never could get to level of usability needed.  Well, along comes VirtualBox from Sun.  Sun, now Oracle, released an open source edition cleverly named VirtualBox Open Source Edition (OSE).  Like many of Sun’s code, it is duel licensed.

Prerequisites

  1. A FreeBSD desktop – Hopefully you are here because you already have this.  If you don’t have a FreeBSD desktop, you can follow my guide to build one.
    How to install and configure a FreeBSD 8 Desktop with Xorg and KDE?
    Or you can install and use PC-BSD which is a nice desktop version of FreeBSD.
  2. A Windows 7 DVD or ISO and a product key.  Please do not pirate!

Step 1 – Installing VirtualBox OSE on FreeBSD 8.1

Installing VirtualBox is not complex. It involves only a few steps.

  1. Go to the directory for virtualbox-ose in your ports tree.
    # cd /usr/ports/emulators/virtualbox-ose
  2. Configure your installation.
    # make config
  3. Select Guest Additions, as it is not selected by default.
    Note: The defaults are Qt4, DBUS, X11, NLS and they should remain checked.
  4. You may also want to select VNC.
  5. Install virtualbox-ose
    # make install

Step 2 – Configuring FreeBD for Virtual Box

There are few things we need to configure on the FreeBSD system to make VirtualBox work.

  1. Add users to the vboxusers.
  2. Configure CD/DVD drive access.
  3. Configure VirtualBox kernel modules to load.

Step 2.1 – Adding use to the vboxusers group

  1. To add users to the group, use this command:
    FBSD# pw groupmod vboxusers -m SomeUserName

Step 2.2 – Configure CD/DVD drive access

Note: This is a copy of what is in my document for building a FreeBSD Desktop.

FreeBSD is more secure by default, so something as simple as accessing a CD or DVD or USB drive is not actually allowed by default. You have enable this.

These steps assume that your user is a member of the operator group. Remember above during the installation, I mentioned to make your user a member of both the wheel and operator groups.

  1. Access a shell and su to root.
    Note: The easiest shell to access now that you are in KDE is Konsole. To access Konsole, click the K and go to Applications | System | Terminal. Also you can add the shell icon to your panel by right-clicking on the icon and choosing Add to Panel.
  2. Enable vfs.usermount.
    FBSD# sysctl -w vfs.usermount=1
  3. Configure vfs.usermount to be enabled on boot.
    FBSD# echo vfs.usermount=1 >> /etc/sysctl.conf

  4. Open the following file with an editor: /etc/devfs.conf
    FBSD# ee /etc/devfs.conf

  5. Add the following lines:
    # Allow all users to access CD’s
    perm /dev/acd0 0666
    perm /dev/acd1 0666
    perm /dev/cd0 0666
    perm /dev/cd1 0666# Allow all USB Devices to be mounted
    perm /dev/da0 0666
    perm /dev/da1 0666
    perm /dev/da2 0666
    perm /dev/da3 0666
    perm /dev/da4 0666# Misc other devices
    perm /dev/pass0 0666
    perm /dev/xpt0 0666
    perm /dev/agpart 0666
    perm /dev/uscanner0 0666

    Note: Yes, I copied these from a PC-BSD install’s version of this file.

    Note: Change to 0660 to only allow users in the operator group to mount drives.

  6. Edit the /etc/devfs.rules file.
    FBSD# /etc/devfs.rules

  7. Edit the following file: /usr/local/etc/PolicyKit/PolicyKit.conf
    FBSD# ee /usr/local/etc/PolicyKit/PolicyKit.conf

  8. Change the xml’s config section from this…
    <config version="0.1">
        <match user="root">
            <return result="yes"/>
        </match>
        <define_admin_auth group="wheel"/>
    </config>
    

    …to this:

    <config version="0.1">
            <define_admin_auth group="operator"/>
            <match action="org.freedesktop.hal.storage.mount-removable">
                    <return result="yes"/>
            </match>
            <match action="org.freedesktop.hal.storage.mount-fixed">
                    <return result="yes"/>
            </match>
            <match action="org.freedesktop.hal.storage.eject">
                    <return result="yes"/>
            </match>
    </config>
    
  9. Edit the following file with ee: ee /etc/fstab
    FBSD# ee /etc/fstab

  10. See if there is a line in the fstab for your CD/DVD-Rom. Comment out or remove the line for your /cdrom. I usually just comment it out by adding a # sign as shown:
    #/dev/acd0 /cdrom cd9660 ro,noauto 0 0
  11. Restart the computer.

You should now be able to mount CD, DVD, and USB drives. You also should be able to both read and write to them, burn disks, write and format USB drives, etc…

Step 2.3 – Configure VirtualBox kernel modules to load

  1. As root, edit the /boot/loader.conf file.
    # ee /boot/loader.conf
  2. Add the following text:
    # VirtualBox
    vboxdrv_load=”YES”
  3. Save and close the file.
  4. Edit the /etc/rc.conf file.
  5. Add the following text.
    # VirtualBox
    vboxnet_enable
  6. Save and close the file.

Step 3 – Creating your Windows 7 VirtualBox

  1. Launch Virtual Box.
    Note: VirtualBox registers itself with the KDE menu.  On my installation, it was in Lost & Found, but on PC-BSD it was under System.  Either way you can type VirtualBox in the KDE menu search and find it.  Also, VirtualBox is the command and it should in $PATH so you should be able to open any shell from your desktop environment and run VirtualBox and have it open.
  2. Click New. This brings up a Wizard.
  3. Follow the wizard.
    Ok, if you need help with the wizard, here are my steps.
  4. Read and click Next.
  5. Choose an easy name.  I used “W7”.
  6. Make sure the Operating System is set to Microsoft Windows.
  7. Change the Version to Windows 7 (64-bit) or if you are on 32 bit hardware still use just Windows 7.
  8. Click Next.
  9. Allow at least 1536 MB (1.5 GB) for the base memory size.  You can get away with less if you need to. You can do better with more if
  10. you want to.
  11. Click Next.
  12. The Virtual Hard Disk page is already configured correctly, Boot Hard Disk is checked and Create new hard disk is selected. So just click next.
  13. Read and click Next.
  14. For Hard Disk Storage Type, I left it set at Dynamically expanding storage.
    Comment: This means that even if you use a 100 GB drive, it will only physically use as much space as Windows 7 has used in the Virtual Drive. So if Windows 7 is using 10 GB, even if you have 100 GB drive, the physical size on disk is only 10 GB.  This is important information for the next screen.
  15. Click Next.
  16. I change the drive size to 50 or 100 GB.
    Comment: It doesn’t really matter, but it is best to not run out of space either virtually or physically. Read my comment in the previous step.
  17. Click Next.
  18. Read and click Finish.

You virtual Machine now shows in the list.

Lets move to the next step.

Step 4 – (Optional) Changing Settings on your Windows 7 VirtualBox

I make two changes to my Windows 7 virtual box. As noted above this is optional, but I like to do them.

  1. Click the settings.
  2. Click System.
  3. Change the boot order to be hard drive first.
    Note: I make this change because it annoys me it when I install and then reboot the machine after the install and it boots right back to the install media. So I make this change and the press F12 during boot to the CD once.
  4. Uncheck and get rid of the floppy. (Does anyone still use those?)

  5. Now click on Storage.
  6. Under the Storage Tree, select your optical drive.
  7. If you are using an ISO, change the CD/DVD Device to point to the ISO. If you are using a DVD, as I am, choose Host Drive.  My host drive says: Host Drive Optiarc DVD RW AD-7910A (cd0).  I assume everyone drive will show up slightly different, but should start with Host Drive.
  8. Click OK.

Your settings should be good to go.

Step 5 – Install Windows 7

Now it is time to install Windows 7.

Don’t pirate! Use a legal product key. Again, just because I like open source does not make me anti closed source. I am not a Microsoft hater and I would hope you aren’t either. Even if you are, that is no excuse for pirating.

  1. Insert the DVD into your DVD drive, unless you are using an ISO and have already connected it.
  2. Click the Start icon.
  3. A new installation window will popup.
    Important! You may get a lot of popups telling you about important tips for using VirtualBox. Take time to read them. If you don’t read them or don’t already know what they are telling you, you will wish you had read them.
  4. Click in the window and to have it take control of your mouse and keyboard.
  5. Press F12 to choose your boot option.
     

    Note: If you miss this, that is OK,  you can restart the VM and try to be quicker.

  6. Once you have pressed F12 in time, you will see the following screen. At this screen, press the letter next to DVD drive.
  7. Press a key when prompted to boot to the Windows 7 media.

Well, you are off to installing Windows 7.  Hopefully you can get Windows 7 installed on your own, cause I am not here to walk you through doing that. Don’t worry, the install media for Windows 7 should be easy enough for you to follow if this is your first time.

Once finished, you will be running Windows 7 on FreeBSD.

Step 6 – Install VirtualBox Guest Additions

Even though all the devices are virtual, drivers are still needed. VirtualBox guest additions installs most of these drivers as well as other features of VirtualBox.

  1. Log in to your Windows 7 install.
  2. Select Device | Install Guest additions.

    This will mount an ISO and start the installer for VirtualBox Guest Additions inside Windows 7.

  3. Click Run VBoxWindowsEditions.exe.
  4. Follow the wizard.
    Note: I use the default install location and I check the option to Use Direct 3D support.
  5. Reboot when prompted.

Step 7 – Install the sound card driver

The sound card driver must be installed. VirtualBox uses a virtual device representing the Realtek AC’97 sound card.

  1. Log back into Windows 7.
  2. Go to the following web site:
    http://download.cnet.com/Realtek-AC-97-Driver-Windows-Vista-Windows-7/3000-2120_4-10962344.html
  3. Download and install the Realtek AC’97 Driver.
  4. Reboot when prompted.

Your Finished

You now have Windows 7 running. Now you can have the great experience of using FreeBSD as your primary OS and load Windows 7 when you need something requires windows, like I do.

Sources:
http://wiki.freebsd.org/VirtualBox
http://forums.freebsd.org/showthread.php?t=18699
The virtualbox-ose port’s pkg-message

GUBUG: Let's start meeting again


I live in Utah. The BSD users group is called: The Greater Utah BSD Users Group (GUBUG).

Unfortunately, I haven’t really seen any activity with this group in years. Sometimes I feel like the only active BSD user Utah, though I know this is far from true. I met some great people at the Utah Open Source Conference.

So I am kicking GUBUG into gear! Lets have a restart of the GUBUG meetings!

Date: Nov 17, 2010
Time: 7:00 pm – 8:30 pm
WHERE: LANDesk Building (see map)

I created a Facebook Group and added this as an event. Please join the group and RSVP if you can make it.
http://www.facebook.com/event.php?eid=119773334748668

Topics:
1. Contacting past members
2. GUBUG web site
3. A BSD topic (To be determined)
4. New GUBUG goals.

It will just be a fun meeting, to get things started again.

Connecting to Active Directory with Kerberos on FreeBSD

So, I am trying to get Active Directory integration with FreeBSD and I have been researching this for a while as I have stated.
http://rhyous.com/2010/01/13/researching-the-process-for-integrating-freebsd-with-active-directory

I don’t have it all integrated yet. I keep running into road blocks.

First, I want to be able to do integration with Kerberos alone.

One part that is really easy is connecting to active directory with kerberos.

Step 1 – Collect Active Directory information.

Active Directory Domain LD.LAB
AD Domain Controller vmdc.ld.lab
Domain Admin user name administrator
Domain Admin password pw

Step 2 – Create the /etc/krb5.conf

Here is mine. Supposedly this is case sensitive, so make sure to match the case.

[libdefaults]
  clockskew = 300
  default_realm = LD.LAB

[realms]
  LD.LAB = {
    kdc = vmdc.ld.lab
    default_domain = LD.LAB
    kpasswd_server = vmdc.ld.lab
  }

[domain_realm]
  .LD.LAB = LD.LAB

Step 3 – Acquiring a ticket

  1. Use kinit and a domain user and password to acquire a certificate.# kinit administratorEnter the password when prompted.
  2. Use klist to list the kerberos tickets.

However, once I have this working, I don’t know how to change authentication using nsswitch.conf and /etc/pam.d/sshd or system to make it work.

I assumed I wouldn’t need to change nsswitch.conf and that for Step 4 I would just have to uncomment the pam_krb5.so lines in the the /etc/pam.d/sshd and /etc/pam.d/system but unfortunately, that isn’t enough.  Authentication is not working.

I can’t seem to find much documentation on pam and kerberos in FreeBSD.  I have tried to add “debug” to the lines in the /etc/pam.d/sshd and /etc/pam.d/system but if that is adding more logging then I am not seeing it.

PCBSD 8 on an IBM T40

Hello all,

I thought I would share my experiences of using PCBSD 8 on an IBM T40.  I am going to put the information in separate headings, and I am going to document who is responsible for the feature I am talking about by prefacing each line with the responsible party.  If it is a positive experience, the responsible party will be in Green.  If it is a negative experience the responsible party will be in Red.

I am probably going to reinstall and do all this over again with the “snapshot” version and look for any improvements and try to submit any bugs/suggestions to Kris and his team.

IBM T40 Hardware Specs

Intel Pentium M
ATI Radeon Mobility M7 LQ (Mobility Radeon 7500 (fdds)
Intel PRO/Wireless 2200BG
Realtek AC97 Audio
Intel 82801DB PRO/100 VE Network Connection
UltraATA/100 EIDE Controller
34 GB 5400 RPM drive

Installation of PCBSD

9:20 AM started boot process
9:25 AM Finished configuring and clicked “Install”
9:37 AM 47% finished
Sorry, I was pulled away for an hour so I don’t know how long hte install took. I did find an install log, but unfortunately it had no date stamps. I rebooted before I realized that the log file itself might have had a timestamp.

PCBSD: So I don’t know how long the install took but it felt too long. I wonder if there are some tricks that can be done to speed this up.  For example, the install could use an image. It could lay down the image, then extend the last partition to fill the drive, and then modify the key files after the image is laid down, add any packages not included in the image.

Boot options

PCBSD: Adding the “Run X in Vesa mode” as item 6 is pretty cool.
PCBSD: Adding the “Run the Display setup wizard” is nice, so you can try to use a different video card post setup.
PCBSD: Single user mode and other boot options normal to FreeBSD still exist.
PCBSD: Splash screen works (this is an x86 box)
PCBSD: The bootup takes too long, there should be some ways to speed it up.

FreeBSD: I like to have a shorter delay when booting. 10 seconds is too long for me. So I added this to /boot/loader.conf

# Boot Options
autoboot_delay=”3″

Post-install Setup

Update: So I reinstalled because I tried a PC-BSD 8-stable snapshot, but ran into a FreeBSD bug, so I returned to PCBSD 8 release.  On Reinstall, the ATI-3D-Enabled drivers worked, so I am editing this to say so.  I am not sure why they didn’t appear to work the first time.  Maybe because I had tried the Radeon settings first, I don’t know.

PCBSD: On first boot, there was a great interface for configuring Xorg.

PCBSD: This has a Radeon card, but there was no option for Radeon, just ATI or Radeonhd and neither worked really.

  • Tried Radeonhd drivers – both normal and 3D failed to launch Xorg.
  • Tried ATI drivers – both worked but I used the one that enabled 3D features.

Note: I found another solution that added 3D features I wanted. See the Xorg and KDE4 Features section.

Networking

FreeBSD: Wired networking worked using DHCP without me having to do anything.
FreeBSD: Unplugging the wired network and plugging into a different subnet does not automatically cause dhclient to run again.  So in order to get new IP settings, I had to run /etc/netstart as root.  It didn’t work the first time either, I had to run it again.
PCBSD/KDE4: I couldn’t easily find a network tool to configure WIFI. I finally found it under System Settings.
PCBSD/KDE4: Once I did find the Newtork Configuration tool, it was easy to use and I connected to my WPA2 secured wireless network using a D-Link DIR-615 router.  It worked very well and I downloaded a lot with no hiccups.

Sleep/Resume

FreeBSD/ACPI: Put machine to sleep. Worked fine.
FreeBSD/ACPI/moused:
Woke machine up. No mouse. Had to use Ctrl + Alt + F1 to get a command prompt and fix this by restarting the moused daemon.

Note: Added this line before exit 0 in the /etc/rc.resume. This doesn’t resolve the bug, but restarts the mouse so it works, which is a workaround, but workable none-the-less.

/etc/rc.d/moused/restart

PCBSD/FreeBSD: Closing the lid does not put the machine to sleep.

Note: I fixed this by added this line to the /etc/sysctl.conf

hw.acpi.lid_switch_state=S3

After making the above settings, you can run this command to change it in the current booted system so you don’t have to reboot.  But the setting in /etc/sysctl.conf is what makes this persist on reboot.

sysctl -w hw.acpi.lid_switch_state=S3

Random Usability Notes

PCBSD: Ports Console is easily confused with a regular console as Icon Text is not always looked at, I recommend a different icon and naming it Ports Jail. I created this for myself.

KDE4/PCBSD: The fonts were a little off for the four default icons vs the background…but this only seems to be an issue with dark backgrounds.
Shutdown and Reboot works as a regular user by default.
KDE4: After selecting Reboot or Shutdown, there is a hesitation before the shutdown/reboot popup, so I sometimes double click. I don’t like how the shutdown/reboot popup just disappears if a second click occurs with the mouse anywhere but on the shutdown/reboot popup.

Web Usability

Firefox/Flash/FreeBSD: YouTube – Went online and clicked on one of the first videos and it played.

Xorg & KDE4 Features

Update: Do to a reinstall, I noticed that choosing ATI 3D actually worked an enabled 3D features.  I will check on the settings below to see whey they set.
Even though I had a Radeon, only the ATI or ATI 3D drivers worked. The RadeonHd drivers did not work.  Probably because it is an old Radeon and not a new RadeonHd.

Note: I got the Radeon driver to work myself by using the xorg.conf from the ati3d settting and changing the “Device” section to use the settings below. I didn’t make these up on my own, I found them here: http://userweb.cs.utexas.edu/~walter/geek/linux-t40.html#video

Section "Device"
	Identifier	"ATI Radeon"
	Driver	"radeon"
	Option	"DynamicClocks" "on"
	Option	"AGPMode" "4"
	Option	"RenderAccel" "on"
	Option	"EnablePageFlip" "on"
	Option	"BIOSHotkeys" "on"
	BusID	"PCI:1:0:0"
EndSection

After doing this, I got much better settings as described below:

Xorg/KDE4: Konsole supports transparency when using ATI 3D.
Xorg/KDE4/3D: Moving the cursor to the top of the screen will do a cool screen where it shows your configured screen in a line from left to right (four by default though I always change to 3).
Xorg/KDE4/3D: Moving the cursor to the top right corner of the screen will do a cool screen where it shows your configured screens in a 3D object (cube or pyramid).

Ctrl + Alt + Backspace is disabled

Ctrl + Alt + F1 does display the terminal sessions and then:

Alt + F2, F3, F4, …, F8 will all take you to one of the open console terminal sessions.
Alt + F9 returns you to your Xorg seesion

KDE4/PCBSD: Alt + F1 does NOT open the start bar. Right-clicking on the Fireball and choosing Application Launcher settings shows no shortcut, so you can configure it if desired. When I install KDE4 the default is Alt + F1, not None, so I assume this is something PCBSD changed.

KDE4: After selecting Reboot or Shutdown, I don’t like how the reboot option or shutdown option just disappears if I click with the mouse on the desktop.

Software Installation

PCBSD: PBIs make installing software fairly easy.
PCBSD: There are not enough PBIs.
PCBSD: The size of PBIs are HUGE, which is by design, they include every library they need to run, but by design or not, they are huge.
PCBSD: I installed Firefox and Open Office and Pidgin post install because there are updated version to those on disk anyway.

KDE4/Firefox: Firefox prompts every single time I open it to be the default browser. Saying yes appears to do nothing. I manually went to KDE4’s System Settings and change the default application for the web browser to be /Programs/bin/firefox3.sh and this issue stopped.

PCBSD: K3b installed perfected first try.

External Media

PCBSD: K3b burnt a DVD (the latest PC-BSD snapshot) without having to perform any tweak, and for those who know how many tweaks are required when using just FreeBSD and not PC-BSD, you know why this is awesome.

Weirdnesses

Every boot when loading KDE4, the following error displays: The profile “” has been selected but it does not exist.

I plan to update this from time to time with my experiences, so this post is in no way final.

Are you using BSD or Linux and you don't even know it?

Hello everyone,

I have had two Open Source experiences with average non-geeks that I would like to share.

Experience 1 – The in-laws are using Linux
I spent Easter at my in-laws and while I was their I of course took some time to “fix” their computers. Doing some maintenance to their computers is a regular task for me. However, they had recent purchased a new netbook and it was the only computer that they didn’t need me to work on.

“You got a new Netbook?”, I asked in surprise. Not that they consult me before every purchase but I usually hear about it. “Can I see it?” I asked.

My father-in-law, a retired seminary teacher who does real estate on the side, went and got the new little Netbook.

I booted it up and while the average person couldn’t tell it was running Linux, I immediately recognized the KDE interface despite the fact that it was tweaked to look as much like windows as possible.

I pressed “Ctrl + Alt + Backspace and sure enough Xorg restarted.

The Netbook is a pretty cool system. It is featured more like a smart phone than a computer, in that it has a tabbed window and you have a limited amount of icons on each tab, including needed items such as a browser, a documentation suite (Google Docs), etc…

My son’s grandparents are using Linux and they don’t even know it. While my curiosity told me to figure out how to enable the root account and start hacking around, I pushed aside the temptation because it was pleasure enough to know that my predictions are coming true.

I said, “By 2010, Linux will be above the watermark of requirements for the majority of users, and will start taking the market by storm.” And I am telling you it has begun.

Well, you might argue that this one purchase by my grandparents doesn’t mean this is true.

Well, I would retort that it isn’t just this one incident.

  • Netbooks are very popular and selling fairly well among all walks of life, not just to my grandparents.
  • There are many Google phones that are running Android, based on the Linux kernel.
  • Slashdot has a story where Ubuntu is claiming 12 million users and Fedora claims 24 million.
  • My company, LANDesk, continues to get an increased amount of request to support Linux flavors.

Experience 2 – A friend of a friend needing to compile an open source app on OS X
My favorite Operating System is FreeBSD, which has a great desktop version PC-BSD. While these are not exactly Linux, they are open source and actually more free than Linux (see my post on licenses). The rise in the use of FreeBSD and PC-BSD is also increasing rapidly.

Windows is the most used operating system by far. Did you know that the second most used operating system is FreeBSD-based. Yes, Macintosh users, underneath the hood of your pretty graphical user interface (GUI), you have a system that is derived in a large amount from FreeBSD.

Yes, if you are running OS X, you are running a system that is, underneath the hood, very similar to FreeBSD. It has a nice ports system called MacPorts that is a very similar system to FreeBSD’s ports system.

Well, as a replacement for a Visio diagram, I used the program Dia so that some of my friends could have the ability to modify and change the diagram (which happens about once a quarter) as desired without spending way too much for Visio when they otherwise would never ever use it. Well, a friend of a friend called me and wanted to use it.

Unfortunately at this time, Dia doesn’t have a version for OS X, but can be installed using MacPorts. So I found myself showing the average user how to install MacPorts. Unfortunately, I don’t have a Mac, so I couldn’t write a walk-thru of doing this and I don’t know if the friend of a friend was successful in installing Dia on OS X, but still, this average user wanted to do it and wanted this open source app that was available to him only because his system was derived in large part from FreeBSD.

How to make Apache handle. asp and .aspx links in FreeBSD or Linux? (Updated)

Ok, so what do you do when a site that was based on asp.net is converted to a Linux box and your product shipped with links to sites such as http://our.home.page/index.asp and many other .asp or aspx sites?

Should you use mono?
Yes, probably

See my mono post on Asp.Net here:

Asp.Net web services on FreeBSD and Apache using Mono

Should you migrate your code to php or ruby or another open source language?
Sure, maybe

If you choose not to go with mono at this point because it might be easy to re-write your code in php or ruby or any other open source language, especially if you are doing nothing more than echoing html code after performing simple calculations.

I haven’t tested it yet, but you may get a lot of the asp code automatically converted using this tool: asp2php

What about the fact that unchangeable links to my pages end with .asp or .aspx entensions?
It doesn’t matter what the file extension is, you can have that file extension handled by any scripting language. For example, to configure Apache to have php handle .asp or aspx file, you can follow the steps below.

If you have an index.asp file that should automatically be served by default, it is probably not in the list of files to serve by default, which is probably just index.htm and index.php. You can either rename index.asp to index.php or modify the httpd.conf to include the index.asp file. These steps assume you are changing the httpd.conf.

  1. Change to the apache configuration directory: /usr/local/etc/apache22/
  2. Edit the httpd.conf with ee.
    ee httpd.conf
  3. Search for “DirectoryIndex” to find the section where the directory index is configured.
  4. Add index.asp as the first item as shown:
    DirectoryIndex index.asp index.php index.html
  5. Change to the “Includes” directory which by default is here: /usr/local/etc/apache22/Includes
  6. Create a file that is named ending in .conf (For example, to show what the file does in the name, I used asp-as-php5.conf):
    # Handle .asp and .aspx with php
    AddType application/x-httpd-php .asp
    AddType application/x-httpd-php .aspx
  7. Restart apache. Now your .asp and .aspx files will be handled by php.

Copyright ® Rhyous.com – Linking to this page is allowed without permission and as many as ten lines of this page can be used along with this link. Any other use of this page is allowed only by permission of Rhyous.com.

How to troubleshoot Xorg on FreeBSD 8?

Ok, so I have been in Tech Support for most of my career and troubleshooting has become a skill I use without thinking about it.

Recently, I have been reading some posts on the FreeBSD forums about Xorg problems. I thought I would write a post about “How to troubleshoot Xorg.

Step 1 – Document the problem clearly

  1. Reproduce the issue and store any output errors or screenshot them (if possible) as needed.
  2. Reproduce the issue again but this time while doing so, document each step you took to reproduce the issue.

Note: You wouldn’t believe how many issues are solved during the process of documenting the steps to reproduce an issue.

Step 2 – Gather Hardware Details
Lets make sure we know what is in your system. Gather the output of this command to get the AGP, PCI, or PCI-Express devices in your system.

# pciconfig -lv

Step 3 – Gather Installed Software Details
We are going to run some commands here. The output of every command you run should be stored into a text file. If you are getting help from a forum, a mailing list or you are paying for support for a company, they are going to want as much information as possible.

Note: I assume you have sshd enabled and that you can both ssh to your machine and sftp to your machine. A windows ssh tools is PuTTY. A windows sftp tool is WinSCP.

  1. Get the basics about the installed FreeBSD system.# uname -a
  2. Make sure Xorg is installed and that any other required software or add-on software such as the Windows Manager (KDE, GNOME, Fluxbox) is installed.# pkg_info
  3. It is often good to just get the list of Xorg packages:# pkg_info |grep xorg
  4. Look in the package list to make sure that if you are using an NVidia or Intel driver that requires the installation of a binary package (as they are not open source) that you have installed the driver.

Step 4 – Gather Software Configuration Details

  1. Gather the Xorg configuration file. Now one does not always exists, but if it exists, it usually located at /etc/X11/xorg.conf
  2. Gather the /etc/rc.conf file so you can see what it is configured to enable.
  3. Gather the /boot/loader/loader.conf file so you can see what it is configured to enable.
  4. Gather the ~/.xinitrc or /home/username/.xinitrc file.

Step 5 – Gather logs and examine logs for errors

Gathering Logs

One process for making it easier to view logs and find the cause of errors. It is an obvious procedure to some.

  1. Backup all logs.
  2. Delete logs once backed up.
  3. Duplicate the issue.
  4. Gather the logs (both backed up and new logs).

The key is to limit the amount of data to go through. So by deleting the logs and duplicating the issue as fast as possible, your logs will be as small as possible and easier to go through.

  1. Gather the /var/log/Xorg.0.log file.
  2. You might want the /var/log/messages file.

Examine the logs for errors

Now that you have the smallest amount of data possible, it may be easier to search the logs for errors.

  1. Start out by greping or searching for words like fail, error, etc…
  2. If you didn’t find anything, then visually scan down the logs.

A nice way to watch a log file live as you duplicate the error is to use tail.

  1. Open two shells, maybe one directly on the system and one through ssh.
  2. In one shell, run this command to watch a specific log file, such as Xorg.0.log. (For this use the ssh shell if you have sshd enabled and opened on through ssh)# tail -f -n 50 /var/log/xorg.0.log
  3. Duplicate the issue in the other shell. (This would be the shell directory on the system.)
  4. Watch the dynamic log live and try to find the line where the error occurs.

Tip #1 – Enable sshd when testing

Sometimes running Xorg may result in a black screen and you can’t switch between ttys either using Alt+F# so you may be tempted to hard power off. Most the time if you have enabled sshd, you can ssh in and kill Xorg or reboot gracefully, saving you a hard power off.

Tip #2 – Try running Xorg with and without an xorg.conf

Supposedly you don’t need and xorg.conf always but there are times when you would want one. I have seen forum posts where the solution goes both ways. One user’s issue was resolved by not using an xorg.conf and letting Xorg just start and automatically handle everything. Another users issue was resolved by using an xorg.conf. So try it both ways.

Tip #3 – Use the FreeBSD forums correctly

If you have all of the above data and you still have an issue, if you go to Xorg section of the FreeBSD Forums, and make a post, you will be able to provide an educated, detailed question.

There is fine line between posting too much data or too little data and posting the perfect amount so a reader can have enough data to resolve your issue. I would say it is rare should post all configs and logs, but it also should be rare that you post a question alone without any details.

Ok, so this may not be complete. If you have anything to add please comment.

Using QlikView and DistroWatch to report on the most popular open source distributions (BSD, Linux, Unix)

Ok, so I am into FreeBSD and open source software, but I have recently had to do a QlikView implementation for my company LANDesk. QlikView has a feature where you can pull data from the web and report on it. So I needed to learn how to use the web-based reporting, so I decided to do a report from www.distrowatch.com.

Report Goals
There are few things that interests me from the data at DistroWatch:

  • Which base platforms are the most used?
  • Which platforms should software companies focus on supporting?
  • Where does BSD sit in the rankings.

How the report was made
So on the main DistroWatch page, there is a report that will give you the average hits per day (hpd) that a Distro’s web site gets. At the bottom there is a link to full popularity page of just these reports:
http://distrowatch.com/stats.php?section=popularity

So at first glance, you see Ubuntu is the best and Fedora is second and so on. I wanted to take the statistics a bit further. I wanted to know what main base distribution was the most used. What I mean by base distro is this: Ubuntu is #1. But Ubuntu is not a base distribution, instead it is based on Debian. Mint is #3 and is also based on Debian. Debian itself is #6 and it is a base distribution. Fedora is a base distribution.

QlikView can connect to this web page and consume this data. It was also able to loop through and click go to the link for each distribution where it was able to pull the “Based on” results. I did a few little tweaks to clean it up.

So I used QlikView to match each Distribution to its base distribution and built my report. I gathered the cumulative hits per day (hpd) of each base distro by summing the hpd from itself and its child distros. The results are staggering.

Result of the Report
I am going to show you a screen shot of the report, but I am only going to show the top 10 base distributions because otherwise it is to hard to view the report.

# 1 – Debian
Well, I have to say that I new that Debian (13818 hpd) was popular because of Ubuntu, but I didn’t know how far ahead it was compared to other base distributions. I expected Red Hat to be a lot closer but its just not. Lets look at the top ten Debian platforms by hits. In QlikView this is easy, I can simply click on the Debian pillar in the report.

So not only is Debian’s cumulative hits per day first, but it is first by a long ways. The cumulative hits per day of distros based on Debian is more than three times larger than any other base distribution’s cumulative hits. It is pulling away from the pack and nobody is going to catch up any time soon.

What I don’t know is are these new users or are other distributions losing members to Debian or Debian-based distros?

You might be grumbling to yourself and saying some incorrect statement like: Well, Ubuntu doesn’t have Enterprise support like Red Hat. But like I said, that is an incorrect statement. See their support page:
http://www.ubuntu.com/support

# 2 – Red Hat
Now, lets look at the top ten distros under Red Hat.

Ok, can I tell you that I was surprised at these results. I realize that Fedora was huge, I mean it is second on the distro list under Ubuntu, but I had missed the fact that CentOS was getting more than twice the hits Red Hat itself gets. The rest are hardly worth mentioning.

Historically mong Enterprise environments Red Hat is the most known distro, but when you look at these stats, you have to wonder if Ubuntu has taken over. The numbers for Fedora are fine, but for Red Hat they are not really that good. In fact, I keep hearing about companies using CentOS instead of Red Hat and as you can see, CentOS is getting a lot more exposure than Red Hat.

I will make this statement. Based on this data, if you are a software company considering whether to support Debian or Red Hat first, based on this data you have to choose Debian. If you were to make up some fuzzy logic for Red Hat (which due to its enterprise presence may or may not actually be valid) and weight the distributions based on other factors and somehow found a way to say Red Hat and its distro’s cumulative hits per day were worth three for every one, it would still be less than the cumulative hits per day Debian gets.

# 3 and #4 – Mandriva and Slackware
Ok, back to the report. Something that shocked me from the first chart and I had to analyze it further. Slackware? I had no idea that it was third. However, is it really third? It has a lot of very small distros based on it and Slackware itself gets 590 hpd and most the distros get less than 100 hpd. Mandriva is fourth but arguable could be third over Slackware. In fact, I have to call Mandriva third over Slackware. Sometimes you have to look at the data and make a judgment like this. Sorry Slackware, I am not trying to be biased (otherwise I would be talking up FreeBSD). I have no bias to any Linux distribution. I just say this based on the fact that Mandriva (1048 hpd) and the based-on-Mandriva version PCLinuxOS (773 hpd) both get more hits by a long way than Slackware’s top distros. The only reason Slackware got more hpd was because it has a lot of distros that were really small, while there were very few small distros based on Mandriva. The difference in the amount of small base distros is most likely due to the fact that Slackware is one of the oldest Linux distros, if not the oldest remaining distro, so naturally it has more distros based on it.

# 5 – Gentoo
Gentoo’s cumulative 1804 hpd was fourth. I have to apologize to Sabayon (760 hpd) as I had never heard of it until now. Gentoo itself only gets 428 hpd.

# 6 – BSD
What is next. Well, finally BSD shows up at number 6 with 1743 hpd. For those of you that are reading this and only know about Linux, BSD is NOT Linux. It does not run on the Linux kernel and is not likely to use many GNU tools. I hope I don’t drip with too much bias as FreeBSD is my favorite open source distribution.

Lets pull up the chart of BSD distros. There are 15 distributions listed under BSD, which is probably more than most people would believe since BSD often claims that it is not as broken up as Linux, but it has had its share of forks.

FreeBSD (553 hpd) is the main distribution. Of the Linux distributions, only Debian has more software packages available than FreeBSD.

PC-BSD (355 hpd) is to FreeBSD as Ubuntu is to Debian. For being such a new distribution PC-BSD is doing rather well. It is pretty comparable in ease of use to Ubuntu, Fedora, and OpenSUSE. Yes, PC-BSD is fully featured, running a nice windows environment with everything you could want, including a working Flash Player, the ability to configure your wireless card, and more. I recommend that if you are looking for a new desktop distribution, you at least install PC-BSD and give it a try. Ok, so my bias does show a little here.

# 7 – SUSE
So I was very surprised that SUSE wasn’t on this list until #7. Well, OpenSUSE is doing its part getting 1327 hpd. Remember, OpenSUSE is #4 if you just go by distro and not cumulative base distros. I think in time SUSE could be more popular. SUSE is newer than some of the other base distros and so it only has four distros listed. Novell’s SUSE Linux Enterprise (121 hpd) is the second most popular SUSE distro, however, it just not getting any were near the hits I expected it to be getting.

The others
And then there are the rest of the top ten: #8 Arch, #9 Puppy, and #10 Solaris (Or is that Oracle now?). Sorry if your distro was left out, this report is in the control of those who visit the distro’s web pages.

How accurate is this data?
On DistroWatch’s popularity page, it says:

The Page Hit Ranking statistics have attracted plenty of attention and feedback. Originally, each distribution-specific page was pure HTML with a third-party counter at the bottom to monitor interest of visitors. Later the pages were transformed into plain text files with PHP generating all the HTML code, but the original counter remained unchanged. In May 2004 the site switched from publicly viewable third-party counters to internal counters. This was prompted by a continuous abuse of the counters by a handful of undisciplined individuals who had confused DistroWatch with a voting station. The counters are no longer displayed on the individual distributions pages, but all visits (on the main site, as well as on mirrors) are logged. Only one hit per IP address per day is counted.

There are other factors to consider, such as the fact that some of the distributions are Live CD distros and not really platforms meant to be installed. It would be interesting to exclude them and only include installable distros but for lack of time, I didn’t.

I did nothing to verify the accuracy of the data at DistroWatch and any errors you see are not likely mine, as all the data was pulled from DistroWatch, please report any error to them and once they fix these errors, the QlikView report’s data can be reloaded.

Also, this data includes all hits from all areas: Consumer, Enterprise, Education, etc. Unfortunately there is no way I know of to tell where the hits came from. If there is a distribution that is 100% education hits, there would be no way to know that. Obviously if your target is Enterprise, you are left wondering which open source distros are really the most used in Enterprise environments. Unfortunately this report doesn’t answer that question. This is not a report of installed platforms, it is a report of cumulative hits per day. It is what it is.


Copyright ® Rhyous.com – Linking to this article is allowed without permission and as many as ten lines of this article can be used along with this link. Any other use of this article is allowed only by permission of Rhyous.com.

How to update all your installed ports on FreeBSD using portupgrade?

Ok, this week there is a simple tool that we are going to talk about. It is called portupgrade. This is a handy software that allows you to manage your ports more efficiently.

I use portupgrade when I want to do things the easy way.

Lets give you a use case. You want to install a new piece of software that requires a library that you already have installed, for example, openssl, however the port fails because the dependency is too old of a version. Well, now you have find the updated port for openssl and uninstall and reinstall it. That might seem easy with one port. But now imaging you have a very new piece of software and you have to update a dozen or more ports. That is going to be time consuming. That is where portupgrade comes in. It does the hard work for you.

Step 1 – Make sure you have ports installed and updated
I already have a post on this. It is pretty short. Check it out here.
How to install ports on FreeBSD?

Make sure that even if you have installed ports that you update ports again so you have the latest.

Step 2 – Install portupgrade

  1. Log on as root.
    $ su
    Password:
    #
  2. Change to the ports directory and
    #
    #
    cd /usr/ports/ports-mgmt/portupgrade
    make BATCH=yes install

Step 3 – See which ports are outdated
The following command will show you which packages are up to date and which are not. Ok, you don’t really need portupgrade for this, because you can also run pkg_version which is part of base, but portupgrade seems to make a database and do this faster.

# portversion

Now, if you want to only see ports that are not up to date, do this:

# portversion |grep \<

Step 4 – Upgrade a port
Ok, now that portupgrade is installed, it is easy to upgrade a port.

# portupgrade portname

You can just copy and past the portname from the output of the portversion command.

Step 5 – Upgrade all ports
Ok, maybe you want to upgrade all your ports, and I am not saying you should, but maybe you want to. Here is a nice command that will do that for you.

# portupgrade -a -m BATCH=yes

Now that is not exactly complete, because we need to update the ports tree first. So do this:

# portsnap fetch update && portupgrade -a -m BATCH=yes

Now, on my FreeBSD box with an Xorg and KDE4 install, this has been going for over a day and isn’t done yet. I takes a long time to recompile all the Xorg, GTK, KDE4, and other miscellaneous ports.

Have fun with portupgrade.


Copyright ® Rhyous.com – Linking to this article is allowed without permission and as many as ten lines of this article can be used along with this link. Any other use of this article is allowed only by permission of Rhyous.com.

How to install VMWare-tools on FreeBSD 8 or PC-BSD 8?

I have documentation on how to create a FreeBSD 8 Desktop environment here:
How to install and configure a FreeBSD 8 Desktop with Xorg and KDE?

However, if you install FreeBSD or PC-BSD as a VMWare guest, you will want to install two additional pieces of software when you are finished:

  1. You need to install the VMWare X11 driver (no, it will not be installed when you install the VMWare tools)
  2. You need to install VMWare-tools

This guide is to walk you through resolving the second of these two issues. I assume you followed my article for building the FreeBSD desktop, and if you did, these steps will work for you. But if you didn’t, I can’t guarantee that there won’t be some steps that are slightly different for you.

In order for me to consider the VMWare-Tools installed and working, the following features must work:

  • Clipboard Synchonization
  • Grab/Release Mouse Input when mouse enters/leaves the guests screen
  • Autofit Guest (automatically making the guests screen resolution take all available space)
  • Time Synchronization (the time in the VMWare guest will match the hosts time).

In this document, I successfully get these features working.

I have VMWare Workstation 6.5.3 build 185404 and the host is Windows 7.

Part 1 – Installing and Configuring the VMWare X11 Driver

Already posted on this here:
How to install the vmware video card driver on a FreeBSD 8 guest virtual machine?

Part 2 – Installing and Configuring VMWare Tools

Step 1 – Mount the VMware Tools virtual cd

  1. On the VMWare hosts make sure that your FreeBSD guest is selected and that you are not full screen so you have the VMWare Workstation application surrounding the FreeBSD guest.
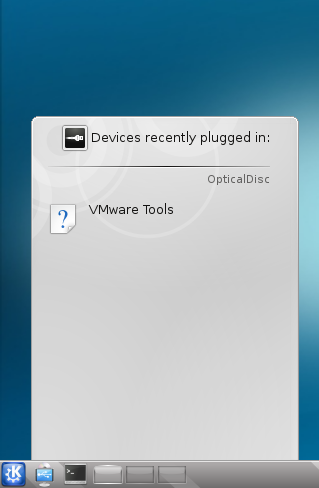
  2. From the VMWare Workstation application, choose VM | Install VMWare tools…You will see a pop-up inside FreeBSD on the bottom left.
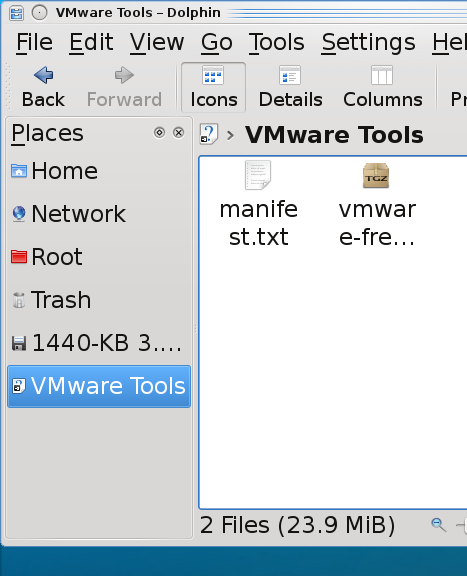
  3. Click on the popup where it says VMWare Tools. This will open Dolphin file browser.
  4. In the Dolphin file browser on the bottom left, you should see the VMWare Tools media. Click on it.

Step 2 – Extract the vmware-freebsd-tools.tar.gz

  1. Right click on vmware-freebsd-tools.tar.gz and choose Extract Archive to… Now you can extract to where you want, as long as you have the folder permission to write to, but the next steps describe where I extracted it to.
  2. Click on Home at the left. There is no need to create a folder as the extacted files will all be in one folder called vmwware-tools-distrib when extracted.
  3. Click OK. The vmware-freebsd-tools.tar.gz is extracted.

Step 3 – Open a shell as root

  1. Cick K | Applications | System | Konsole to open the shell.
  2. Type in su$ su
    Password:
    #

Step 4 – Install the freebsd6 compatibility package.

  1. Determine your architecture or processor type. If you are 64 bit, it will be amd64 even it is intel 64 bit. If you are 32 bit, it is likely x86. Type uname -a to determine what your architecture is and look at the last piece of information provided.

    # uname -a
    FreeBSD FBSD8.hsd1.ut.comcast.net. 8.0-RELEASE-p2 FreeBSD 8.0-RELEASE-p2 #0: Tue Jan 5 21:11:58 UTC 2010 root@amd64-builder.daemonology.net:/usr/obj/usr/src/sys/GENERIC amd64
    #

  2. Install the compat6x-[arch].tgz package, where you replace [arch] with your architecture.  This is already installed on PC-BSD.
    # pkg_add -r compat6x-amd64

Step 5 – Compile and Install the vmware-freebsd-tools

  1. Change to the directory where you extracted the vmware-freebsd-tools.tar.gz.

    # cd /home/jared/vmware-tools-distrib

  2. Run vmware-install.pl.# ./vmware-install.pl

    Just keep hitting enter and accepting the defaults until the vmware-tools are installed.

Step 6 – Start vmware tools

  1. As root run the following:

    # /usr/local/etc/rc.d/vmware-tools.sh start

    Or you could just reboot.

    Note: Since vmware-tools doesn’t exactly integrate with rcNG, you don’t need to add anything to /etc/rc.conf. The just dump a script into /usr/local/etc/rc.d and it is just a shell script and isn’t formatted to require it to be enabled by /etc/rc.conf.

Step 7 – Enabling VMWare user features
The vmware-user process must be launched to enable vmware-user features.

  • Clipboard Synchonization
  • Grab/Release Mouse Input when mouse enters/leaves the guests screen
  • Autofit Guest (automatically making the guests screen resolution take all available space)
  1. Configure vmware-user to run at KDE login by copying the /usr/local/bin/vmware-user shell script to the ~/.kde4/Autostart directory.  You could also create a symlink.
    $ cp /usr/local/bin/vmware-user ~/.kde4/Autostart

    Note: You don’t have to use the command.  In the System Settings under Advanced |Autostart there is an option to Add Script that you can use.

  2. Logout of KDE and log back in.

Step 8 – Running the VMWare-Toolbox
There may be some vmware settings you want to change on the VMWare guest. Not many are configurable through the vmware-toolbox on FreeBSD but at least one is configurable here called Time Synchronization. This feature will synchronize your vmware guest’s time with the hosts time.

  1. Run vmware-toolbox

    $ vmware-toolbox

  2. Check the box to enable time synchronization
  3. Feel free to explore and become familiar with the other settings, there aren’t many and two of the settings can only run as root.

Tuning Recommendations
I found a lot of tuning recommendations. However, if you chose Other | FreeBSD or Other FreeBSD 64 when creating your vm, these first two are set by default.

  1. It is recommended to have kern.hz set to 100 and it is by default so nothing to do here.
  2. It was recommended that on the host, in the vmx config file for the guest, that the following be configured:
    • ethernet0.virtualDev = “e1000”

    Again, if you chose Other | FreeBSD or Other FreeBSD 64 when creating your vm, this is set by default.

  3. Some people will recommend this setting in the vmx config file as well:
    • tools.syncTime = “TRUE”

    However, this is the same as the time synchronization setting we configured with the vmware-toolbox. It is safer to make the configuration in the vmware-toolbox tool.

If you know of any further tuning options, please comment them to me.


Copyright ® Rhyous.com – Linking to this article is allowed without permission and as many as ten lines of this article can be used along with this link. Any other use of this article is allowed only by permission of Rhyous.com.

How to install the vmware video card driver on a FreeBSD 8 guest virtual machine?

Well, I have documentation on how to create a FreeBSD 8 Desktop environment here:
How to install and configure a FreeBSD 8 Desktop with Xorg and KDE?

However, if you install FreeBSD as a VMWare guest, you will want to install two additional pieces of software when you are finished:

  1. You need to install the VMWare X11 driver (no, it will not be installed when you install the VMWare tools)
  2. You need to install VMWare-tools

This guide is to walk you through resolving the first of these two issues. I assume you followed my article for building the FreeBSD desktop, and if you did, these steps will work for you. But if you didn’t, I can’t guarantee that there won’t be some steps that are slightly different for you.

Part 1 – Installing and Configuring the VMWare X11 Driver

Step 1 – Install the VMWare X11 driver

  1. Change to the appropriate ports directory.

    # cd /usr/ports/x11-drivers/xf86-video-vmware

  2. Make (compile) and install the VMWare X11 driver

    # make install

The VMWare X11 driver is now installed.

Step 2 – Modify the /etc/X11/xorg.conf
Note: If you didn’t create an xorg.conf file, then you don’t need to do this step, so skip it.

  1. If you auto-created your xorg.conf, auto create it again.
    # Xorg -configure
  2. Move the auto created /root/xorg.conf.new to /etc/X11/xorg.conf.

    # mv /root/xorg.conf.new /etc/X11/xorg.conf

If you have a custom xorg.conf, then it may be easier to edit it manually.

  1. Edit the /etc/x11/xorg.conf as root.

    # ee /etc/x11/xorg.conf

  2. Change the “Device” section to look as follows.
    Section "Device"
            ### Available Driver options are:-
            ### Values: <i>: integer, <f>: float, <bool>: "True"/"False",
            ### <string>: "String", <freq>: "<f> Hz/kHz/MHz"
            ### [arg]: arg optional
            #Option     "HWcursor"                  # [<bool>]
            #Option     "Xinerama"                  # [<bool>]
            #Option     "StaticXinerama"            # <str>
            Identifier  "Card0"
            Driver      "vmware"
            VendorName  "VMware"
            BoardName   "SVGA II Adapter"
            BusID       "PCI:0:15:0"
    EndSection
    

Step 3 – Restart Xorg
If you are still in KDE, you must logout and log back in. You can probably do this without instructions, but if this is your first time using FreeBSD and KDE 4, a quick screen shot of how to do this won’t hurt. I do like my walk-thru’s to be newbie proof.

  1. At the bottom left of your window, click on the K icon, then Leave, then Logout.

  2. After clicking the Leave option, KDE will exit, and xorg will restart and you should be returned to the login screen. Now log back in.

Note: If you aren’t using KDM, then you will be returned to your logged in shell and you will have to launch Xorg and KDE yourself using the startx command.
Step 4 – Configure your screen resolution

  1. Click the K icon, then Applications | System.
  2. When the menu shifts, the system options appears. Select Screen Resize & Rotate.

  3. Now don’t be confused when this doesn’t open a window. It does launch the program, but for some reason it starts up minimized and is an icon at the bottom right of the panel. It looks like a little monitor (the red arrow is pointing to it).
  4. Click on the monitor icon to get the Configure Display window.
  5. Click the Size drop down menu and choose your new resolution.
  6. Click Apply.
  7. If the resolution fails, it should return to the previous resolution after about ten or fifteen seconds. If the resolution works, click the option to accept the resolution.

You should now have the VMWare Driver installed.

Part 2 – Installing and Configuring VMWare Tools

This is in a separate post here:
How to install VMWare-tools on FreeBSD 8?


Copyright ® Rhyous.com – Linking to this article is allowed without permission and as many as ten lines of this article can be used along with this link. Any other use of this article is allowed only by permission of Rhyous.com.

How to install the Code::Blocks IDE on FreeBSD 8?

Ok, so some developers are completely happy and content coding without an Integrated Development Environment (IDE), but I really like IDEs and think they provide a lot of ways to improve development speed and efficiency. I never have been able to get into vim or emacs though if you are into it, that’s cool for you, just doesn’t work for me.

So lets install the Code::Blocks IDE on FreeBSD and compile an application or two.

Step 1 – Setup a FreeBSD Desktop
Instructions for doing this are located here
How to install and configure a FreeBSD 8 Desktop with Xorg and KDE?
After following the linked-to guide, you should have FreeBSD with Xorg and KDE installed.

Step 2 – Install CodeBlocks from ports

  1. Login as root.
  2. Change to the ports directory.

    # cd /usr/ports

  3. Find the CodeBlocks port. There are a couple of commands that can help you find the port.

    Run this from anywhere:

    # whereis codeblocks

    Or from /usr/ports run this:

    # make search name=codeblocks

    The port location is /usr/ports/devel/codeblocks.

  4. Change to the directory for the codeblocks port.

    # cd /usr/ports/devel/codeblocks

  5. Type make install to compile and install Code::Blocks.

    # make install

    Note: If you pay attention while CodeBlocks is compiled, you will see that wxWidgets is installed as a dependency.

Step 3 - Launch CodeBlocks for the first time

  1. Click the K icon at the bottom left (similar to the Start icon in windows) and move the cursor over the Applications tab.
  2. Click Development and you will see the list of items. Yes, the Code::Blocks install places an icon to the Development section of the KMenu for you.

  3. Click the Code::Blocks icon.
  4. You will be prompted for a compiler. Select GNU GCC Compiler.

You now are running the Code::Blocks IDE on FreeBSD.

Note: Code::Blocks opens and gives you a "Tip of the day" window. These tips can be valuable, so unless you are a Code::Blocks expert, I recommend leaving them on and taking the short seconds it takes to read them. This goes along with my overall theme of becoming a little more of an expert each day.

Step 4 - Create a new project and compile it

  1. Click File | New | Project.
  2. Select Empty Project.
  3. The next screen is just a welcome screen and you can click a check box to never see it again and then click Next.
  4. Enter a project name. I just typed in hw (short for, yes you guessed it, Hello World).
  5. Enter a directory or click the ... icon to browse to a directory.
    Note: The bottom two fields are filled out for you.

  6. Click Next.
  7. On the next screen you have options, such as switching to a different compiler, but everything is pretty much set to defaults how you probably want. So unless you have a good reason, leave it as is and click Finish.
  8. Click File | New | Empty File.
  9. When prompted to add to the project, choose Yes.
  10. Enter a file name. I used main.cpp and click next.
  11. You will be prompted for the targets this file should be added to, such as debug and release. Click Select All and hit Ok.
  12. On the left, under Projects, expand Workspace, the expand the project Name ("hw" in this example), expand Sources.
  13. Open main.cpp by double-clicking on it.
  14. Enter your code (in this case I am entering in some simple hello world code).

    #include

    int main()
    {
    std::cout << "Hello World" << std::endl; return 0; } [/sourcecode]

  15. Select Build | Build or press Ctrl + F9 to build/compile your program.

Your program should now be compiled.

Step 5 - Run the program

  1. You can run the program in two ways:
    • Select Build | Run or press Ctrl + F10.
    • Open a shell and browse to the directory.

Step 6 - Debug the program
To debug a program you must first create a break point and then start debugging, in that order. So lets do it.

  1. Set a breakpoint by clicking just to the right of the line numbers just to the left of the line of code you want the program to break at. When you set the break point, a red circle is added. I am setting a breakpoint on line 3 of the Hello World code, which is the main() function.
  2. Click Debug | Start or press F8. The program will start and a yellow arrow will show up inside the red circle.
  3. Press F7 to cause the debugging to continue on to the next line. Notice the yellow arrow moves to the next line.

Congratulations you are now using the Code::Blocks IDE on a FreeBSD desktop.


Copyright ® Rhyous.com - Linking to this article is allowed without permission and as many as ten lines of this article can be used along with this link. Any other use of this article is allowed only by permission of Rhyous.com.

How to debug a portion of FreeBSD code using gdb from a shell? (Using Sysinstall code as an example)

Well, in my last FreeBSD Friday post, I talked about How to compile a portion of FreeBSD code with debugging? (Sysinstall for this example). The next step is to learn to step through the code. There is a debugging tool included with FreeBSD called gdb.

A good start for gdb is to read this document from the FreeBSD Developers’ Handbook.
http://www.freebsd.org/doc/en/books/developers-handbook/debugging.html

To really get good at gdb though, you should read the gdb documenation here:
http://sourceware.org/gdb/current/onlinedocs/gdb/

Well, lets get started.

Step 1 – Compile a portion of FreeBSD code with debugging enabled
How to compile a portion of FreeBSD code with debugging? (Sysinstall for this example)

Step 2 – Start gdb
As a user (not root) launch gdb with the name of the executable as the only parameter.

$ gdb sysinstall
GNU gdb 6.1.1 [FreeBSD]
Copyright 2004 Free Software Foundation, Inc.
GDB is free software, covered by the GNU General Public License, and you are
welcome to change it and/or distribute copies of it under certain conditions.
Type “show copying” to see the conditions.
There is absolutely no warranty for GDB. Type “show warranty” for details.
This GDB was configured as “amd64-marcel-freebsd”…
(gdb)

Step 3 – Set a break point
At the gdb prompt, type break main.

(gdb) break main
Breakpoint 1 at 0x416b00: file main.c, line 55.
(gdb)

Step 4 – Start the program
To start the program type run and hit enter.

(gdb) run
Starting program: /usr/home/jared/Devel/FreeBSD/head/usr.sbin/sysinstall/sysinstall

Breakpoint 1, main (argc=1, argv=0x7fffffffe998) at main.c:55
55 {
(gdb)

Step 5 – Step through the code
Ok, to step through the code you simply type ‘s’.

(gdb) s
Breakpoint 1 at 0x416b00: file main.c, line 55.
(gdb)

Once you have typed ‘s’ once, you can just hit enter and it will keep stepping through. You could keep typing ‘s’ but you don’t need to.

Step through the code until it terminates because you are not root.

Here is the entire run through in one screen.

$ gdb sysinstall
GNU gdb 6.1.1 [FreeBSD]
Copyright 2004 Free Software Foundation, Inc.
GDB is free software, covered by the GNU General Public License, and you are
welcome to change it and/or distribute copies of it under certain conditions.
Type “show copying” to see the conditions.
There is absolutely no warranty for GDB. Type “show warranty” for details.
This GDB was configured as “amd64-marcel-freebsd”…
(gdb) break main
Breakpoint 1 at 0x416b00: file main.c, line 55.
(gdb) run
Starting program: /usr/home/jared/Devel/FreeBSD/head/usr.sbin/sysinstall/sysinstall

Breakpoint 1, main (argc=1, argv=0x7fffffffe998) at main.c:55
55 {
(gdb) s
61 StartName = argv[0];
(gdb)
64 if (getpid() == 1) {
(gdb)
68 signal(SIGPIPE, SIG_IGN);
(gdb)
71 if (geteuid() != 0) {
(gdb)
72 fprintf(stderr, “Error: This utility should only be run as root.\n”);
(gdb)
Error: This utility should only be run as root.
204 }
(gdb)
0x0000000000404d9e in _start ()
(gdb)
Single stepping until exit from function _start,
which has no line number information.

Program exited with code 01.
(gdb)

Ok, you now have done some basic debugging with gdb and you have learned that you cannot run sysinstall as root.

Step 6 – Debug as root
Ok, this shouldn’t be hard for you by now. Sudo to root and repeat the above steps only this time the program will continue past the check for whether it is running as root because it will be. Stop just after you pass the line that checks if you are root.

One you get so far, you will actually get to the sysinstall gui and you can choose to exit.

Step 7 – Set a break point based on line number
Type the following to set a break point based on line number.

(gdb) break main.c:103
Breakpoint 2 at 0x416bd6: file main.c, line 103.
(gdb)

Step 8 – Continuing to the next break point
So now instead of stepping to line 110, we will just continue the program with the command “continue”. By the way, the following three commands will continue and all are really the exact same command. You might ask, “Why are there three ways to do the same thing?” I have to answer, “I don’t know, I didn’t write gdb.” But hey, I am not complaining.

  • continue
  • c
  • fg

So yes to continue you can type any of the three commands at the gdb prompt and your program will continue until the next break point or until the program terminates.

(gdb) c
Continuing.

Breakpoint 2, main (argc=1, argv=0x7fffffffe8c8) at main.c:103
103 systemInitialize(argc, argv);
(gdb)

Note on finding development code or development features
Often while developing, a developer adds code to help them develop. This is development code, development features, debug code, or whatever you want to call it. This code is not really meant to be used in production, but it sure helps the developer write and test and debug the production code. Most large applications have such hidden development features. When stepping through code, you should look for these.

As I was looking through the sysinstall code, I noticed a section of code starting at line 110 (obviously this is subject to change but you should be able to find the line number in the same area) that checks for a parameter called -fake.

    if (argc > 1 && !strcmp(argv[1], "-fake")) {
        variable_set2(VAR_DEBUG, "YES", 0);
        Fake = TRUE;
        msgConfirm("I'll be just faking it from here on out, OK?");
    }

This hidden switch is never mentioned in the man page. It appears to be one of those development only features that we can take advantage of to help us code Sysinstall. It also suggests that you can step through Sysinstall without having anything actually happen, which might be useful in debugging.

Making our first code change
Ok, so if I am going to use the -fake switch, I would assume that I could do so without running as root. Since we are “faking it” anyway, we might as well not be running as root at all.

So here is a code change I have made that will allow me to run as a normal user if I pass the -fake parameter. I am going to change line 73 (again this may not be the exact line for you as this is subject to change) where sysinstall checks if it is running as root and add an additional check to see if a parameter was passed and if so see if the parameter was -fake and if so, continue even though it is not root.

Here is what the code was originally.

    if (geteuid() != 0) {
        fprintf(stderr, "Error: This utility should only be run as root.\n");
        return 1;
    }

Here is what I changed the code to. Notice that I didn’t delete or add to the existing line just yet. Instead, I commented it out and added a new line because that makes it easier to switch back and forth when testing this new code out.

//if (geteuid() != 0) {
if (geteuid() != 0 && (argc < 2 || strcmp(argv[1], "-fake"))) { fprintf(stderr, "Error: This utility should only be run as root.\n"); return 1; } [/sourcecode] Ok, so save and exit. No go ahead and exit your root shell so you are just logged in as your user again. Recompile to apply your changes. In case you forgot, you recompile with this command:

$ make DEBUG_FLAGS=-g

Go ahead and debug again. Repeat the steps above again, however, this time, in the gdb prompt, before you execute the command “run”, go ahead and set the arguments to pass to your application so that the -fake argument is passed.

(gdb) set args -fake
(gdb)

Just to make sure, lets show the arguments to make sure that we properly set them.

(gdb) show args
Argument list to give program being debugged when it is started is “-fake”.
(gdb)

Now you can run your program in gdb and continue debugging sysinstall as a regular user. I think I am going to send this change in because maybe it should be a permanent change. What do you think?


Copyright ® Rhyous.com – Linking to this article is allowed without permission and as many as ten lines of this article can be used along with this link. Any other use of this article is allowed only by permission of Rhyous.com.